In previous tutorials I showed you how we use the DialogService or SnackbarService to show user information or ask for information directly from the business logic that requires that user interaction. The latest addition to the stacked_services is the BottomSheetService. This will allow you to show either default or a custom BottomSheet directly from the business logic. To follow along with this tutorial you can download the starting code here.
Setup
To start using the BottomSheetService we have to be using stacked_services: ^0.6.0. Open up the pubspec file and add stacked_services or update the version to ^0.6.0
stacked_services: ^0.6.0Fix Breaking Change for DialogService
There’s been a breaking change. We’ve removed the DialogService.registerCustomDialogUi function. It’s been deprecated for a while so you should have moved off it by now. If you’re working with the code above then you can update your setupDialogUi function to use the new Map of builders registration.
void setupDialogUi() {
  var dialogService = locator<DialogService>();

  var builders = {
    DialogType.Basic: (context, dialogRequest, completer) => Dialog(
          child: _BasicCustomDialog(
            dialogRequest: dialogRequest,
            onDialogTap: completer,
          ),
        ),
    DialogType.Form: (context, dialogRequest, completer) => Dialog(
          child: _FormCustomDialog(
            dialogRequest: dialogRequest,
            onDialogTap: completer,
          ),
        )
  };

  dialogService.registerCustomDialogBuilders(builders);
}
Setup BottomSheet UI
We’ll start off by registering the BottomSheetService with the locator. You can do that be simply calling locator.registerSingleton and passing it the BottomSheetService instance or adding it to the third_party_services_module.dart file where we register the services from other packages.
locator.registerSingleton(BottomSheetService());

// or


@module
abstract class ThirdPartyServicesModule {
  @lazySingleton
  NavigationService get navigationService;
  @lazySingleton
  DialogService get dialogService;
  @lazySingleton
  BottomSheetService get bottomSheetService;
}
If you used the injectable way by adding it to the Module. Make sure to run the flutter pub run build_runner build --delete-conflicting-outputs command.
Basic usage
Now that we’ve setup the service we can make use of it in the code. Open the bottom_sheet_example_viewmodel.dart file where we’ll add the code. We start by getting the BottomSheetService from the locator at the top of the class. Then using that service we fill out the showBasicBottomSheet function and call showBottomSheet on it.
class BottomSheetExampleViewModel extends BaseViewModel {
final _bottomSheetService = locator<BottomSheetService>();
...
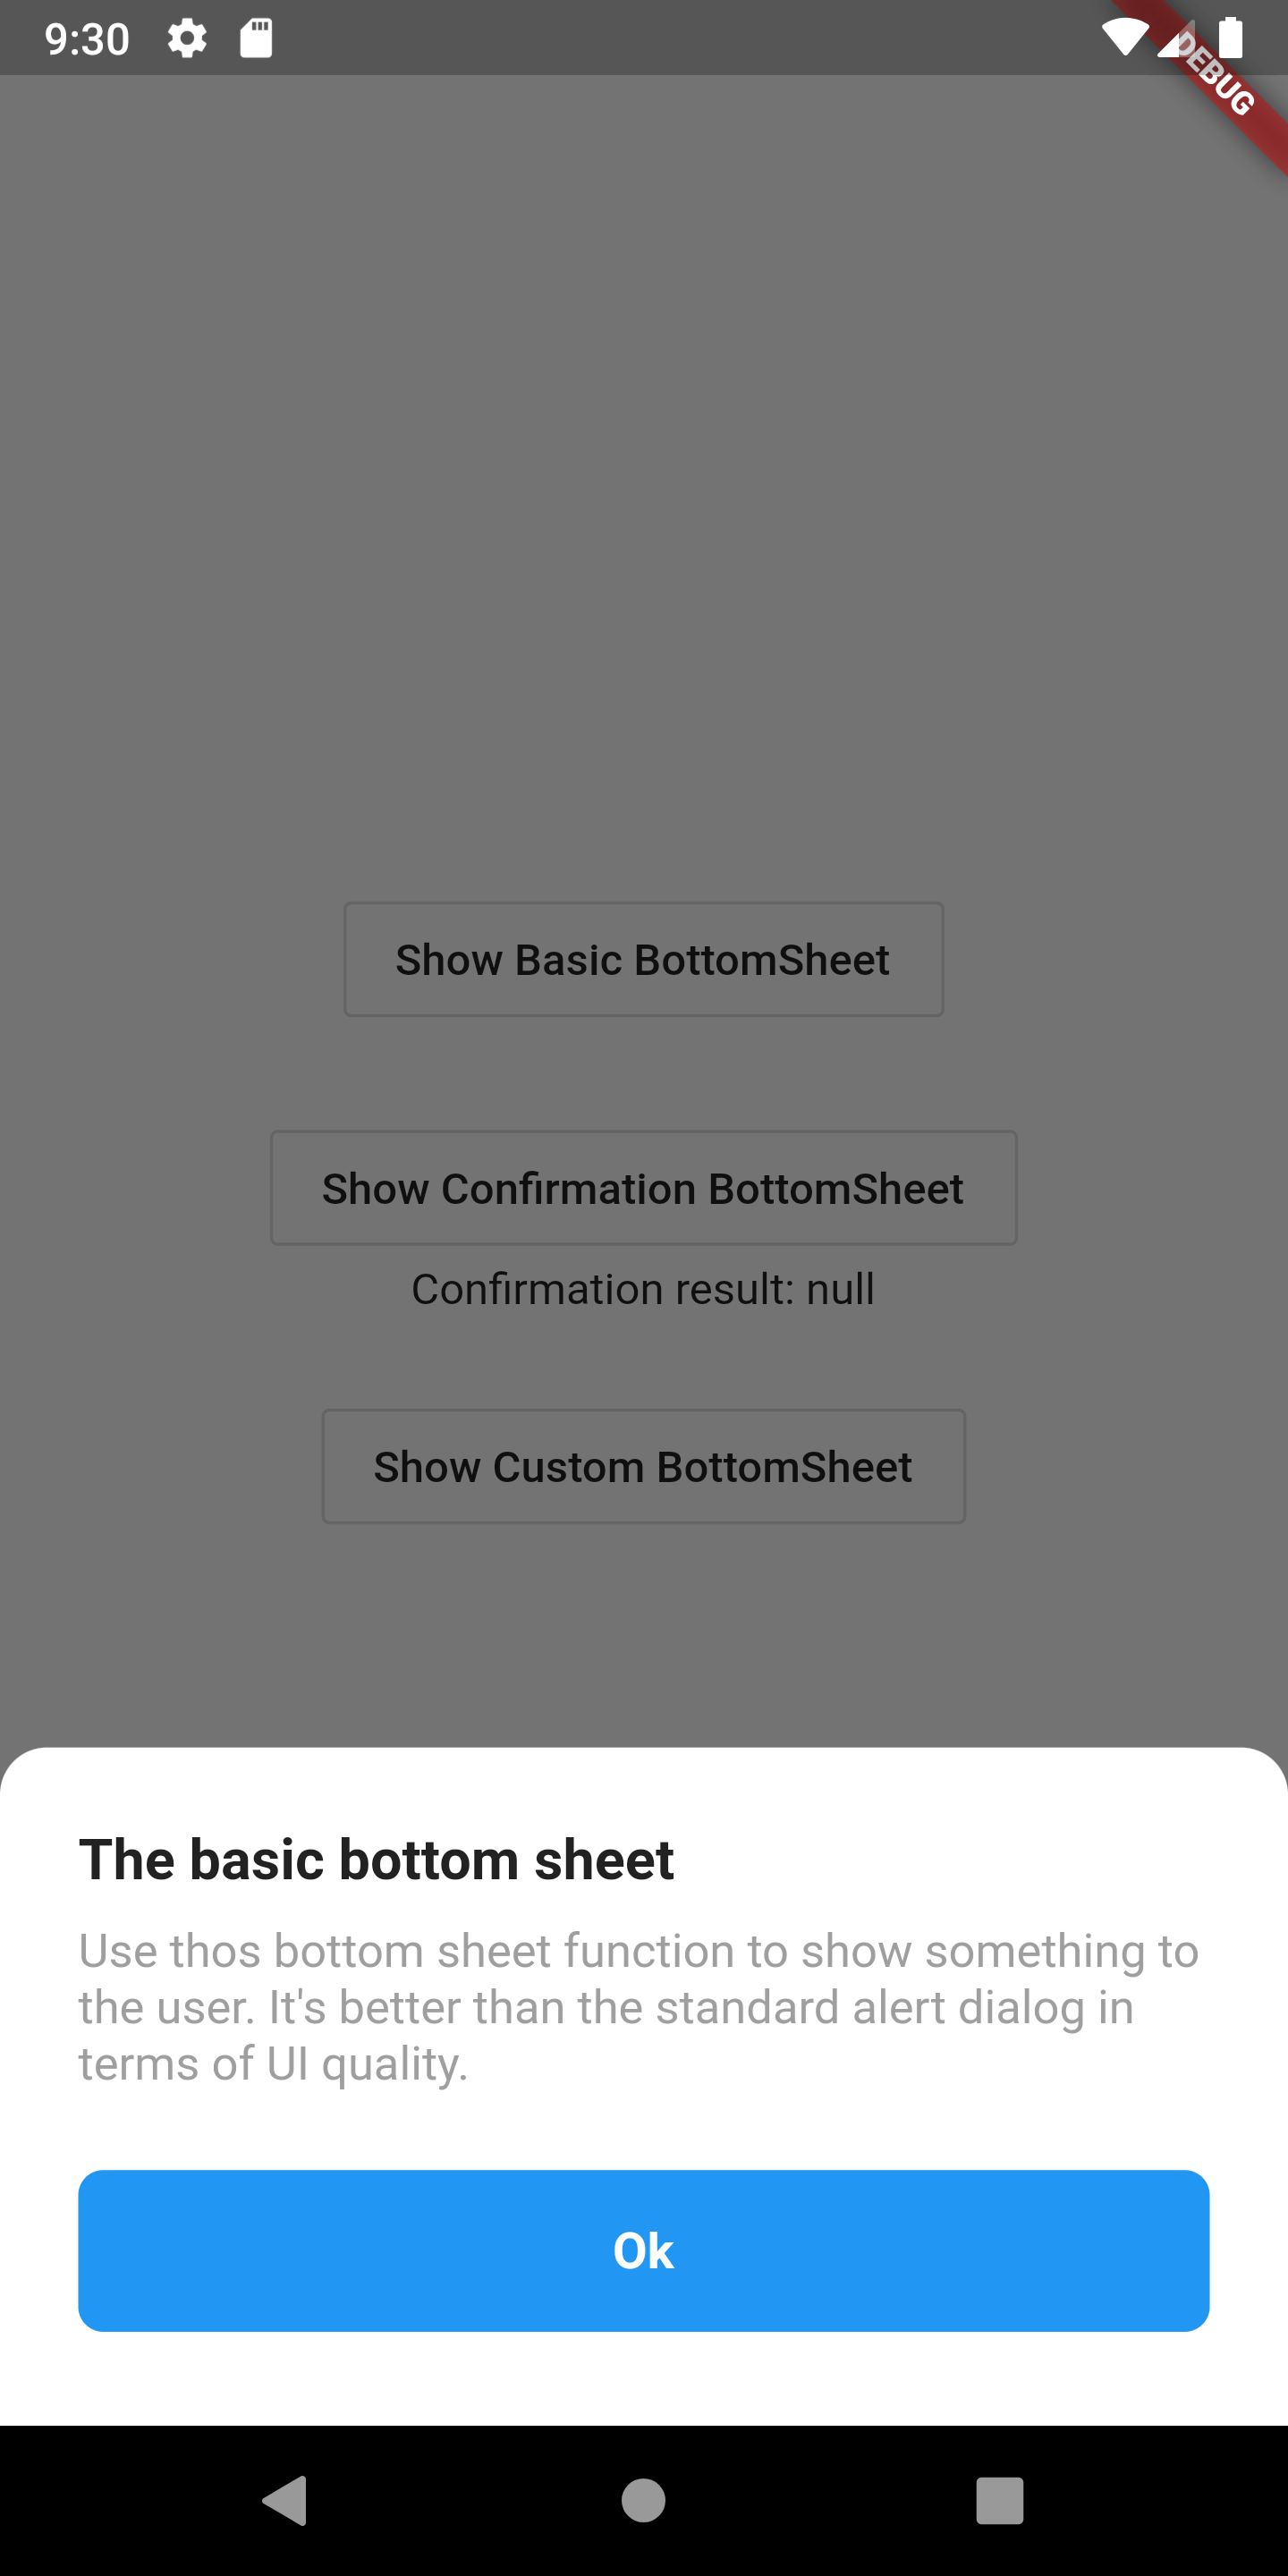
Future showBasicBottomSheet() async {
await _bottomSheetService.showBottomSheet(
title: 'The basic bottom sheet',
description:
'Use this bottom sheet function to show something to the user. It\'s better than the standard alert dialog in terms of UI quality.',
);
}
...
}Run the code and then tap on the “Show basic BottomSheet” button. You should see something like below.
Confirmation Dialog
The showBottomSheet returns a SheetResponse as well. This can be used to determine which button the user has tapped. To get this response all you have to do is await the call and assign the value for a variable of choice. The SheetResponse has a boolean on it called confirmed which will be true or false depending on which button is tapped. The showBottomSheet function has two more properties that we didn’t make use of. The confirmButtonTitle which is the text that is written on the button that will set confirmed to true, and cancelButtonTitle which is the text written on the button that will set confirmed to false. Lets see how to use that.
Future showConfirmationBottomSheet() async {
  var sheetResponse = await _bottomSheetService.showBottomSheet(
    title: 'Confirmation of Terms',
    description:
        'I want to use this sheet to confirm some information from you. Is it okay?',
    confirmButtonTitle: 'I confirm this action',
    cancelButtonTitle: 'I dont accept the terms above',
  );

  print('Confirmed: ${sheetResponse?.confirmed}');

  _confirmationResult = sheetResponse?.confirmed;
  notifyListeners();
}
We await the call to showBottomSheet and then we print out the result. We then set _confirmationResult to true and call notifyListeners. This will show you the same sheet you saw earlier but with two buttons on it instead of one. Tapping either one will set confirmed to true or false.
Custom Bottom Sheet
Now comes the real meat. It’s unlikely that you’ll want to use exactly the same UI as the basic bottom sheet UI for all your alerts / user interactions. Lets setup a custom bottom sheet UI. The way this works is as follows:
- You create an enum where each value maps to a different custom bottom sheet UI.
- You create a map that has the enum value as the key and the UI builder as the value
- You register that map with the service
- You call
showCustomBottomSheetsand pass the Enum value you want to see as the variant with all the other information.
Create your Enum mapping
So we’ll start by creating a new file called bottom_sheet_type.dart in the enums folder.
enum BottomSheetType {
  floating,
}
Setup your custom UI map
Then we create a new file called setup_bottom_sheet_ui.dart in the ui folder. In this file we’ll have a function setupBottomSheetUi that will get the service and register a map of custom builders.
void setupBottomSheetUi() {
  final bottomSheetService = locator<BottomSheetService>();

  final builders = {
    BottomSheetType.floating: (context, sheetRequest, completer) =>
        _FloatingBoxBottomSheet(request: sheetRequest, completer: completer)
  };

  bottomSheetService.setCustomSheetBuilders(builders);
}
The builder for a dialog has 3 parameters. The BuildContext as passed in by the calling widget, the SheetRequest which has all the information that’s passed to the function call and a completer of type Function(SheetResponse). The completer is what you call when you want to close the sheet and return the result. To complete the example above lets make our _FloatingBoxBottomSheet so we can run the code.
class _FloatingBoxBottomSheet extends StatelessWidget {
  final SheetRequest request;
  final Function(SheetResponse) completer;
  const _FloatingBoxBottomSheet({
    Key key,
    this.request,
    this.completer,
  }) : super(key: key);

  @override
  Widget build(BuildContext context) {
    return Container(
      margin: EdgeInsets.all(25),
      padding: EdgeInsets.all(25),
      decoration: BoxDecoration(
        color: Colors.white,
        borderRadius: BorderRadius.circular(15),
      ),
      child: Column(
        mainAxisSize: MainAxisSize.min,
        children: [
          Text(
            request.title,
            style: TextStyle(
              fontSize: 20,
              fontWeight: FontWeight.bold,
              color: Colors.grey[900],
            ),
          ),
          SizedBox(height: 10),
          Text(
            request.description,
            style: TextStyle(color: Colors.grey),
          ),
          Row(
            mainAxisSize: MainAxisSize.max,
            mainAxisAlignment: MainAxisAlignment.spaceBetween,
            children: [
              MaterialButton(
                onPressed: () => completer(SheetResponse(confirmed: true)),
                child: Text(
                  request.secondaryButtonTitle,
                  style: TextStyle(color: Theme.of(context).primaryColor),
                ),
              ),
              FlatButton(
                onPressed: () => completer(SheetResponse(confirmed: true)),
                child: Text(
                  request.mainButtonTitle,
                  style: TextStyle(color: Colors.white),
                ),
                color: Theme.of(context).primaryColor,
              )
            ],
          )
        ],
      ),
    );
  }
}
Everything is pretty basic Flutter UI building. If you struggle with Flutter widget building you should check out my video on how I build any UI. The main things to note in this code above is
onPressed: () => completer(SheetResponse(confirmed: true)),That means when that button is pressed the dialog is closed and we return a confirmed result of true. There’s also a dynamic responseData property which you can pass any data to. So if you have a form you can pass back all the text in there or whatever you’d like to pass back. Two things left to do.
Finish custom BottomSheet setup
In the main function, after you’ve setup your locator. Call the setupBottomSheetUi function.
void main() {
  setupLocator();
  setupDialogUi();
  setupBottomSheetUi();
  runApp(MyApp());
}
Show your custom dialog
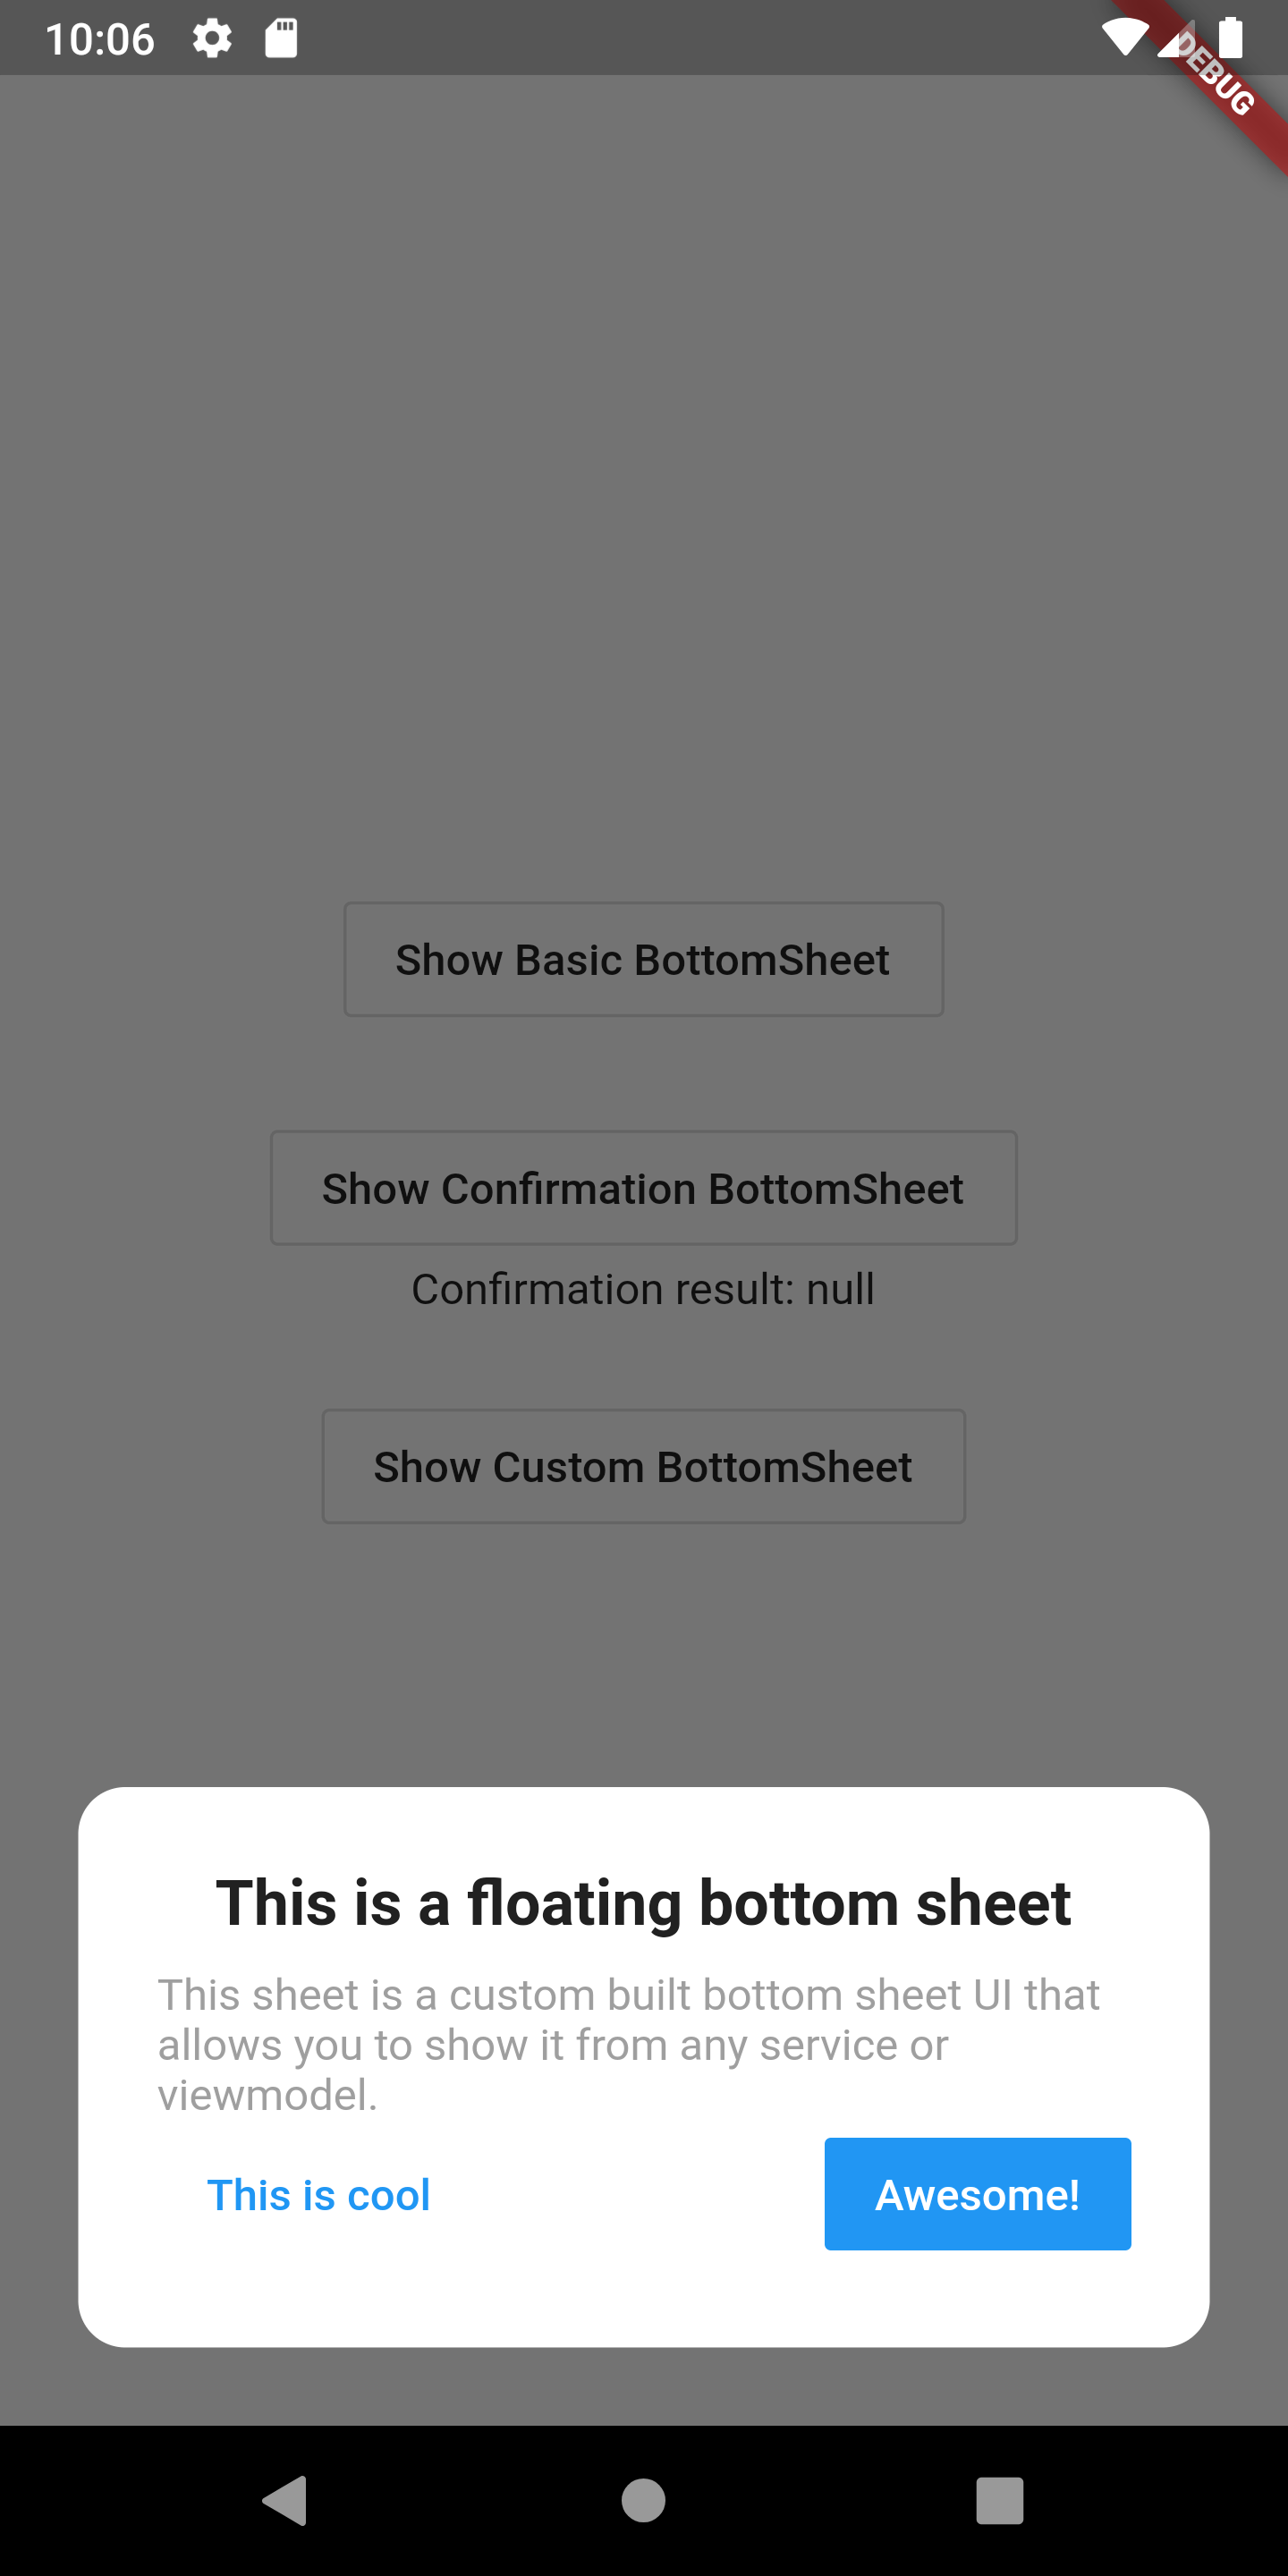
Now we can finally show the bottom sheet. On the BottomSheetService call the showCustomSheet function and pass in BottomSheetType.floating as the variant.
Future showCustomBottomSheet() async {
  var sheetResponse = await _bottomSheetService.showCustomSheet(
    variant: BottomSheetType.floating,
    title: 'This is a floating bottom sheet',
    description:
        'This sheet is a custom built bottom sheet UI that allows you to show it from any service or viewmodel.',
    mainButtonTitle: 'Awesome!',
    secondaryButtonTitle: 'This is cool',
  );

  print('confirmationResponse confirmed: ${sheetResponse?.confirmed}');
}
If you run the code now and tap the “Show Custom Bottom sheet” function you’ll see something like below.
And that’s it! You can build infinite bottom sheets. Remember that a bottom sheet is a normal widget so you can give it a ViewModel and treat it like any other view. Give it it’s own folder with a view and viewmodel file and have some kick ass custom bottom sheets. Until next time.
Dane