Welcome back! In this tutorial we’ll be building the Login and Create Account Views for the Box’t Out customer project. We’ll be using this project to write the code in. This is apart of our open source product building series. We’ll start off with some basic planning to give our selves a goal to hit as well as a guide to follow when implementing. Lets take a look at what we’re building.
UI Design
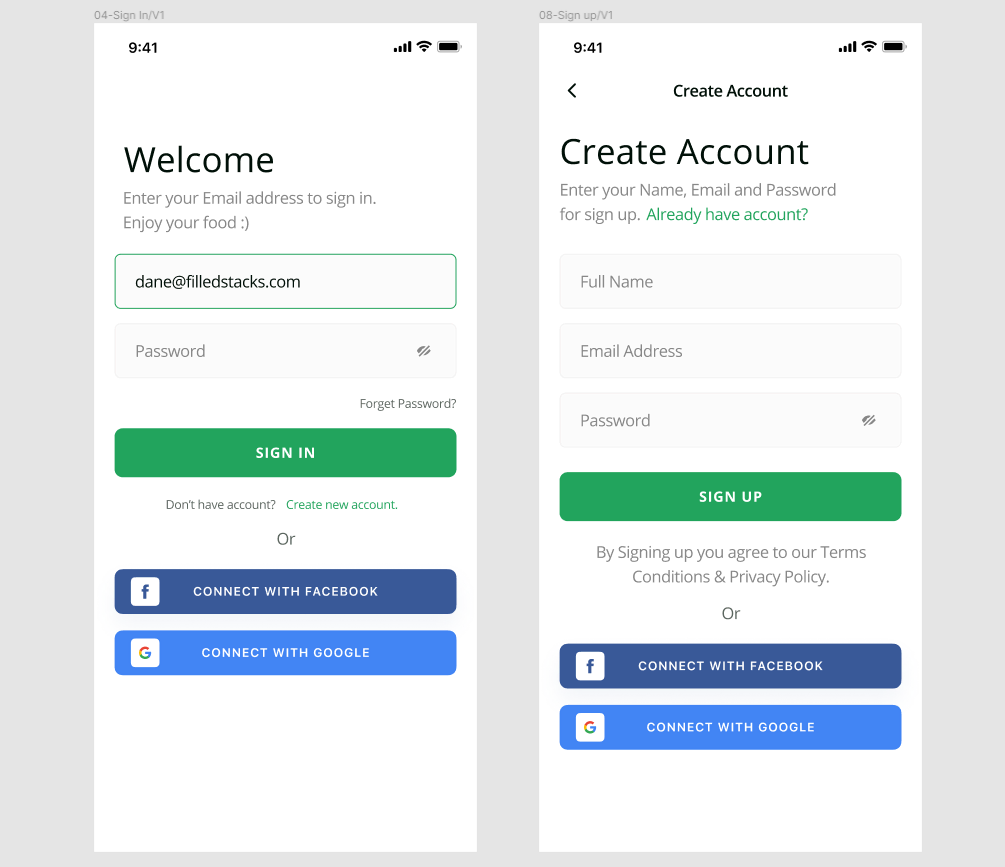
Above we can see the two views that we’ll be building. They look quite similar so we’ll make sure our code reflects that as well.
View Breakdown
These views look and function the same so a lot of the functionality can be shared. Lets look over the UI similarities first. We’ll see that both have a Title and a SubTitle. This is followed by two different forms, followed by the same matching UI again. A Main CTA and the SSO. The only part that’s different is the forms section, so we’ll build it that way.
We’ll make a widget called AuthenticationLayout which cakes in the properties mentioned above.
ViewModel break down
Each of the views will have the exact same functionality. When we submit we send the data to the FirebaseAuthenticationService depending on the result we either navigate to a success route or we set the validation message if there’s an error. That’s about it.
Excluded from this tutorial
- The “Already have an account” hyperlink text
- The Styling of the FormFields (own tutorial)
- Social Authentication (own tutorial)
Implementation
We’ll start by creating the shared widget that we’ll need in both views.
Shared Widget UI
In the UI folder create a new folder called dumb_widgets. Inside create a new file called authentication_layout.dart. We’ll start off with an empty stateless widget that takes in all of the properties that we’ll need to customise the layout.
import 'package:flutter/material.dart';

class AuthenticationLayout extends StatelessWidget {
  /// The main title to show in the top left of the view
  final String title;

  /// The text to show under the subtitle
  final String subtitle;

  /// The text to show in the main CTA button on the view
  final String mainButtonTitle;

  /// The form to show in the middle of the layout
  final Widget form;

  /// Indicates if we want to display the terms text
  final bool showTermsText;

  /// Called when the main button is pressed
  final Function onMainButtonTapped;

  // Called when the user taps on the "Create Account text"
  final Function onCreateAccountTapped;

  /// Called when tapping on the "Forgot Password" text
  final Function onForgetPasswordTapped;

  /// Called when the on screen back button is tapped
  final Function onBackPressed;

  /// The validation message to show on the form
  final String validationMessage;

  /// Indicates if the form is busy or not
  final bool busy;

  const AuthenticationLayout({
    @required this.title,
    @required this.subtitle,
    @required this.form,
    @required this.onMainButtonTapped,
    this.validationMessage,
    this.onCreateAccountTapped,
    this.onForgetPasswordTapped,
    this.onBackPressed,
    this.mainButtonTitle = 'CONTINUE',
    this.showtTermsText = false,
    this.busy = false,
    Key key,
  }) : super(key: key);

  @override
  Widget build(BuildContext context) {
		return Padding(
      padding: const EdgeInsets.symmetric(horizontal: 25),
      child: ListView(
        children: [
				],
		);
	}
}
All these properties has clear names with docs so I don’t think we need to go over them. Then we can start adding the rest of the code. Each piece of the following code will be a child in the list of children. We’ll start off by making sure that when onBackPressed is not null we show the back button. This will be used on the SignUpView.
ListView(
  children: [
		if (onBackPressed == null) verticalSpaceLarge,
    if (onBackPressed != null) verticalSpaceRegular,
    if (onBackPressed != null)
      IconButton(
        padding: EdgeInsets.zero,
        alignment: Alignment.centerLeft,
        icon: Icon(
          Icons.arrow_back_ios,
          color: Colors.black,
        ),
        onPressed: onBackPressed,
      ),
		...
	],
)
Don’t be alarmed by the verticalSpaceLarge and verticalSpaceRegular value. We’ll create that now. In the ui folder create a new folder called shared. Inside create a file called ui_helpers.dart and put the following content in there.
// Horizontal Spacing
const Widget horizontalSpaceTiny = SizedBox(width: 5.0);
const Widget horizontalSpaceSmall = SizedBox(width: 10.0);
const Widget horizontalSpaceRegular = SizedBox(width: 18.0);
const Widget horizontalSpaceMedium = SizedBox(width: 25.0);
const Widget horizontalSpaceLarge = SizedBox(width: 50.0);

// Vertical Spacing
const Widget verticalSpaceTiny = SizedBox(height: 5.0);
const Widget verticalSpaceSmall = SizedBox(height: 10.0);
const Widget verticalSpaceRegular = SizedBox(height: 18.0);
const Widget verticalSpaceMedium = SizedBox(height: 25);
const Widget verticalSpaceLarge = SizedBox(height: 50.0);
const Widget verticalSpaceMassive = SizedBox(height: 120.0);
Nothing special here. We just construct some empty space widgets to help with the UI building. Import that in the AuthenticationLayout widget and everything should work. Then we’ll create another file in the shared folder called styles.dart.
import 'package:flutter/material.dart';

// colors
const Color kcPrimaryColor = Color(0xff22A45D);
const Color kcMediumGreyColor = Color(0xff868686);

// Text Style

/// The style used for all body text in the app
const TextStyle ktsMediumGreyBodyText = TextStyle(
  color: kcMediumGreyColor,
  fontSize: kBodyTextSize,
);

// Font Sizing
const double kBodyTextSize = 16;
This contains the TextStyle used for the Body which will be the subtitle, terms text as well as the forgot password text. Then we can move onto adding the title and the subtitle text widgets.
ListView(
  children: [
		...
		Text(
      title,
      style: TextStyle(fontSize: 34),
    ),
    verticalSpaceSmall,
    SizedBox(
      width: screenWidthPercentage(context, percentage: 0.7),
      child: Text(
        subtitle,
        style: ktsMediumGreyBodyText,
      ),
    ),
    verticalSpaceRegular,
	],
)
Looking at the designs again you’ll see that the subtitle text never goes past the last 30% of the screen on the right. So we’ll have to artificially create that effect by putting the text in a SizedBox that’s only 70% of the screen’s width. To do that we add another ui_helper function along with some others. Add the following in to the ui_helper.dart file.
// Screen Size Helpers
double screenWidth(BuildContext context) => MediaQuery.of(context).size.width;
double screenHeight(BuildContext context) => MediaQuery.of(context).size.height;

/// Returns the pixel amount for the percentage of the screen height. [percentage] should
/// be between 0 and 1 where 0 is 0% and 100 is 100% of the screens height
double screenHeightPercentage(BuildContext context, {double percentage = 1}) =>
    screenHeight(context) * percentage;

/// Returns the pixel amount for the percentage of the screen width. [percentage] should
/// be between 0 and 1 where 0 is 0% and 100 is 100% of the screens width
double screenWidthPercentage(BuildContext context, {double percentage = 1}) =>
    screenWidth(context) * percentage;
These are used to get the screens width or height as a fraction of the total size. 1 for 100% 0 for 0%. Next we can add in the form passed in with another vertical space.
ListView(
  children: [
		...
		form,
    verticalSpaceRegular,
  ]
)
Underneath the form we have the optional forget password UI which will only be shown if we supply the onForgetPasswordTapped function callback.
ListView(
  children: [
		...
		if (onForgotPassword!= null)
      Align(
        alignment: Alignment.centerRight,
        child: GestureDetector(
	        onTap: onForgotPassword,
	        child:Text(
	            'Forget Password',
	            style: ktsMediumGreyBodyText.copyWith(
	                fontWeight: FontWeight.bold),
	          ),
	        ),
      ),
    verticalSpaceRegular,
  ]
)
Super basic, here we simply Align a GestureDetector (wrapping some text) to the right of the ListView. Next up we’ll add the validation message under the forgot password section
ListView(
  children: [
		...
		if (validationMessage != null)
      Text(
        validationMessage,
        style: TextStyle(color: Colors.red, fontSize: 16),
      ),
    if (validationMessage != null) verticalSpaceRegular,
  ]
)
This will show we have a validation message. Then we’ll be adding our main CTA into the view using a decorated container.
ListView(
  children: [
		...
		GestureDetector(
      onTap: onMainButtonTapped,
      child: Container(
        width: double.infinity,
        height: 50,
        alignment: Alignment.center,
        decoration: BoxDecoration(
          color: kcPrimaryColor,
          borderRadius: BorderRadius.circular(8),
        ),
        child: busy
            ? CircularProgressIndicator(
                valueColor: AlwaysStoppedAnimation(Colors.white),
              )
            : Text(
                mainButtonTitle,
                style: TextStyle(
                  color: Colors.white,
                  fontWeight: FontWeight.bold,
                  fontSize: 14,
                ),
              ),
      ),
    ),
    verticalSpaceRegular,
  ]
)
And lastly we have the optional UI for the create account and terms and conditions text.
ListView(
  children: [
		...
		if (onCreateAccountTapped != null)
      GestureDetector(
        onTap: onCreateAccountTapped,
        child: Row(
          mainAxisAlignment: MainAxisAlignment.center,
          children: [
            Text('Don\'t have an account?'),
            horizontalSpaceTiny,
            Text(
              'Create an account',
              style: TextStyle(color: kcPrimaryColor),
            )
          ],
        ),
      ),
    if (showtTermsText)
      Text(
        'By signing up you agree to our terms, conditions and privacy Policy.',
        style: ktsMediumGreyBodyText,
        textAlign: TextAlign.center,
      )
  ]
)
And that’s it for the AuthenticationLayout widget. The full file you can see here if you don’t feel like copying all that. to wrap up the UI we can complete the implementation of the Login and the Create Account View. In the ui folder create a new folder called login and in there create two files. login_view.dart
import 'package:flutter/material.dart';
import 'package:stacked/stacked.dart';

class LoginView extends StatelessWidget {
 const LoginView({Key key}) : super(key: key);

 @override
 Widget build(BuildContext context) {
   return ViewModelBuilder<LoginViewModel>.reactive(
     builder: (context, model, child) => Scaffold(),
     viewModelBuilder: () => LoginViewModel(),
   );
 }
}
And login_viewmodel.dart.
class LoginViewModel extends BaseViewModel {}Lets finish up the LoginView first. For the body of the LoginView we’ll create an AuthentitcationLayout and pass in the required properties to display the correct UI.
class LoginView extends StatelessWidget {
  const LoginView({Key key}) : super(key: key);

  @override
  Widget build(BuildContext context) {
    return ViewModelBuilder<LoginViewModel>.reactive(
      builder: (context, model, child) => Scaffold(
        body: AuthenticationLayout(
          busy: model.isBusy,
          onCreateAccountTapped: (){},
          title: 'Welcome',
          subtitle: 'Enter your email address to sign in. Enjoy your food',
          mainButtonTitle: 'SIGN IN',
          form: Column(
            children: [
              TextField(
                decoration: InputDecoration(labelText: 'Email'),
              ),
              TextField(
                decoration: InputDecoration(labelText: 'Password'),
              ),
            ],
          ),
          onForgetPasswordTapped: () {},
        ),
      ),
      viewModelBuilder: () => LoginViewModel(),
    );
  }
}
We’ll use a basic TextField for now, we’ll come back to styling when our functionality is working. Then we can do the same for create account. Create a new folder called create_account and in that folder a new file called create_account_view.dart
class CreateAccountView extends StatelessWidget {
  const CreateAccountView({Key key}) : super(key: key);

  @override
  Widget build(BuildContext context) {
    return ViewModelBuilder<CreateAccountViewModel>.reactive(
      builder: (context, model, child) => Scaffold(
          body: AuthenticationLayout(
        busy: model.isBusy,
        onBackPressed: (){},
				validationMessage: model.validationMessage,
        title: 'Create Account',
        subtitle: 'Enter your name email and password for sign up',
        mainButtonTitle: 'SIGN UP',
        form: Column(
          children: [
            TextField(
              decoration: InputDecoration(labelText: 'Full Name'),
            ),
            TextField(
              decoration: InputDecoration(labelText: 'Email'),
            ),
            TextField(
              decoration: InputDecoration(labelText: 'Password'),
            ),
          ],
        ),
        showtTermsText: true,
      )),
      viewModelBuilder: () => CreateAccountViewModel(),
    );
  }
}
And another file called create_account_viewmodel.dart
class CreateAccountViewModel extends BaseViewModel {}To test either of these views out you can uncomment the assignment of the onGenerateRoute in the main.dart file and set the home as the view you want to see. This is a quick way to test out your UI. Update your MyApp widget in the main.dart file to the following.
class MyApp extends StatelessWidget {
  @override
  Widget build(BuildContext context) {
    return MaterialApp(
      title: 'Flutter Demo',
      theme: ThemeData(
        primarySwatch: Colors.blue,
        visualDensity: VisualDensity.adaptivePlatformDensity,
      ),
      navigatorKey: StackedService.navigatorKey,
      // onGenerateRoute: StackedRouter().onGenerateRoute,
      home: LoginView(),
    );
  }
}
If you run the code now you’ll see a view resembling the UI design that we got. Now we can add the functionality.
Form Functionality
Both of these forms will act exactly the same, but we know we have some other forms in the app that can also make use of this functionality. So we’ll start with the AuthenticationViewModel which will be the base viewmodel for the Login and Create Account models. In the ui folder create a new folder called base and in this folder a new file called authentication_viewmodel.dart this ViewModel will inherit from FormViewModel.
abstract class AuthenticationViewModel extends FormViewModel {
	@override
  void setFormStatus() {}
}
Then we can implement the saveData function which will.
- Execute the authentication function implemented by the viewmodel and set the model to busy
- Store the result and check
- If we have no error we navigate to a success route(passed in from the implementing viewmodel)
- If there’s an error we show the errorMessage from the result (this will be a friendly firebase message)
The code is just as short as the high level overview
abstract class AuthenticationViewModel extends FormViewModel {
  final navigationService = locator<NavigationService>();

  final String successRoute;
  AuthenticationViewModel({@required this.successRoute});

  @override
  void setFormStatus() {}

  Future saveData() async {
		// Run the authentication and set viewmodel to busy
    final result =
        await runBusyFuture(runAuthentication());

		// Check result
    if (!result.hasError) {
      // Navigate to successful route
      navigationService.replaceWith(successRoute);
    } else {
			// set validation message if we have an error
      setValidationMessage(result.errorMessage);
    }
  }

  Future<FirebaseAuthenticationResult> runAuthentication();
}
That’s all the functionality that will be shared. This is an abstract class where each class that extends it will have to implement runAuthentication.Lets move on to the implementing ViewModels. We’ll start with Login.
class LoginViewModel extends AuthenticationViewModel {
  LoginViewModel() : super(successRoute: Routes.addressSelectionView);

  final _firebaseAuthenticationService =
      locator<FirebaseAuthenticationService>();

  @override
  Future<FirebaseAuthenticationResult> runAuthentication() =>
      _firebaseAuthenticationService.loginWithEmail(
        email: emailValue,
        password: passwordValue,
      );

  void navigateToCreateAccount() =>
      navigationService.navigateTo(Routes.createAccountView);
}
We extend the AuthenticationViewModel and then pass in our successRoute to the super constructor. Then we get the firebase authentication service from the locator and we implement the runAuthentication action. All we do in this function is call loginWithEmail and pass in the emailValue and passwordValue these are two properties that will be generated by the form functionality built into the stacked package. The last thing we do is create a function that will navigate to the createAccountView. Before we move onto the Create Account View there’s 2 things we have to do.
- Create an
AddressSelectionViewand add it to the views in the router so we can have the view to navigate to when authentication is successful. - Setup the formView so we can get the email and password values when running the authentication.
Update the Routing
In the ui folder create a new folder called address_selection. Inside create a new file called address_selection_view.dart
import 'package:flutter/material.dart';
import 'package:stacked/stacked.dart';

class AddressSelectionView extends StatelessWidget {
 const AddressSelectionView({Key key}) : super(key: key);

 @override
 Widget build(BuildContext context) {
   return ViewModelBuilder<AddressSelectionViewModel>.reactive(
     builder: (context, model, child) => Scaffold(),
     viewModelBuilder: () => AddressSelectionViewModel(),
   );
 }
}
and address_selection_viewmodel.dart
class AddressSelectionViewModel extends BaseViewModel {}Then you can open up the app.dart file and update it to
@StackedApp(
  routes: [
    MaterialRoute(page: StartUpView),
    CupertinoRoute(page: AddressSelectionView),
    CupertinoRoute(page: CreateAccountView),
    CupertinoRoute(page: LoginView, initial: true),
  ],
  dependencies: [
    LazySingleton(classType: NavigationService),
    Singleton(classType: FirebaseAuthenticationService)
  ],
)
class AppSetup {
  /** Serves no purpose besides having an annotation attached to it */
}
Now before we generate the new router, lets also setup the forms to be functional and sync the users input to the viewmodel.
Setup the forms
Open up login_view.dart and lets add the form bits. We’ll start by adding the form annotation with the fields we need. Then we’ll add the generated mixin onto the widget. The mixing will take the view’s name Prefixed with $. Then we’ll call listenToFormUpdated in the onModelReady function. This will setup the automatic sync of the text typed by the user to the ViewModel.
// #1: add the Form annotation
@FormView(fields: [
  FormTextField(name: 'email'),
  FormTextField(name: 'password'),
])
// #2: add the mixin onto the widget
class LoginView extends StatelessWidget with $LoginView {
  LoginView({Key key}) : super(key: key);

@override
  Widget build(BuildContext context) {
    return ViewModelBuilder<LoginViewModel>.reactive(
			// #3: Call the function to automatically sync text to viewmodel
      onModelReady: (model) => listenToFormUpdated(model),
      builder: (context, model, child) => Scaffold(
        body: AuthenticationLayout(
          busy: model.isBusy,
          onCreateAccountTapped: model.navigateToCreateAccount,
          onMainButtonTapped: () => model.saveData(),
          validationMessage: model.validationMessage,
          title: 'Welcome',
          subtitle: 'Enter your email address to sign in. Enjoy your food',
          mainButtonTitle: 'SIGN IN',
          form: Column(
            children: [
              TextField(
                decoration: InputDecoration(labelText: 'Email'),
                // #4a: Set the controller on the intended text field
                controller: emailController,
              ),
              TextField(
                decoration: InputDecoration(labelText: 'Password'),
                // #4b: Set the controller on the intended text field
                controller: passwordController,
              ),
            ],
          ),
          onForgetPasswordTapped: () {},
        ),
      ),
      viewModelBuilder: () => LoginViewModel(),
    );
  }
}
Now you can run flutter pub run build_runner build --delete-conflicting-outputs . When that’s complete everything should compile. As you see above we also call model.navigateToCreateAccount when onCreateAccountTapped is called. The same goes for calling saveData when onMainButtonTapped is called. Now we can go back to the main.dart file and add back the commented out code and remove the home value.
class MyApp extends StatelessWidget {
  @override
  Widget build(BuildContext context) {
    return MaterialApp(
      title: 'Flutter Demo',
      theme: ThemeData(
        primarySwatch: Colors.blue,
        visualDensity: VisualDensity.adaptivePlatformDensity,
      ),
      navigatorKey: StackedService.navigatorKey,
      onGenerateRoute: StackedRouter().onGenerateRoute,
      //home: LoginView(),
    );
  }
}
Create Account Implementation
We’re basically gonna go through the exact same process that we went through for the LoginView.
- Add annotation with fields
- Add the mixin to the widget
- Call the listenToFormUpdated function
- Pass in the correct functions to call for the
AuthenticationLayoutfunctions
@FormView(fields: [
  FormTextField(name: 'fullName'),
  FormTextField(name: 'email'),
  FormTextField(name: 'password'),
])
class CreateAccountView extends StatelessWidget with $CreateAccountView  {
  const CreateAccountView({Key key}) : super(key: key);

  @override
  Widget build(BuildContext context) {
    return ViewModelBuilder<CreateAccountViewModel>.reactive(
			onModelReady: (model) => listenToFormUpdated(model),
      builder: (context, model, child) => Scaffold(
          body: AuthenticationLayout(
        busy: model.isBusy,
				onMainButtonTapped: () => model.saveData(),
        onBackPressed: model.navigateBack,
				validationMessage: model.validationMessage,
        title: 'Create Account',
        subtitle: 'Enter your name email and password for sign up',
        mainButtonTitle: 'SIGN UP',
        form: Column(
          children: [
            TextField(
              decoration: InputDecoration(labelText: 'Full Name'),
            ),
            TextField(
              decoration: InputDecoration(labelText: 'Email'),
            ),
            TextField(
              decoration: InputDecoration(labelText: 'Password'),
            ),
          ],
        ),
        showtTermsText: true,
      )),
      viewModelBuilder: () => CreateAccountViewModel(),
    );
  }
}
Then we wrap it all up by implementing the CreateAccountViewModel
class CreateAccountViewModel extends AuthenticationViewModel {
  CreateAccountViewModel() : super(successRoute: Routes.addressSelectionView);

  final _firebaseAuthenticationService =
      locator<FirebaseAuthenticationService>();

  @override
  Future<FirebaseAuthenticationResult> runAuthentication() =>
      _firebaseAuthenticationService.createAccountWithEmail(
        email: emailValue,
        password: passwordValue,
      );

  void navigateBack() => navigationService.back();
}
This is the same as the LoginView (as we knew) the only difference being we call createAccountWithEmail. And we also have a function that’s dedicated to navigating back. This should now be a fully authentication flow. Start the app, tap on the “Create account” text. Create a new account (this will navigate you to an empty view when successful). Close the app, open it again and then login with the account you created. That should work just fine. If you enter the wrong details, or if you try sign up with an account that exists you’ll see the validation message pop up above the CTA.
That’s it for the Authentication implementation (we’ll spend 1 tutorial polishing up the UI and and matching the designs and then move onto the next functionality to implement.