Flutter Architecture-ScopedModel, A complete guide to real world architecture
In this post I will be giving direct and (hopefully) clear guidelines to writing a production ready application in Flutter using the ScopedModel architecture.
Some context
I recently built my first Production Flutter application for a client which was a rebuild from an existing wrapped mobile app. Designs were “not well thought out” and the performance was extremely bad. I was in the process of reviewing Flutter as my new cross platform tool and was only using it for three weeks when I pitched it as the technology I want to use. When the green light was given I decided on the ScopedModel architecture after looking at Redux and ScopedModel as options (didn’t consider BLoC at the time).
I found ScopedModel easy to use and has since revised my implementation based on the experience I gained from the app I built.
The Implementation style
Scoped model can be implemented in one of two ways. Models group features and extending a larger app model or a scoped model per view. In both of these cases the models interact with services (that does all the work) and reduce a state from information provided by those services. I’ll go over those two implementation types quickly.
One AppModel with FeatureModel mixins

In this way you have one AppModel that extends Mixins, that are also of type Model. It groups certain pieces of logic relating to features together. UserModel, AuthenticationModel, InformationModel, etc. You pass the combined one AppModel from the top of your application widget tree and access it anywhere in the app using the ScopedModelDescendent or ScopedModel.of<AppModel> call. See this example if you don’t understand my explanation. Go to lib/scoped_models and look at how app_model.dart is setup.
One Model per view/widget
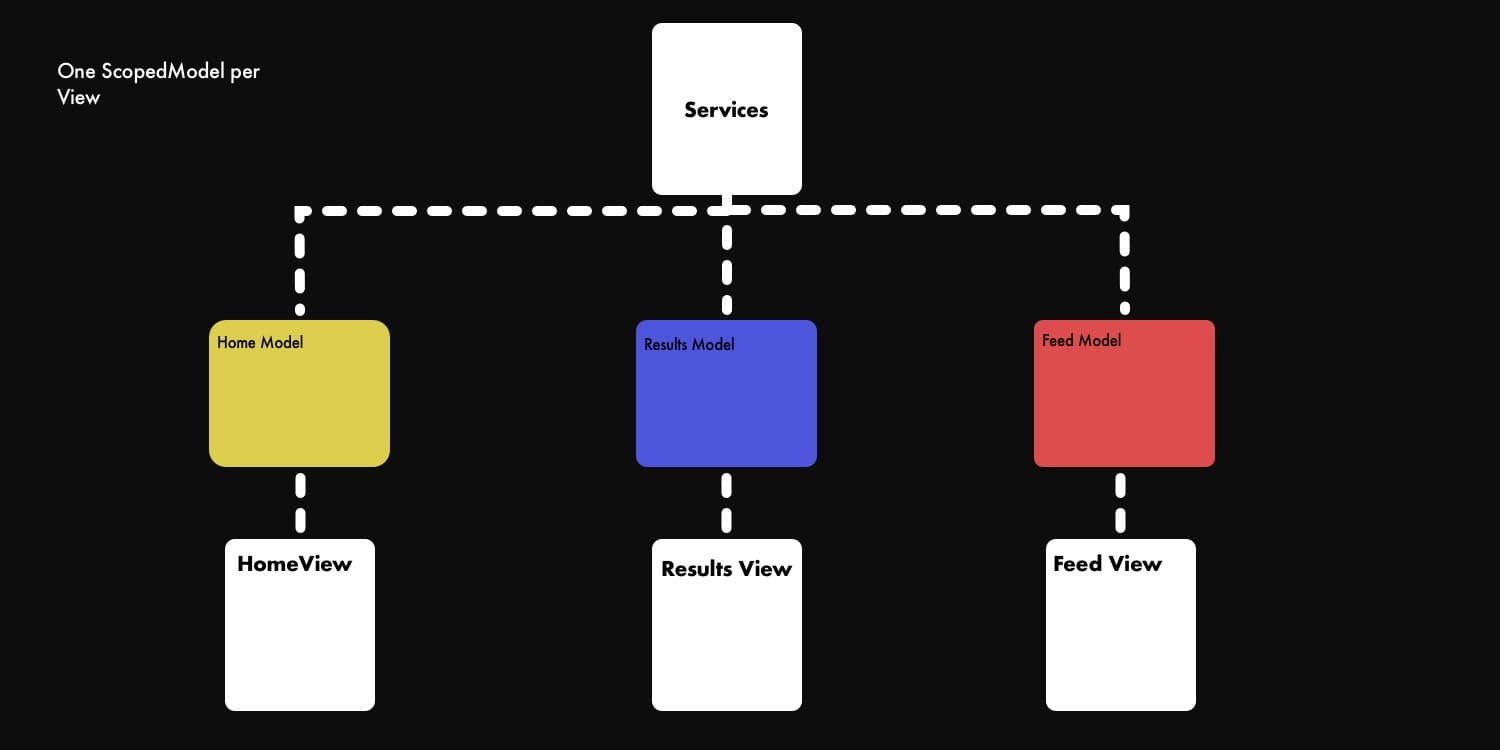
This way a ScopedModel is directly associated with a View file/widget. This produces a bit more boiler plate code because you have to create a scoped model for every view you create.
For my production app I used one AppModel and grouped specific pieces of Functionality together under separate mixin models. As the app grew I was mixing state reduction for my views because one Model had to reduce state for multiple views so it became a bit cumbersome. After some review I’ll be moving over to the second option. One Model per view/widget using GetIt as a IoC container. This is the setup we’ll use for this architecture guide.
If you’d like to follow along you can create a new Flutter project from scratch or clone this repo and open the start folder in your IDE.
Implementation Overview
This setup is meant for quick start and a easy to follow starting point. Each view will have a root ScopedModel descendent that runs off it’s own dedicated ScopedModel. The ScopedModel instance will be supplied by our locator (called locator because it locates the services and the Models). The Locator will also supply the services to the Model on construction. The model will delegate all the actual work like fetching data or saving to a database to the dedicated service and will only provide our view with state reflecting current operations. We’ll start by installing ScopedModel and setting up GetIt.
Implementation
ScopedModel and Dependency Injection Setup
Add the scoped_model and get_it package to your pubspec file.
---
dependencies:
  flutter:
    sdk: flutter

  # The following adds the Cupertino Icons font to your application.
  # Use with the CupertinoIcons class for iOS style icons.
  cupertino_icons: ^0.1.2
  # scoped model
  scoped_model: ^1.0.1
  # dependency injection
  get_it: ^1.0.3
Create a service_locator.dart file in the /lib folder and create the locator instance. Import GetIt, create a GetIt instance and an empty setupLocator function.
import 'package:get_it/get_it.dart';

GetIt locator = GetIt();

void setupLocator() {
  // Register services

  // Register models
}
This is where you will register all our models and services. Go to the main.dart file and call the setupLocator function before the app is started.
...
import 'service_locator.dart';

void main() {
  // setup locator
  setupLocator();

  runApp(MyApp());
}
...
That’s it for all the setup we can now fill out the app.
Adding views and Models
Lets create the Home view that will be see when the app starts. Since each view has a ScopedModel associated with it, create both files and bind them together using the locator. Create a folder under lib called ui, and in that folder create a views folder. In the views folder create a home_view.dart file.
import 'package:flutter/material.dart';
import 'package:scoped_model/scoped_model.dart';

class HomeView extends StatelessWidget {
  @override
  Widget build(BuildContext context) {
    return ScopedModel<HomeModel>(
      child: Scaffold(

    ));
  }
}
We need a HomeModel to get everything working smoothly. In the lib folder create another folder called scoped_model and in that folder create a home_model.dart file.
import 'package:scoped_model/scoped_model.dart';

class HomeModel extends Model {

}
Now we need to provide the HomeView ScopedModel widget with our HomeModel. We will use our locator to provide the HomeModel instead of the inherited widget method.
First register the HomeModel as a Factory with the locator. What this means is that every time you request a type of HomeModel from the locator it will run the factory function provided and return you a new instance of HomeModel. Head over to the service_locator import the HomeModel and register it with the locator.
import 'package:scoped_guide/scoped_models/home_model.dart';
...

void setupLocator() {
  // register services
  // register models
  locator.registerFactory<HomeModel>(() => HomeModel());
}
We can now get the Homemodel anywhere in our app where we have access to our locator instance. In the home_view file we need to provide a model to our ScopedModel descendent. We’ll get that from the locator.
Import the service locator and request a type HomeModel and provide it as the model. We’ll also provide the Scaffold with a ScopedModelDescendant and display a title on screen to get information from the model.
import 'package:flutter/material.dart';
import 'package:scoped_model/scoped_model.dart';
import 'package:scoped_guide/scoped_models/home_model.dart';
import 'package:scoped_guide/service_locator.dart';

class HomeView extends StatelessWidget {
  @override
  Widget build(BuildContext context) {
    return ScopedModel<HomeModel>(
      model: locator<HomeModel>(),
      child: ScopedModelDescendant<HomeModel>(
        builder: (context, child, model) => Scaffold(
          body: Center(
            child: Text(model.title),
          ),
        )));
  }
}
Add the title property to the home model String title = “HomeModel”; . And that’s it for setting up the Model injection into the views. Set your HomeView in main.dart as your home widget and then we can continue.
Adding Services
Add a new folder under lib called services. We’ll create a fake service that delays for 2 seconds and then returns true so we can stay the course of architecture only. Create a file called storage_service.dart. Add a Future<bool> saveData, that delays for 2 second then returns true.
class StorageService {
  Future<bool> saveData() async {
    await Future.delayed(Duration(seconds: 2));
    return true;
  }
}
Register the service with the locator so we can have access to it. Register it as a lazy singleton meaning, there’s only one instance of it in existence and that instance will be created the first time the type is requested.
import 'package:scoped_guide/services/storage_service.dart';
...
void setupLocator() {
  // register services
  locator.registerLazySingleton<StorageService>(() => StorageService());

  // register models
  locator.registerFactory<HomeModel>(() => HomeModel());
}
As I mentioned at the beginning the Models will use the services to do the work and will just update state for the views to display. So we’ll get the service into the view using our locator and have a function that calls the saveData function.
To see that everything is working we’ll just update the title when we call the function and when the function is complete. notify listeners has to be called for the model to be rebuilt so put the title update into it’s own function where we can call notify listeners after an update.
import 'package:scoped_guide/service_locator.dart';
import 'package:scoped_guide/services/storage_service.dart';
import 'package:scoped_model/scoped_model.dart';

class HomeModel extends Model {
  StorageService storageService = locator<StorageService>();

  String title = "HomeModel";

  Future saveData() async {
    setTitle("Saving Data");
    await storageService.saveData();
    setTitle("Data Saved");
  }

  void setTitle(String value) {
    title = value;
    notifyListeners();
  }
}
Add a floating action button into your HomeView Scaffold and call model.saveData in the onPressed function. You should see the text updating to “Saving data” and then to “Data Saved”. Now that we have Models and services setup with the injection. Let’s cover some of the common scenarios in app development and build out our architecture to handle it properly.
Covering all the Bases
Let’s go over some of the things that are almost always required in a production / real-world app.
View State Management
If your app retrieves its data from a service or even from a local DB then you have 4 Default states based on that fact alone. Idle, Busy (Fetching Data), Retrieved and Error. ALL your views will go through this state so it’s a good idea to build it into your models from the beginning.
Create a new folder under lib called enums. Create a new file in that folder called view_states.dart. Add an enum ViewState with the 4 states mentioned above.
/// Represents a view's state from the ScopedModel
enum ViewState {
  Idle,
  Busy,
  Retrieved,
  Error
}
Now in your View’s Model (I’m trying so hard not to say ViewModel) import the ViewState. We’ll keep a private state variable so it’s only changeable from within the Model and we’ll expose it through a getter. The same way that we have to call notify listeners after updating our title, we have to do that after updating our state (I know, that seems a lot like setState outside the widget). Which it is. To keep the notify listeners to a minimum we’ll only call notify listeners when the state changes, not the individual properties we have in the model (NOT A HARD RULE).
import 'package:scoped_guide/service_locator.dart';
import 'package:scoped_guide/services/storage_service.dart';
import 'package:scoped_model/scoped_model.dart';
import 'package:scoped_guide/enums/view_state.dart';

class HomeModel extends Model {
  StorageService storageService = locator<StorageService>();

  String title = "HomeModel";

  ViewState _state;
  ViewState get state => _state;

  Future saveData() async {
    _setState(ViewState.Busy);
    title = "Saving Data";
    await storageService.saveData();
    title = "Data Saved";
    _setState(ViewState.Retrieved);
  }

  void _setState(ViewState newState) {
    _state = newState;
    notifyListeners();
  }
}
Now when we set change the value of _state through our setState the ScopedModel will be notified. Add some UI to the HomeView to indicate these changes. We’ll show a busy indicator when state is busy and then Done text when state is retrieved. Change the body of your Scaffold to the below and add the _getBodyUi method in there as well.
...
body: Center(
    child: Column(
      mainAxisSize: MainAxisSize.min,
      children: <Widget>[
        _getBodyUi(model.state),
        Text(model.title),
      ]
    )
  )
...

Widget _getBodyUi(ViewState state) {
  switch (state) {
    case ViewState.Busy:
      return CircularProgressIndicator();
    case ViewState.Retrieved:
    default:
      return Text('Done');
  }
}
That’s it for the level of state management that I required for the app. It had about 15 views, the app was completely API driven. No local storing because of the sensitive information so the way we managed state was tested heavily and there hasn’t been any problems yet.
Multiple Views
Having multiple views is probably a scenario that will come up in your app :) As you’ve seen, there is some boilerplate code associated with setting up a view, ScopedModel, ScopedModelDescendant and getting the model from the Locator, it’s not a lot. But it’s still boilerplate code. Let’s make that a bit less. We’ll create a base view that does all this for us.
import 'package:flutter/material.dart';
import 'package:scoped_model/scoped_model.dart';
import 'package:scoped_guide/service_locator.dart';

class BaseView<T extends Model> extends StatelessWidget {

  final ScopedModelDescendantBuilder<T> _builder;

  BaseView({ScopedModelDescendantBuilder<T> builder})
      : _builder = builder;

  @override
  Widget build(BuildContext context) {
    return ScopedModel<T>(
        model: locator<T>(),
        child: ScopedModelDescendant<T>(
          builder: _builder));
  }
}
The BaseView takes our Model type as well as a builder we can supply to build our UI. This BaseView has ScopedModel root, provides the model through though our locator and gives us a scopedModelDescendent as the main child so our UI still reacts to model changes. In the home view we can now replace all the scoped model code with our BaseView as the widget.
...
import 'base_view.dart';

@override
Widget build(BuildContext context) {
  return BaseView<HomeModel> (
      builder: (context, child, model) => Scaffold(
        ...
  ));
}
So now we can create our additional views with less effort. I recommend creating a snippet for yourself to create these views, or if that’s too much effort just keep a template copy in your code base somewhere. Lets make a template in our views folder and we’ll copy paste that whenever we make a new view. Make a file called _template_view.dart with the following code.
import 'package:flutter/material.dart';
import 'package:scoped_guide/scoped_models/home_model.dart';

import 'base_view.dart';

class Template extends StatelessWidget {
  @override
  Widget build(BuildContext context) {
    return BaseView<HomeModel>(
      builder: (context, child, model) => Scaffold(
         body: Center(child: Text(this.runtimeType.toString()),),
      ));
  }
}
Since we want the state we setup to be shared with every view, instead of setting up a new state per view we’ll create a BaseModel that takes care of this for us. Create a BaseModel where you expose the state and extend the HomeModel using the BaseModel.
import 'package:scoped_guide/enums/view_state.dart';
import 'package:scoped_model/scoped_model.dart';

class BaseModel extends Model {
  ViewState _state;
  ViewState get state => _state;

  void setState(ViewState newState) {
    _state = newState;
    notifyListeners();
  }
}
Remove all your state code from the HomeModel and extend it from BaseModel.
...
class HomeModel extends BaseModel {
  ...
  Future saveData() async {
    setState(ViewState.Busy);
    title = "Saving Data";
    await storageService.saveData();
    title = "Data Saved";
    setState(ViewState.Retrieved);
  }
}
The setup is now done for multiple views, for most situations. From here you’ll be extending BaseView as needed or the Model to include more shared functionality for your app.
Next up is navigation, let’s do some setup for that. Create two copies of your template_view.dart, call one success_view.dart and the other error_view.dart. Rename the classes inside appropriately. Create two matching models under scoped_models SuccessModel and ErrorModel and pass that to your base view. These models should inherit from the BaseModel not Model. Then go to the service_locator.dart and register them.
Navigation
The basic navigation stays the same, we use the Navigator to push/replace views on our stack. There’s only one navigation scenario I want to cover. Navigating to a different view based on a result. I believe navigation should be done in the UI side (for this architecture, to keep things clear) so we’ll return a value from our Future and use that value to navigate to a different view. Update your saveData function to return a bool and return true at the end.
Note: In most scenarios you don’t have to return anything from futures on the model because you’ll update your state internally and notify the listeners. There are some exceptions, like navigation.
Future<bool> saveData() async {
    _setState(ViewState.Busy);
    title = "Saving Data";
    await storageService.saveData();
    title = "Data Saved";
    _setState(ViewState.Retrieved);

    return true;
}
Then in the home view, we’ll update the onPressed in the FloatingActionButton. Make it async, await the saveData and check the value to decide where to navigate. The floatingActionButton in your HomeView should look like below.
 floatingActionButton: FloatingActionButton(
    onPressed: () async {
      var whereToNavigate = await model.saveData();
      if (whereToNavigate) {
        Navigator.push(context,MaterialPageRoute(builder: (context) => SuccessView()));
      } else {
        Navigator.push(context,MaterialPageRoute(builder: (context) => ErrorView()));
      }
    }
)
Shared Overlay UI (Busy Indicator)
Sometimes an app doesn’t require a specialised busy indication for every view. A simple modal overlay that reacts to the model’s busy state would do just fine. Most of the time almost all the views in the app is required to show a busy indicator, so we’ll need the states in all of our Models as well.
Then we’ll need an easy way to share UI accross the views that will respond to the busy state on every view. Create a BusyOverlay widget and wrap the scaffold in it. The widget will take in a boolean called show, a child and an optional title. It’ll place the busy overlay and the child in a Stack and show/hide the overlay using the Opacity widget. We’ll also wrap it in an ignore pointer to make sure touches still go to our underlying view.
Create a folder under ui called widgets. Create a file called busy_overlay.dart and put the following code in there. I won’t go over the implementation more, the explanation above should be enough.
import 'package:flutter/material.dart';

class BusyOverlay extends StatelessWidget {
  final Widget child;
  final String title;
  final bool show;

  const BusyOverlay({this.child,
      this.title = 'Please wait...',
      this.show = false});

  @override
  Widget build(BuildContext context) {
    var screenSize = MediaQuery.of(context).size;
    return Material(
        child: Stack(children: <Widget>[
      child,
      IgnorePointer(
        child: Opacity(
            opacity: show ? 1.0 : 0.0,
            child: Container(
              width: screenSize.width,
              height: screenSize.height,
              alignment: Alignment.center,
              color: Color.fromARGB(100, 0, 0, 0),
              child: Column(
                mainAxisSize: MainAxisSize.min,
                children: <Widget>[
                  CircularProgressIndicator(),
                  Text(title,
                      style: TextStyle(
                          fontSize: 16.0,
                          fontWeight: FontWeight.bold,
                          color: Colors.white)),
                ],
              ),
            )),
      ),
    ]));
  }
}
Now we can use this to add into the views and set the show value based on the state of the model. Go to your Home view, wrap your Scaffold in the BusyOverlay (Ctrl + Shift + R, in Visual Code, choose the last option) and supply the show property with model.state == ViewState.Busy .
 @override
Widget build(BuildContext context) {
  return BaseView<HomeModel>(builder: (context, child, model) =>
     BusyOverlay(
      show: model.state == ViewState.Busy,
      child: Scaffold(
      ...
      )));
}
Now, when you click your floating action button you’ll see a “Please Wait” busy indication. You can even work this into a Specialised BaseView, just remember your busy overlay value needs to be updated within the builder so that it reacts to the notifiedListeners from the model.
Async scenarios
There are a few common scenarios when it comes to a real world app, we’ve covered showing different states and the busy indicator. There’s one more that’s very common.
Landing on a page and requesting data
When you have a list, tap an item and you want to show more details about that item this will usually be the case. So the way we’ll cover this is. When navigating to the view we supply the data required for it to perform it’s request (id usually) and then we’ll make our request in the initState call of our stateful widget.
In our example we won’t be adding too much UI because that’ll distract from the architecture setup. We’ll navigate to success passing in some hardcoded text, you can get it from your model if you want. We’ll run an async function on the SuccessModel to duplicate this text and show it when it’s done.
Let’s first update our success model.Add the duplication Future and make it update your title to a duplicate value.
import 'package:scoped_guide/scoped_models/base_model.dart';

class SuccessModel extends BaseModel {
  String title = "no text yet";

  Future fetchDuplicatedText(String text) async {
    setState(ViewState.Busy);
    await Future.delayed(Duration(seconds: 2));
    title = '$text $text';

    setState(ViewState.Retrieved);
  }
}
Now we need a way to call a function on the model when the view has been created. What we’ll do is update our BaseView to be a stateful widget, we’ll pass it a Function that will get called in the initState that passes back our Model to us. This way we can execute code once when the model is created in our view.
import 'package:flutter/material.dart';
import 'package:scoped_model/scoped_model.dart';
import 'package:scoped_guide/service_locator.dart';

class BaseView<T extends Model> extends StatefulWidget {
  final ScopedModelDescendantBuilder<T> _builder;
  final Function(T) onModelReady;

  BaseView({ScopedModelDescendantBuilder<T> builder, this.onModelReady})
      : _builder = builder;

  @override
  _BaseViewState<T> createState() => _BaseViewState<T>();
}

class _BaseViewState<T extends Model> extends State<BaseView<T>> {
  T _model = locator<T>();

  @override
  void initState() {
    if(widget.onModelReady != null) {
      widget.onModelReady(_model);
    }
    super.initState();
  }

  @override
  Widget build(BuildContext context) {
    return ScopedModel<T>(
        model: _model,
        child: ScopedModelDescendant<T>(
          child: Container(color: Colors.red),
          builder: widget._builder));
  }
}
Then update your Success view and pass in your onModelReady function that calls your fetchDuplicatedText future.
class SuccessView extends StatelessWidget {
  final String title;

  SuccessView({this.title});

  @override
  Widget build(BuildContext context) {
    return BaseView<SuccessModel>(
        onModelReady: (model) => model.fetchDuplicatedText(title),
        builder: (context, child, model) => BusyOverlay(
            show: model.state == ViewState.Busy,
            child: Scaffold(
              body: Center(child: Text(model.title)),
            )));
  }
}
Lastly, pass in the data we require at the point of Navigation.
Navigator.push(context,MaterialPageRoute(builder: (context) => SuccessView(title: “Passed in from home”)));And that’s it. Now you can execute functions on startup in your ScopedModel architecture without jumping through any more hoops or even bothering with overriding your init state.
All Done
That covers everything that you need to build a production app using ScopedModel. At this point you can implement all your services. One thing I didn’t make space for is getting it ready for testing. The way we’d do that is to inject the services into models through the constructor. That way you can inject a fake service if you want to. I personally don’t test the Models since they rely completely on the Services and the services I test directly using instances.
I’m building a new tool for Flutter project creation, AppSkeletons. You can generate an app using this architecture setup, with more to come in the Future. Check it out, I would appreciate any feedback on that too. The plan is to hopefully in the coming months and years take away all the unnecessary setup and boilerplate code and allow a dev to generate a project that caters for evertything they need to complete a production ready app. I’m hoping to save atleast 2–5 coding days of setup and architecture planning with this tool so ANY feedback is appreciated. It’s only 6 weeks only, but I have big plans for it.