This tutorial will be focused on covering the scenarios brought up by the community members as well as common scenarios encountered while developing a mobile app using this architecture. I’ll go over the list first then you can know where to jump to in order to see the scenario most important to you. The full source code can be found here
- Partial View Rebuilds
- Rebuilding a ViewModel A when ViewModel B triggered a change
- Getting Data From a Future and Showing it
- Listening to Streams and Showing Data
Partial View Rebuilds
The most criticism I get for the architecture is that “the entire view will rebuild for a change”. Even though this is default functionality in Flutter when using setState, at a view level, I guess it’s something people think about when the word architecture is mentioned. This is not actually the case for Stacked, it’s just how I like to implement things to keep my code looking cleaner. I don’t mind the rebuild because Flutter is very optimised and I haven’t ran into any sub 60fps problems. So lets go over the steps to NOT rebuild your entire UI.
You’ll start by creating your ViewModelBuilder using the nonReactive constructor at the view level. As the name suggests, this will not react to the notifyListeners call and the builder will only be fired once and never again after that. Create a new folder under views called partial_builds, inside create a filed called partial_builds_view.dart and partial_builds_viewmodel.dart.
// partial_builds_view.dart
class PartialBuildsView extends StatelessWidget {
  const PartialBuildsView({Key key}) : super(key: key);

  @override
  Widget build(BuildContext context) {
    return ViewModelBuilder<PartialBuildsViewModel>.nonReactive(
      builder: (context, model, child) => Scaffold(
        body: Column(
          mainAxisSize: MainAxisSize.max,
          mainAxisAlignment: MainAxisAlignment.center,
          children: <Widget>[

          ],
        ),
      ),
      viewModelBuilder: () => PartialBuildsViewModel(),
    );
  }
}

// partial_builds_viewmodel.dart
import 'package:stacked/stacked.dart';

class PartialBuildsViewModel extends BaseViewModel {}
This example is intentionally verbose to show how you can use the technique, you don’t have to use this for every widget. But I’ll show you how to do partial rebuilds and not rebuild for other widgets. Next up we’ll create the widgets that will react to ViewModel changes.
ViewModelWidgets for children that “inherit” the ViewModel
Then we’ll create some private widgets in the view file that will make use of the ViewModel but won’t rebuild the UI when it notifies it’s listeners. We’ll build a form that will take in some text and will print it out, with it’s length. I know, not super fancy, but it gets the idea across. We’ll create the Form part that will take in the Text and update the ViewModel with it. When it comes to forms I’ve started using Flutter Hooks to reduce all the boiler plate around using stateful widgets, etc.
class _StringForm extends HookViewModelWidget<PartialBuildsViewModel> {
  _StringForm({Key key}) : super(key: key, reactive: false);

  @override
  Widget buildViewModelWidget(
    BuildContext context,
    PartialBuildsViewModel model,
  ) {
    var text = useTextEditingController();
    return TextField(
      controller: text,
      onChanged: model.updateString,
    );
  }
}
To use the HookViewModelWidget you have to add stacked_hooks to your pubspec and import.
flutter_hooks:
stacked_hooks: ^0.1.1+3
So what’s happening here is we’re using the Hooks version of the ViewModelWidget and setting the reactive property to false. This tells the widget that when notifyListeners is called for the ViewModel associated with this view the buildViewModelWidget should not be called again. Then we have the buildViewModelWidget which will build our UI. Simple UI, we create a text editting controller and return a text field. We also call model.updateString from the onChanged function callback of the TextField. Then we can update our ViewModel.
import 'package:stacked/stacked.dart';

class PartialBuildsViewModel extends BaseViewModel {
  String _title;
  String get title => _title;

  void updateString(String value) {
    _title = value;
    notifyListeners();
  }
}
Set the PartialBuildsView as the home view in your main file and uncomment the initialRoute. This is for testing only.
class MyApp extends StatelessWidget {
  @override
  Widget build(BuildContext context) {
    return MaterialApp(
      title: 'Flutter Demo',
      // initialRoute: Routes.startupViewRoute,
      home: PartialBuildsView(),
      onGenerateRoute: Router().onGenerateRoute,
      navigatorKey: locator<NavigationService>().navigatorKey,
    );
  }
}
When you run the code now you’ll have a TextField in the middle of the view. Typing in it will change nothing. Lets create a widget that will react to the values typed in. Under the string form widget create a new stateless widget _TitleAndValue.
class _TitleAndValue extends ViewModelWidget<PartialBuildsViewModel> {
  _TitleAndValue({Key key}) : super(key: key, reactive: true);

  @override
  Widget build(BuildContext context, PartialBuildsViewModel model) {
    return Column(
      children: <Widget>[
        Text(
          model.title ?? '',
          style: TextStyle(fontSize: 40),
        ),
      ],
    );
  }
}
This widget will inherit the same ViewModel to get access to it through the build function but this time the reactive value is set to true. This means that whenever notifyListeners is called the _TitleAndValue widget will be rebuilt. That is the only widget that is rebuild when the value changes. If you add print statements into the view’s builder function, the _StringForm build override and the _TitleAndValue build function you’ll see a log like this.
I/flutter ( 9830): _PartialBuildsView built
I/flutter ( 9830): _StringForm built
I/flutter ( 9830): _TitleAndValue built
I/flutter ( 9830): _TitleAndValue built
I/flutter ( 9830): _TitleAndValue built
I/flutter ( 9830): _TitleAndValue built
I/flutter ( 9830): _TitleAndValue built
I/flutter ( 9830): _TitleAndValue built
I/flutter ( 9830): _TitleAndValue built
This is from start, the three is built. Then as you type only the one marked as reactive is rebuilt to show the updated value. You can mix and match the .reactive constructor and .nonReactive constructor to get the desired outcome. I separate my forms into widgets and remove the reactivity and then have separate validation message widgets that are reactive and react to the ViewModel changes when required.
Rebuilding a ViewModel A when ViewModel B triggered a change
This was the other most common scenario that came up from developers that adopted the architecture from the first video and also my provider_architecture package. The case where you want to rebuild two widgets on the screen that have different ViewModels. Stacked was originally created to improve only this part of the state management specifically. Lets first do all the setup to show the problem. The setup is longer than the solution haha, but you wanted a tutorial “from scratch” so we gotta write all the things we need.
Problem setup
Under the views folder create a new folder called reactive_example inside create a new file called reactive_example_view.dart. This will be a normal widget with no ViewModel bindings.
import 'package:flutter/material.dart';

class ReactiveExampleView extends StatelessWidget {
  const ReactiveExampleView({Key key}) : super(key: key);

  @override
  Widget build(BuildContext context) {
    return Scaffold(
      body: Center(
        child: Row(
          children: <Widget>[
            SingleIncreaseCounter(),
            SizedBox(width: 50),
            DoubleIncreaseCounter(),
          ],
        ),
      ),
    );
  }
}
It’ll make use of two widgets that will have it’s own internal ViewModels. They will both read the same property from a service and display that. IMPLEMENTATION NOTE: When data is shared between ViewModels put it in a service that can be injected / retrieved in all ViewModels that need it. Like a NavigationService or DialogService. Under the UI folder we’ll create a new folder called smart_widgets. Smart widgets are widgets that has it’s own ViewModel attached to it. Mostly you will create dumb widgets where you can re-use the UI without the logic in multiple places. To demonstrate the example I want two active ViewModels on screen. The application between views will be exactly the same. In the smart_widgets folder create a new folder called single_increase_counter, inside create a file called single_increase_counter.dart and single_increase_counter_viewmodel.dart.
//single_increase_counter.dart
class SingleIncreaseCounter extends StatelessWidget {
  @override
  Widget build(BuildContext context) {
    return ViewModelBuilder<SingleIncreaseCounterViewModel>.reactive(
      builder: (context, model, child) => GestureDetector(
        onTap: model.updateCounter,
        child: Container(
          width: 100,
          height: 100,
          color: Colors.blue,
          alignment: Alignment.center,
          child: Column(
            mainAxisSize: MainAxisSize.min,
            children: <Widget>[
              Text(
                'Tap to increment the Counter',
                textAlign: TextAlign.center,
              ),
              Text(model.counter.toString())
            ],
          ),
        ),
      ),
      viewModelBuilder: () => SingleIncreaseCounterViewModel(),
    );
  }
}
and the ViewModel will be
// single_increase_counter_viewmodel.dart
class SingleIncreaseCounterViewModel extends BaseViewModel {
final _counterService = locator<CounterService>();
int get counter => _counterService.counter;
void updateCounter() {
_counterService.incrementCounter();
notifyListeners();
}
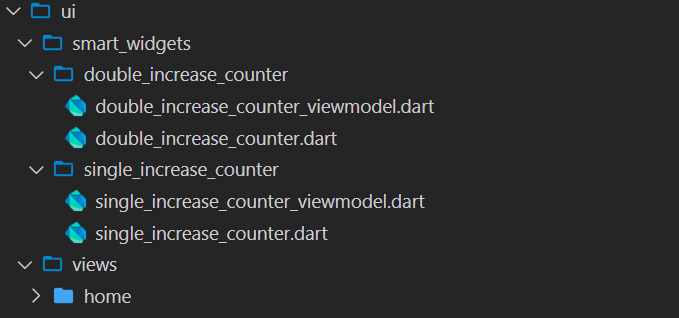
}Then we’ll repeat the process for DoubleIncreaseCounter. Copy the folder under smart widgets called single_increase_counter and rename everything that’s single to double. It should look like this when you’re done.
Then you can update the internals. As well.
// double_increase_counter.dart
class DoubleIncreaseCounter extends StatelessWidget {
  @override
  Widget build(BuildContext context) {
    return ViewModelBuilder<DoubleIncreaseCounterViewModel>.reactive(
      builder: (context, model, child) => GestureDetector(
        onTap: model.updateCounter,
        child: Container(
          width: 100,
          height: 100,
          color: Colors.yellow,
          alignment: Alignment.center,
          child: Column(
            mainAxisSize: MainAxisSize.min,
            children: <Widget>[
              Text(
                'Tap to double the Counter',
                textAlign: TextAlign.center,
              ),
              Text(model.counter.toString())
            ],
          ),
        ),
      ),
      viewModelBuilder: () => DoubleIncreaseCounterViewModel(),
    );
  }
}
And for the ViewModel we’ll change the function we call on the Service to call the doubleCounter.
// double_increase_counter_viewmodel.dart
class DoubleIncreaseCounterViewModel extends BaseViewModel {
  final _counterService = locator<CounterService>();
  int get counter => _counterService.counter;

  void updateCounter() {
    _counterService.doubleCounter();
    notifyListeners();
  }
}
Then we have to create the counter service with the functionality on it. In the services folder create a new service called CounterService. Run the command to generate the locator injection below or add it to your locator as locator.registerLazySingleton(() => CounterService()).
flutter pub run build_runner build --delete-conflicting-outputs@lazySingleton
class CounterService {
int _counter = 0;
int get counter => _counter;
void incrementCounter() {
_counter++;
}
void doubleCounter() {
_counter *= 2;
}
}Solution to Problem
Finally now I can show you the problem that stacked makes easier. If you run the code now with the ReactiveExampleView as the home layout you will see if you tap the blue counter the value will increase but the counter on the right won’t change, even though they’re using the same value from the service. We want all ViewModels using this simple service to update when the value changes. This is where the Reactive functionality comes in. It’s literally in the first iteration of it so any feedback or help in making it a more complete feature would be appreciated. Here are the steps to making a service value reactive.
- Mix in the
ReactiveServiceMixin - Wrap the value to use in an
RxValue - call
listenToReactiveValuesand pass in all values to react to.
RxValue comes from a package that I might merge into stacked for the reactive functionality and call it something else. It’s a package that’s not maintained at the moment but the current functionality is enough to show what I’d like to accomplish. In the pubspec add the observable-ish package.
observable_ish:Then we can update the CounterService to become reactive. I’ve added the comment numbers for changes you have to make. You also have to use .value where you expect the value instead of the _counter directly.
@lazySingleton
class CounterService with ReactiveServiceMixin { // 1
  // 2
  RxValue<int> _counter = RxValue<int>(initial: 0);

  CounterService() {
    //3
    listenToReactiveValues([_counter]);
  }

  int get counter => _counter.value;

  void incrementCounter() {
    _counter.value++;
  }

  void doubleCounter() {
    _counter.value *= 2;
  }
}
The next thing is to make sure the ViewModel reacts to the changes in this service. To do this we make use of the ReactiveViewModel. Change the SingleIncreaseCounterViewModel and the DoubleIncreaseCounterViewModel to extend the ReactiveViewModel instead of the BaseViewModel. This will require you to override the reactiveServices getter. In that list we supply the _counterService.
class SingleIncreaseCounterViewModel extends ReactiveViewModel { // extend from ReactiveViewModel
  @override
  List<ReactiveServiceMixin> get reactiveServices => [_counterService]; // add counter service as reactive service
  ...
}
Do the exact same for the DoubleIncreaseCounterViewModel and run the code. You’ll see now that when you tap for the one to increase the other widget will be rebuilt as well. Now, again, the same as with the reactive constructor of the ViewModel you don’t have to make both ViewModels reactive, only the ones you want to react to the service changes. Some ViewModels won’t have to so they can stay BaseViewModels. This is a sneaky and very useful functionality to have in the application. I’m very excited for it to evolve as we use it in development. Lets move onto some boiler plate removal functionality.
Getting Data From a Future
If you have a ViewModel that depends completely on a Future running, fetching data and returning that to you then the FutureViewModel is perfect for that. This ViewModel will automatically run the future, set the ViewModel to busy and then put that data returned into the data property for the model for you to use. It will be rebuilt when the future starts and then also when it completes. Under the views file create a new folder called future_example
class FutureExampleView extends StatelessWidget {
  @override
  Widget build(BuildContext context) {
    return ViewModelBuilder<FutureExampleViewModel>.reactive(
      builder: (context, model, child) => Scaffold(
        body: Center(
                child: model.isBusy
                    ? CircularProgressIndicator()
                    : Text(model.data),
            ),
      ),
      viewModelBuilder: () => FutureExampleViewModel(),
    );
  }
}
And for the ViewModel we have the following. There’s a function called futureToRun which is a required override and it has to return the type as passed into the FutureViewModel. In this case a string that we’ll return after 3 seconds of delay. The value return will be in the data property. As you see in the UI above we show a progress indicator while .isBusy is true, which will automatically be set to false when the future is complete. Or when an error occurs. So lets talk about handling errors for this viewmodel.
class FutureExampleViewModel extends FutureViewModel<String> {
  Future<String> getDataFromServer() async {
    await Future.delayed(const Duration(seconds: 3));
    return 'This is fetched from everywhere';
  }

  @override
  Future<String> futureToRun() => getDataFromServer();
}
you can change the ViewModel to this.
class FutureExampleViewModel extends FutureViewModel<String> {
  Future<String> getDataFromServer() async {
    await Future.delayed(const Duration(seconds: 3));
    throw Exception('This is an error');
  }

  @override
  void onError(error) {
    // error thrown above will be sent here
    // We can show a dialog, set the error message to show on the UI
    // the UI will be rebuilt after this is called so you can set properties.
  }

  @override
  Future<String> futureToRun() => getDataFromServer();
}
When that error is thrown the property hasError will be true so you can show a different UI. Lets see how that would look in the UI code.
class FutureExampleView extends StatelessWidget {
  @override
  Widget build(BuildContext context) {
    return ViewModelBuilder<FutureExampleViewModel>.reactive(
      builder: (context, model, child) => Scaffold(
        body: model.hasError
            ? Container(
                color: Colors.red,
                alignment: Alignment.center,
                child: Text(
                  'An error has occered while running the future',
                  style: TextStyle(color: Colors.white),
                ),
              )
            : Center(
                child: model.isBusy
                    ? CircularProgressIndicator()
                    : Text(model.data),
              ),
      ),
      viewModelBuilder: () => FutureExampleViewModel(),
    );
  }
}
This will completely swap out the UI for the error state. But there are other more elegant ways of showing the user an error has occurred. Lets move onto everyone’s favourite. Streams.
Listening to and reacting to Streams
Similar to the Future above we also have the StreamViewModel which allows you to do the same but for a Stream instead. Under the views folder create a new folder called stream_example, inside create a file called stream_example_view.dart and stream_example_viewmodel.dart
// stream_example_view.dart
class StreamExampleView extends StatelessWidget {
  @override
  Widget build(BuildContext context) {
    return ViewModelBuilder<StreamExampleViewModel>.reactive(
      builder: (context, model, child) => Scaffold(
        body: Center(
          child: Text(model.title),
        ),
      ),
      viewModelBuilder: () => StreamExampleViewModel(),
    );
  }
}
and the ViewModel
class StreamExampleViewModel extends StreamViewModel<int> {
  String get title => 'This is the time since epoch in seconds \n $data';

  @override
  Stream<int> get stream => epochUpdatesNumbers();

  Stream<int> epochUpdatesNumbers() async* {
    while (true) {
      await Future.delayed(const Duration(seconds: 2));
      yield DateTime.now().millisecondsSinceEpoch;
    }
  }
}
This will automatically rebuild this ViewModel when a new value is emitted from the epochUpdatesNumbers stream. It also has an onError override along with an hasError property that will help you to determine if an error has occurred. Streams will be automatically disposed when the ViewModel is disposed. That dispose is tied to the widget’s lifecycle.
An additional set of functionalities is present for the Stream which is the idea of the stream source changing. Say for instance in something like firebase you make a query for one stream then update that query and want this ViewModel to update it’s stream source. The same way we have a notifyListeners to rebuild the UI we have a notifySourceChanged to tell the ViewModel the source has changed. This will automatically dispose the current stream, listen to the new stream and then set the data to the new values as they come through. We can quickly show how to do that if we duplicate the stream function and make it emit faster, then we can swap between the two.
class StreamExampleViewModel extends StreamViewModel<int> {
  String get title => 'This is the time since epoch in seconds \n $data';

  bool _otherSource = false;

  @override
  Stream<int> get stream => _otherSource ? epochUpdates() : epochFasterUpdates();

  void swapSources() {
    _otherSource = !_otherSource;
    notifySourceChanged();
  }

  Stream<int> epochUpdates() async* {
    while (true) {
      await Future.delayed(const Duration(seconds: 2));
      yield DateTime.now().millisecondsSinceEpoch;
    }
  }

  Stream<int> epochFasterUpdates() async* {
    while (true) {
      await Future.delayed(const Duration(milliseconds: 500));
      yield DateTime.now().millisecondsSinceEpoch;
    }
  }
}
In the view we can then add a some UI to call this functionality.
class StreamExampleView extends StatelessWidget {
  @override
  Widget build(BuildContext context) {
    return ViewModelBuilder<StreamExampleViewModel>.reactive(
      builder: (context, model, child) => Scaffold(
        body: Center(
          child: Text(model.title),
        ),
        floatingActionButton: MaterialButton(
          child: Text('Change Stream Srouces'),
          onPressed: model.swapSources,
        ),
      ),
      viewModelBuilder: () => StreamExampleViewModel(),
    );
  }
}
As you press the button text in the bottom right you should see the numbers updating faster and then going back to 2 second again. This ViewModel makes a lot of Stream Implementations way more compact and I can personally say we’ll be refactoring 3 production code bases to use Stacked and make use of this to remove some code from the code base. To keep these videos easy to take in on one sitting I’ll end it here. Please let me know what you’d like to see next episode. You can choose between Unit testing (ViewModels only, not widgets) or Deep Dive into services. This will cover when to create a service, what are they exactly, why is it called a service, why are they required and what purpose do they ultimately serve.
I would really appreciate your input so the next video can be relevant to that.