

This tutorial will teach you the basics of building a Flutter Website and deploying it to Firebase. This is part 1 in a 4 part series, the series we will cover:
Contents
Part 1: A Basic Landing Page
- Creating the app using Stacked
- Intro to Responsive UI
- How to structure your project files
- Intro to Form Input
- Deploying a Flutter Web app
Part 2: UI Layout
- Create Persistent headers and footer
- Create a Menu / Toolbar using Navigator nesting
Part 3: Route Management
- Url specific navigation
- Back and forward nav using Back Buttons
- Basics of Route Guarding
Part 4: Improve the Flutter Web Experience
- Loading animations on start
- Intro animations when your page loads
- Hover effects for increased interactivity
Getting Started
I build our apps and our clients apps using Stacked, it’s a meta-framework that provides opinionated production patterns to your code base. Your code stays testable, maintainable and scalable for large teams. To get started we install the stacked_cli by running.
dart pub global activate stacked_cliWhen installation completes we’ll create our web project using the dedicated web template.
stacked create app filledstacks_academy --template=webWarning: Stacked doesn’t control where it is installed. If stacked is not recognized check your path and try to install other dart packages to see if it works.
Project Overview
Stacked provides you with a template where most of the setup has been done already. To avoid doing a deep dive into everything immediately we’ll address the parts we need to achieve the goal at hand.
Responsive Layouts
To showcase this lets start by running the app. In your terminal execute the following.
flutter run -d chromeNow re-size your chrome window and you’ll see the UI change between desktop (the counter UI), tablet and mobile. If you open home_view.dart you’ll see the widget responsible for this, ScreenTypeLayout.builder. It allows you to build different UI’s based on the current screenSize defined as mobile, tablet and desktop.
My goal is always to have scalable code, meaning me and my team have a pattern to follow to produce high quality code, consistently. The responsive_builder package is the only package that place focus on creating an easily understandable responsive UI, without having multiple checks and conditional logic scattered everywhere.
Building a Landing Page
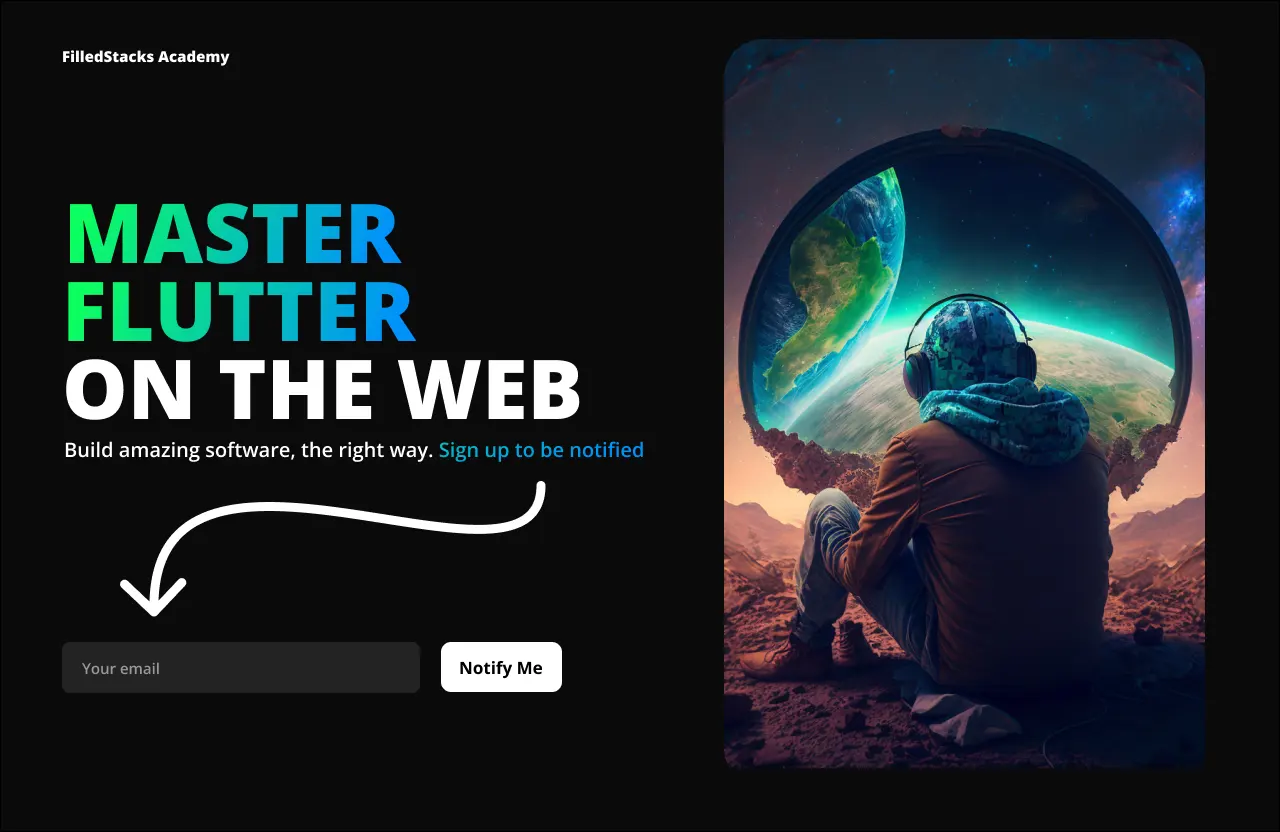
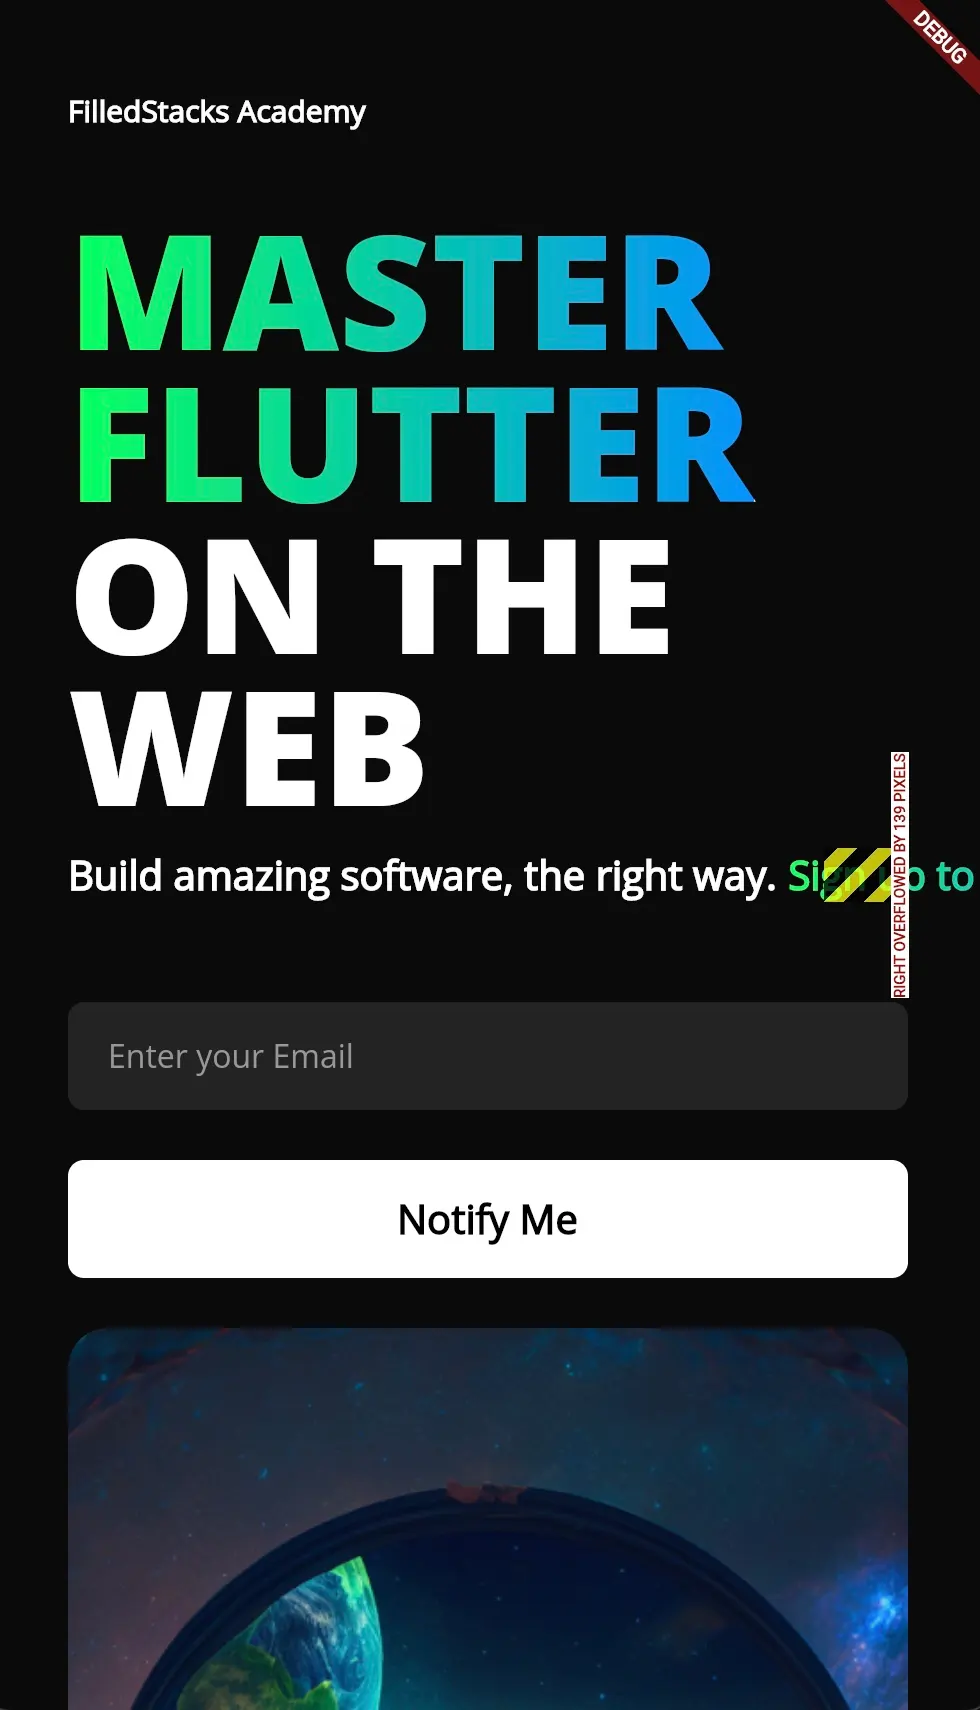
With that brief overview we can start building the Desktop UI (Design below).

We’ll break up the layout as follows.
UI Layouts
Open home_view.desktop.dart where you can remove the body of the Scaffold. Set the body to a Row, the first child (Left side of screen) is a Column and the last child is an Image (We’ll use a container for now).
@override
Widget build(BuildContext context, HomeViewModel viewModel) {
    return Scaffold(
    // Outside Row
    body: Row(
        mainAxisSize: MainAxisSize.max,
        children: [
            // Left side of screen
            Column(
                crossAxisAlignment: CrossAxisAlignment.start,
                children: [],
            ),
            // Right side of screen
            Container(width: 450, color: Colors.amber)
        ],
    ));
}
Now that we have the layout we can start adding in our actual UI. Below is a per widget breakdown of the UI we are going to build.
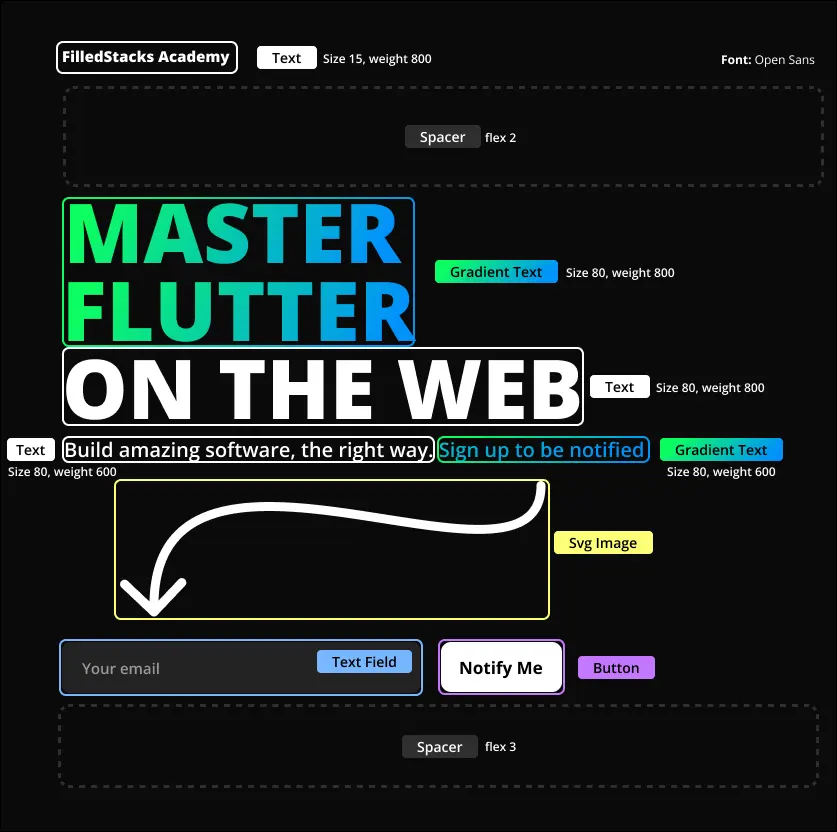
Each rectangle shows a separate widget with its type in the tag next to it. You can copy the below and paste it inside the Column children.
// Academy Icon
const Text(
    'FilledStacks Academy',
    style: TextStyle(
        fontSize: 15,
        fontWeight: FontWeight.w800,
    ),
),

// Space
const Spacer(flex: 2),

// Title
GradientText(
    'MASTER\nFLUTTER',
    style: const TextStyle(
        fontWeight: FontWeight.w800,
        fontSize: 80,
        height: 0.95,
    ),
    colors: const [Color(0xff0CFF60), Color(0xff0091FB)],
    ),
    const Text(
    'ON THE WEB',
    style: TextStyle(
        fontWeight: FontWeight.w800,
        fontSize: 80,
        height: 0.95,
    ),
),

// Subtitle
Row(
    children: [
        const Text(
        'Build amazing software, the right way.',
        style: TextStyle(
            fontWeight: FontWeight.w600,
            fontSize: 20,
        ),
        ),
        GradientText(
        ' Sign up to be notified',
        style: const TextStyle(
            fontWeight: FontWeight.w600,
            fontSize: 20,
        ),
        colors: const [Color(0xff0CFF60), Color(0xff0091FB)],
        )
    ],
),

verticalSpaceMedium,

// Arrow
Padding(
    padding: const EdgeInsets.symmetric(horizontal: 100),
    child: SvgPicture.asset('assets/sign-up-arrow.svg'),
),

verticalSpaceSmall,

Row(
    children: [
        // Input Field
        Container(
            child: const TextField(
                decoration: InputDecoration.collapsed(
                hintText: 'Enter your Email',
                hintStyle: TextStyle(
                    color: Color(0xff989898),
                ),
                filled: true,
                fillColor: Color(0xFF232323),
                ),
            ),
            width: kdDesktopMaxContentWidth * 0.3,
            padding: const EdgeInsets.symmetric(
                horizontal: 20, vertical: 20),
            decoration: BoxDecoration(
                color: const Color(0xFF232323),
                borderRadius: BorderRadius.circular(8),
            ),
        ),

        horizontalSpaceSmall,

        // Notify Button
        Container(
            padding: const EdgeInsets.symmetric(
                horizontal: 20,
                vertical: 16,
            ),
            alignment: Alignment.center,
            decoration: BoxDecoration(
                color: Colors.white,
                borderRadius: BorderRadius.circular(8),
            ),
            child: const Text(
                'Notify Me',
                style: TextStyle(
                    color: Colors.black,
                    fontWeight: FontWeight.w700,
                    fontSize: 20),
            ),
        )
    ],
),

const Spacer(flex: 3)
Now we have to do a few things to get this working.
- Go to
kdDesktopMaxContentWidtherror on the TextField and import the app constants. On the error pressCmd+.orctrl+.and select import option. - Install Simple Gradient Text by running
flutter pub add simple_gradient_textand import. Using tip from #1 - Install Flutter SVG by running
flutter pub add flutter_svgand import. Use tip from #1 - Download this svg file (Open link then save from the browser). Then create a new folder in the root directory called
assetsand put the file in there. - Open up your
pubspec.yamlfile and add the assets folder.
---
flutter:
  # The following line ensures that the Material Icons font is
  # included with your application, so that you can use the icons in
  # the material Icons class.
  uses-material-design: true

  # To add assets to your application, add an assets section, like this:
  assets:
    - assets/
In your terminal run flutter run -d chrome and you’ll see a very ugly web application 😂
UI building in a tutorial is not my favorite, I always try to keep it as compact as I can. Only one more set of UI styling left then we can move on to more fun things like responsive layouts.
UI Styling
We’ll setup all the colors before continuing. Open app_colors.dart, in VS Code press Cmd+p and type app_colors then press enter. We’ll update the file to the following.
import 'package:flutter/material.dart';

const Color kcPrimaryColor = Color(0xFF9600FF);
const Color kcPrimaryColorDark = Color(0xFF300151);
const Color kcBlack = Color(0xff0A0A0A);
const Color kcDarkGreyColor = Color(0xFF1A1B1E);
const Color kcMediumGrey = Color(0xFF232323);
const Color kcLightGrey = Color(0xff989898);
const Color kcVeryLightGrey = Color(0xFFE3E3E3);
const Color kcBackgroundColor = kcBlack;

const List<Color> kgTitle = [kcTitleGradientLeft, kcTitleGradientRight];
const Color kcTitleGradientLeft = Color(0xff0CFF60);
const Color kcTitleGradientRight = Color(0xff0091FB);
I don’t like how verbose the Flutter Theme stuff is so I use constants to store my colors. The convention I use is a k infront, which indicates a constant. In all my code bases I can type k and it’ll pop up all my constants for me. The following letter indicates the constant type. Here’s a few examples.
kc: Colorkg: Gradientkts: TextStylekd: double
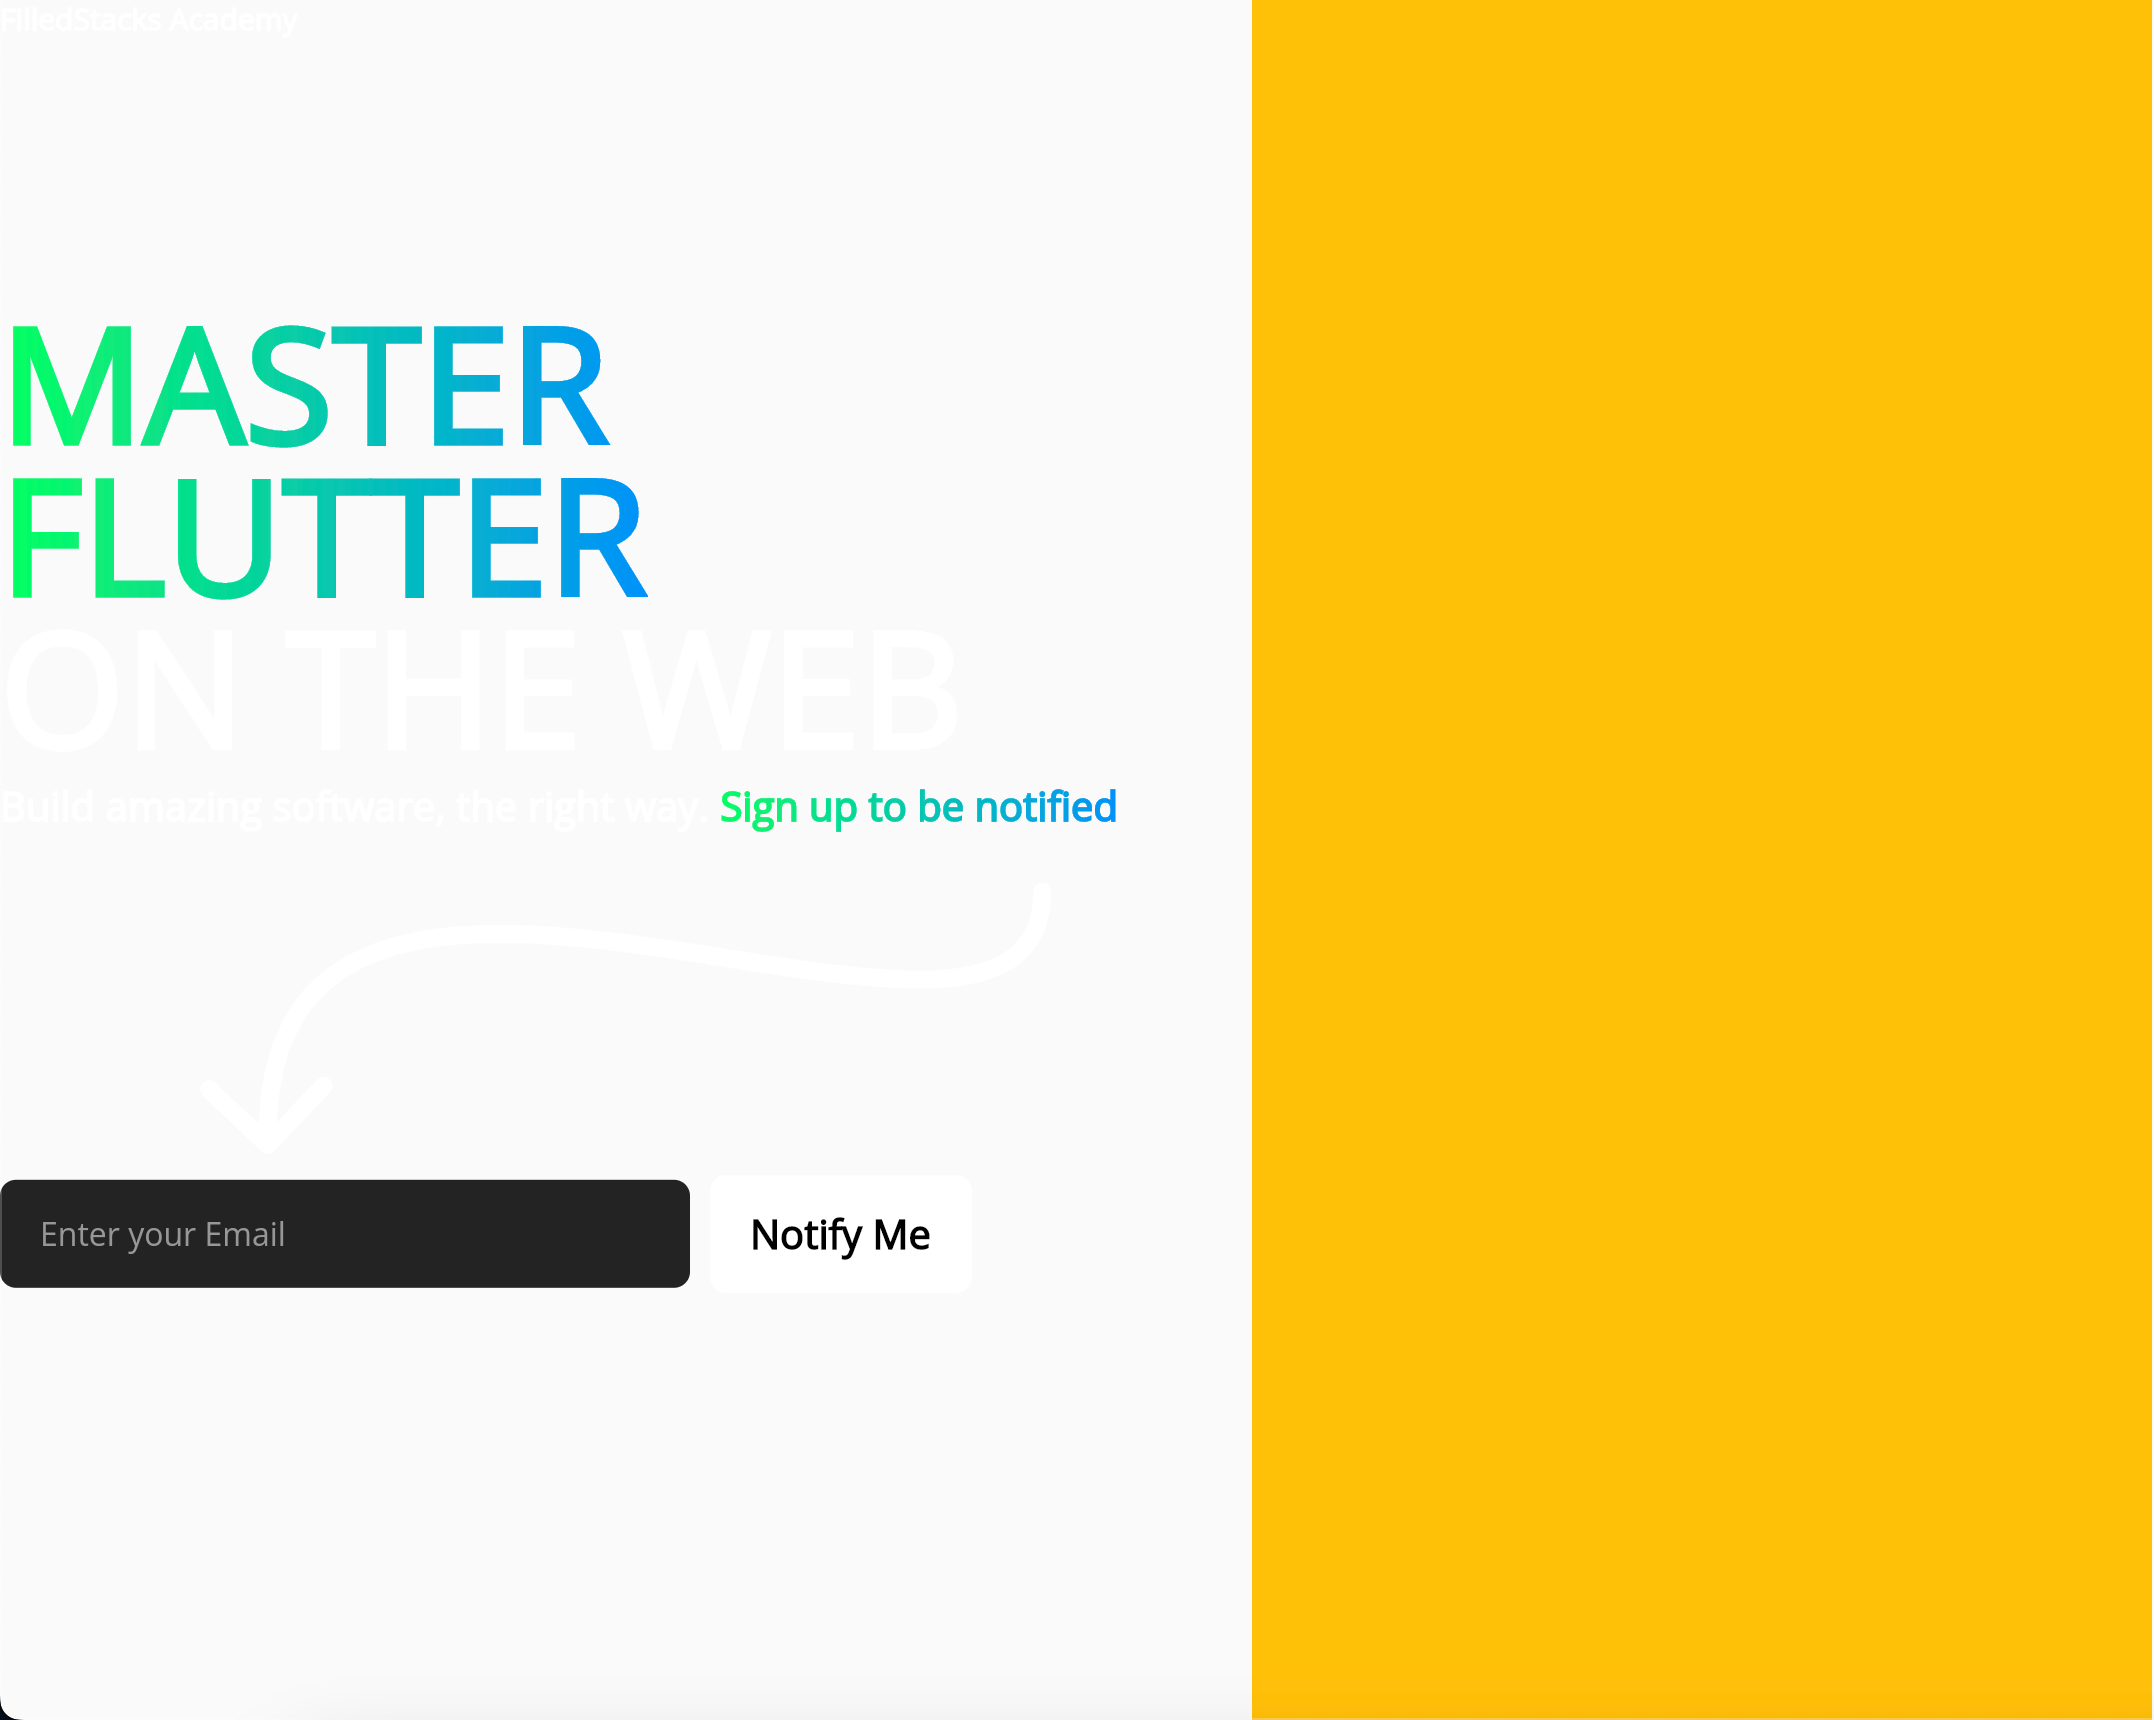
And others I make up as I need them. This makes up a constant like kcLightGrey which translates to “a constant of type color that is Light Grey”. To get the screenshot looking better there’s a only a few things we need to do.
- Set the background color
- Put the content in the center of the view
- Restrict the width of the content
- Use the correct font (OpenSans)
1-3 is done with small updates to the build function.
return Scaffold(
      // #1
      backgroundColor: kcBackgroundColor,
      // #2
      body: Center(
        // #3
        child: SizedBox(
          width: kdDesktopMaxContentWidth,
          height: kdDesktopMaxContentHeight,
          child: Row(
            mainAxisSize: MainAxisSize.max,
            children: [
                ...
            ]
          ),
        ),
      ),
);
As for #4, we’ll start off by adding google fonts.
flutter pub add google_fontsOur first update is the main theme in main.dart. We will set that to openSans and white as default color.
MaterialApp(
    title: 'FilledStacks Academy',
    theme: Theme.of(context).copyWith(
        primaryColor: kcBackgroundColor,
        focusColor: kcPrimaryColor,
        // Use openSansTextTheme
        textTheme: GoogleFonts.openSansTextTheme().apply(
            bodyColor: Colors.white,
        ),
    ),
   ...
);
To keep things organized we want to create a set of shared styles. Create a new file lib/ui/common/shared_styles.dart where we’ll put our shared styling values.
import 'package:flutter/material.dart';
import 'package:google_fonts/google_fonts.dart';

TextStyle get ktsTitleText => GoogleFonts.openSans(
      fontSize: 80,
      height: 0.95,
      fontWeight: FontWeight.w800,
    );

TextStyle get ktsBodyRegular => GoogleFonts.openSans(
      fontSize: 15,
    );

TextStyle get ktsBodyLarge => GoogleFonts.openSans(
      fontSize: 20,
    );
Now We can replace the style we supplied earlier with the ones we just created. Your code should look like below.
// Academy Icon
Text(
    'FilledStacks Academy',
    style: ktsBodyRegular.copyWith(fontWeight: FontWeight.w800),
),

// Title
GradientText(
    'MASTER\nFLUTTER',
    style: ktsTitleText,
    colors: const [Color(0xff0CFF60), Color(0xff0091FB)],
),
Text(
    'ON THE WEB',
    style: ktsTitleText,
),

 // Subtitle
Row(
    children: [
        Text(
        'Build amazing software, the right way.',
        style:
            ktsBodyLarge.copyWith(fontWeight: FontWeight.w600),
        ),
        GradientText(
        ' Sign up to be notified',
        style:
            ktsBodyLarge.copyWith(fontWeight: FontWeight.w600),
        colors: const [Color(0xff0CFF60), Color(0xff0091FB)],
        )
    ],
),
And that concludes the styling portion. Last bit of UI to complete is adding the image. We can replace the yellow container with
ClipRRect(
    borderRadius: BorderRadius.circular(20),
    child: Image.asset(
        'assets/master-web-hero-image.png',
        width: kdDesktopMaxContentWidth * 0.4,
        height: double.infinity,
        fit: BoxFit.cover,
    ),
)
Download the hero image and place it in the assets folder where the arrow is. Now when you run the app you should see a UI matching our original design. Easy Peasy! Let’s move on.
Responsive UI
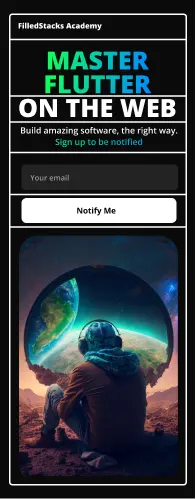
Here is the design for the mobile UI

As you can see the widgets are the same, but in a different layout. So we’ll start off by refactoring each of the widgets we added into its own file so we can re-use it. We’ll create a new folder at lib/ui/view/home/ called widgets. I store all my widgets that are only used in single views in a folder called widgets so its easy to know its scope and where it will be used.
Home View Only Widgets
The first widgets we’ll refactor out are the ones that will only be used in the HomeView for now. Starting with the title, create a new file home_title.dart.
class HomeTitle extends StatelessWidget {
  const HomeTitle({Key? key}) : super(key: key);

  @override
  Widget build(BuildContext context) {
    return Column(
      crossAxisAlignment: CrossAxisAlignment.start,
      children: [
        GradientText(
          'MASTER\nFLUTTER',
          style: ktsTitleText,
          colors: const [Color(0xff0CFF60), Color(0xff0091FB)],
        ),
        Text(
          'ON THE WEB',
          style: ktsTitleText,
        ),
      ],
    );
  }
}
Then we’ll move the subtitle into its own file called home_subtitle.dart
class HomeSubtitle extends StatelessWidget {
  const HomeSubtitle({Key? key}) : super(key: key);

  @override
  Widget build(BuildContext context) {
    return Row(
      children: [
        Text(
          'Build amazing software, the right way.',
          style: ktsBodyLarge.copyWith(fontWeight: FontWeight.w600),
        ),
        GradientText(
          ' Sign up to be notified',
          style: ktsBodyLarge.copyWith(fontWeight: FontWeight.w600),
          colors: const [Color(0xff0CFF60), Color(0xff0091FB)],
        )
      ],
    );
  }
}
Next up is home_notify_button.dart
class HomeNotifyButton extends StatelessWidget {
  final Function()? onTap;
  const HomeNotifyButton({Key? key, this.onTap}) : super(key: key);

  @override
  Widget build(BuildContext context) {
    // We're adding a Gesture detector now so we don't need to later
    return GestureDetector(
      onTap: onTap,
      child: Container(
        padding: const EdgeInsets.symmetric(
          horizontal: 20,
          vertical: 16,
        ),
        alignment: Alignment.center,
        decoration: BoxDecoration(
          color: Colors.white,
          borderRadius: BorderRadius.circular(8),
        ),
        child: const Text(
          'Notify Me',
          style: TextStyle(
              color: Colors.black, fontWeight: FontWeight.w700, fontSize: 20),
        ),
      ),
    );
  }
}
Last in line is the image widget. Create a file called home_image.dart and put the following code in there.
class HomeImage extends StatelessWidget {
  const HomeImage({Key? key}) : super(key: key);

  @override
  Widget build(BuildContext context) {
    return ClipRRect(
      borderRadius: BorderRadius.circular(20),
      child: Image.asset(
        'assets/master-web-hero-image.png',
        width: kdDesktopMaxContentWidth * 0.4,
        height: double.infinity,
        fit: BoxFit.cover,
      ),
    );
  }
}
Common Widgets
The last set of widgets are widgets that will be used throughout the app and not only in the home view. These widgets go to lib/ui/widgets/common/. The first one is academy_icon.dart.
class AcademyIcon extends StatelessWidget {
  const AcademyIcon({Key? key}) : super(key: key);

  @override
  Widget build(BuildContext context) {
    return Text(
      'FilledStacks Academy',
      style: ktsBodyRegular.copyWith(fontWeight: FontWeight.w800),
    );
  }
}
And the last one is our input_field.dart
class InputField extends StatelessWidget {
  final TextEditingController? controller; // This is extra, but we'll need it very shortly
  const InputField({Key? key, this.controller}) : super(key: key);

  @override
  Widget build(BuildContext context) {
    return Container(
      child: TextField(
        controller: controller,
        decoration: const InputDecoration.collapsed(
          hintText: 'Enter your Email',
          hintStyle: TextStyle(
            color: Color(0xff989898),
          ),
          filled: true,
          fillColor: Color(0xFF232323),
        ),
      ),
      width: kdDesktopMaxContentWidth * 0.3,
      padding: const EdgeInsets.symmetric(horizontal: 20, vertical: 20),
      decoration: BoxDecoration(
        color: const Color(0xFF232323),
        borderRadius: BorderRadius.circular(8),
      ),
    );
  }
}
This should leave home_view.desktop.dart looking much neater 👌
Row(
    mainAxisSize: MainAxisSize.max,
    children: [
        Column(
        crossAxisAlignment: CrossAxisAlignment.start,
        children: [
            const AcademyIcon(),
            const Spacer(flex: 2),
            const HomeTitle(),
            const HomeSubtitle(),

            // Arrow
            verticalSpaceMedium,
            Padding(
                padding: const EdgeInsets.symmetric(horizontal: 100),
                child: SvgPicture.asset('assets/sign-up-arrow.svg'),
            ),
            verticalSpaceSmall,

            Row(
                children: const [
                    InputField(),
                    horizontalSpaceSmall,
                    HomeNotifyButton()
                ],
            ),
            const Spacer(flex: 3)
        ],
        ),
        const HomeImage()
    ],
),
Responsive UI
Now that the widgets are all refactored they’re ready for re-use on the mobile UI. Looking at this design we see that it’s now a single Column.
We can open home_view.mobile.dart and Organize the widgets in the order they show up in the design.
class HomeViewMobile extends ViewModelWidget<HomeViewModel> {
  const HomeViewMobile({super.key});

  @override
  Widget build(BuildContext context, HomeViewModel viewModel) {
    return Scaffold(
        backgroundColor: kcBackgroundColor,
        body: ListView(
          padding: const EdgeInsets.symmetric(
            horizontal: 40,
            vertical: 50,
          ),
          children: const [
            AcademyIcon(),
            verticalSpaceLarge,
            HomeTitle(),
            verticalSpaceTiny,
            HomeSubtitle(),
            verticalSpaceLarge,
            InputField(),
            verticalSpaceMedium,
            HomeNotifyButton(),
            verticalSpaceMedium,
            HomeImage(),
          ],
        ));
  }
}
Since we want the view to scroll, instead of using a column, we’ll use a ListView. If you run this you’ll see that the UI doesn’t build. This is because HomeImage sets its height:double.infinity which means it’s infinite in the list scroll direction. So we can go in and make a modification.
Widget Level Responsiveness
This is our first encounter with widget level responsiveness. What we’ll do is return 650 on mobile and infinity for desktop. We’ll do this by using a helper function getValueForScreenType from the responsive_builder package which allows you to return a value based on the screen type.
class HomeImage extends StatelessWidget {
  const HomeImage({Key? key}) : super(key: key);

  @override
  Widget build(BuildContext context) {
    return ClipRRect(
      borderRadius: BorderRadius.circular(20),
      child: Image.asset(
        'assets/master-web-hero-image.png',
        width: kdDesktopMaxContentWidth * 0.4,
        // Return 650 for mobile and double.infinity on desktop
        height: getValueForScreenType<double>(
          context: context,
          mobile: 650,
          desktop: double.infinity,
        ),
        fit: BoxFit.cover,
      ),
    );
  }
}
If you’re running the app make your browser window as small as it can go and you’ll see the UI now looks like this.
Only 3 widget responsive changes required and this UI will be ready.
- Reduce title size on mobile to avoid wrapping
- On Mobile use a
Columnfor the subtitle instead of aRow - Title should center the items instead of left align
Reduce title size on Mobile
This we can fix simply by using fontSize 60 on mobile and 80 on desktop for the title.
class HomeTitle extends StatelessWidget {
  const HomeTitle({Key? key}) : super(key: key);

  @override
  Widget build(BuildContext context) {
    return Column(
      crossAxisAlignment: CrossAxisAlignment.start,
      children: [
        GradientText(
          'MASTER\nFLUTTER',
          // Use 60 for mobile and 80 for desktop <====== #1
          style: ktsTitleText.copyWith(
            fontSize: getValueForScreenType<double>(
              context: context,
              mobile: 60,
              desktop: 80,
            ),
          ),
          colors: const [Color(0xff0CFF60), Color(0xff0091FB)],
        ),
        Text(
          'ON THE WEB',
          // Use 60 for mobile and 80 for desktop <====== #1
          style: ktsTitleText.copyWith(
            fontSize: getValueForScreenType<double>(
              context: context,
              mobile: 60,
              desktop: 80,
            ),
          ),
        ),
      ],
    );
  }
}
Use Column on Mobile and Row on Desktop
Open the home_subtitle.dart file. All the changes below will be in its build function. With this requirement, it’s also pretty simple to solve with the responsive builder. We know the children should be exactly the same so we can store them in a list.
final children = [
    Text(
        'Build amazing software, the right way.',
        style: ktsBodyLarge.copyWith(fontWeight: FontWeight.w600),
    ),
    GradientText(
        ' Sign up to be notified',
        style: ktsBodyLarge.copyWith(fontWeight: FontWeight.w600),
        colors: const [Color(0xff0CFF60), Color(0xff0091FB)],
    )
];
And to return a different layout for mobile and desktop we use the same ScreenTypeLayout.builder.
return ScreenTypeLayout.builder(
    mobile: (_) => Column(children: children),
    desktop: (_) => Row(children: children),
);
Center align children in the Title
Update the crossAxisAlignment to return .start on desktop and .center on mobile.
class HomeTitle extends StatelessWidget {
  const HomeTitle({Key? key}) : super(key: key);

  @override
  Widget build(BuildContext context) {
    return Column(
      crossAxisAlignment: getValueForScreenType<CrossAxisAlignment>(
        context: context,
        mobile: CrossAxisAlignment.center,
        desktop: CrossAxisAlignment.start,
      ),
      children: [
        ...
      ]
    );
  }
}
And that’s literally how easy it is to do responsive UI, down to a per widget level using the responsive_builer package.
The last thing to do is ensure that the tablet layout shows the desktop layout. Run the app flutter run -d chrome and if you change width of your browser between desktop and mobile you’ll see it uses the old tablet layout on the way to mobile. To fix this we can open home_view.dart and remove the tablet builder.
class HomeView extends StackedView<HomeViewModel> {
  const HomeView({super.key});

  @override
  Widget builder(
    BuildContext context,
    HomeViewModel viewModel,
    Widget? child,
  ) {
    return ScreenTypeLayout.builder(
      mobile: (_) => const HomeViewMobile(),
      // <====== No more Tablet builder
      desktop: (_) => const HomeViewDesktop(),
    );
  }
  ...
}
By default responsive_builder prefers the mobile layout so things will look weird as you resize your window from desktop to mobile. To ask responsive_builder to prefer the desktop when no other layout is supplied, all we do is open up main.dart and pass preferDesktop:true. Now you’ll see as you resize your UI you’ll stay on desktop, even when it hits tablet size, then only swaps to mobile when you reach that point.
Basics of Forms
We have a text field but we haven’t hooked it up to anything. I want to give you a quick overview of how awesome forms work in Stacked:
- Tell Stacked which text values you’ll be capturing
- Extend the generated Form Mixin
- Enable two way binding. This syncs the typed value to the ViewModel automatically 🔥
- Use the values in your
ViewModellike a inherited property.
Let’s implement a form to get the users email quickly. Open home_view.dart where we’ll add our form functionality.
// #1: Tell Stacked which text values you'll be capturing
@FormView(fields: [FormTextField(name: 'email')])
class HomeView extends StackedView<HomeViewModel>
    with $HomeView { // #2: Extend the generated form mixin

    ...
    @override
    void onViewModelReady(HomeViewModel viewModel) {
        // #3: Enable two way binding
        syncFormWithViewModel(viewModel);
    }
}
When you’re done with this run stacked generate and you’ll see a new file home_view.form.dart generated. This is where all the form code is stored. You can import that file and you should see most of the errors go away. The last thing to do is update the ViewModel, we do this by:
- Extending from a FormViewModel
- Using the email value as mentioned in #4 above.
Open home_viewmodel.dart, you can replace the code with the following.
// #1: Extend from the FormViewModel
class HomeViewModel extends FormViewModel {
  final _dialogService = locator<DialogService>();

  void captureEmail() {
    _dialogService.showCustomDialog(
      variant: DialogType.infoAlert,
      title: 'Thanks for Signing Up',
      // #2: Use emailValue like a normal property
      description: 'Check in $emailValue for a verification email',
    );
  }
}
That’s it for the form setup. The next thing to do is to wire the form into the UI. In Flutter a TextField or FormField requires a TextEditingController to keep track of what a user has entered. We have to set the controller where we use our InputField widget. This means a few updates to get it to the InputField widget.
- Pass the controller to the Desktop and Mobile Layouts
- Update desktop and mobile layouts to accept controller
- Pass the controller to the Input Field in those layouts
- Call the capture email function when the NotifyButton is tapped
Pass controller to Desktop and Mobile Layouts
Open home_view.dart where we can now pass the emailController to the two layouts.
@FormView(fields: [FormTextField(name: 'email')])
class HomeView extends StackedView<HomeViewModel> with $HomeView {
  HomeView({super.key});

  @override
  Widget builder(
    BuildContext context,
    HomeViewModel viewModel,
    Widget? child,
  ) {
    return ScreenTypeLayout.builder(
      mobile: (_) => HomeViewMobile(controller: emailController), // #1
      desktop: (_) => HomeViewDesktop(controller: emailController), // #1
    );
  }

  ...
}
Then we need to update the layout widgets to accept the TextEditingController and pass it to the InputField widget.
// #2: Update desktop and mobile layouts to accept controller
class HomeViewDesktop extends ViewModelWidget<HomeViewModel> {
  final TextEditingController? controller;
  const HomeViewDesktop({super.key, this.controller});

   @override
  Widget build(BuildContext context, HomeViewModel viewModel) {
    return Scaffold(
      body: Center(
        child: SizedBox(
          child: Row(
            children: [
              Column(
                children: [
                  ...
                  Row(
                    children: [
                      // #3: Pass controller to input field
                      InputField(controller: controller),
                      ...
                    ],
                  ),
                ],
              ),
            ],
          ),
        ),
      ),
    );
  }
}
// #2: Pass the controller to the Mobile layout
class HomeViewMobile extends ViewModelWidget<HomeViewModel> {
  final TextEditingController? controller;
  const HomeViewMobile({super.key, this.controller});

  @override
  Widget build(BuildContext context, HomeViewModel viewModel) {
    return Scaffold(

        body: ListView(
          children: [
            ...
            // #3: Pass controller to input field
            InputField(controller: controller),
            ...
          ],
        ),
    );
  }
}
And the last thing to do is to call the captureEmail function when the NotifyButton is tapped. Update your Mobile and Desktop layout to the following where you use the NotifyButton.
...
HomeNotifyButton(onTap: viewModel.captureEmail),
...
Then what we’ll do is run stacked generate to update the generated code to the latest, then run the app again using flutter run -d chrome. Now type in an email or anything really, then tap the “Notify Me” button. You should see a dialog pop up with the value that you typed in like below.
Bonus UI
The mouse cursor doesn’t change when you hover over a button. To fix this simply add .showCursorOnHover at the end of your NotifyButton code in the widget.
class HomeNotifyButton extends StatelessWidget {
  final Function()? onTap;
  const HomeNotifyButton({Key? key, this.onTap}) : super(key: key);

  @override
  Widget build(BuildContext context) {
    return GestureDetector(
      onTap: onTap,
      child: Container(
       ...
      ),
    ).showCursorOnHover; // <===== Hover extension
  }
}
Stacked has a few extensions you can checkout in lib/extensions/hover_extensions.dart
Deploy to Firebase
And the last thing to do is to deploy to firebase. This has become so much easier than it use to be. If you have the firebase tools installed do:
- Run
firebase init - Select
Hosting: Configure files for Firebaseoption. - Select existing or create a new project
- Set your public directory as
build/web - Reply
Yesto single page app question
And that’s it. Now we run flutter build web then firebase deploy --only hosting and you’re done 🚀 The video is coming soon, make sure to subscribe on YouTube.

