Ever wondered how you would build those super fancy animations that you see on design sites. Well this is definitely one way.
When it comes to animations in Flutter I would say it’s one of the sections where it lacks sophistication (in my opinion). There’s a few things you have to do to perform basic animations in Flutter.
You have to extend your state class with a TickerProviderStateMixin. You need to keep track of your AnimationController as well as your Animation (not saying it’s bad, but it’s also not great). This produces quite a bit of boilerplate code (as you see this code for a simple transform animation). Lets instead take a different approach using Flare from 2Dimensions and smart gesture recognition. This is an experiment to improve on general animation code and I would love to hear your feedback.
I won’t be covering the building of the actual animation in this tutorial just using it and managing the states and interactions with it in code. If you want me to share how I built the animation please leave a response letting me know and that will be my next tutorial.
If you’d like to follow along you can clone the code, open the flutter-flare folder and drag the start folder into Visual Code and you’re ready to go.
Setting up everything
Let’s start by adding in the package and getting our animation file into the project.
Add flutter_flare: Go to your pubspec.yaml file and under the cupertino_icons import add flare_flutter: any . Perform a packages get, saving the file will also do this.
Add our asset: The animation file is already exported and in the repo under the assets folder. All you have to do is add it to the pubspec. Head over to pubspec, uncomment the assets section and add in the animation file. It should look like this.
  ...

  # The following adds the Cupertino Icons font to your application.
  # Use with the CupertinoIcons class for iOS style icons.
  cupertino_icons: ^0.1.2
  flare_flutter: any

  ...
  ...

  flutter:
  # The following line ensures that the Material Icons font is
  # included with your application, so that you can use the icons in
  # the material Icons class.
  uses-material-design: true
  # To add assets to your application, add an assets section, like this:
  assets:
    - button-animation.flr

  ...
And that’s all we need for setting up. Make sure your indentation is correct in the yaml file if there’s any errors. Lets see just how much better this will be for managing animations in Flutter.
Using animations
Go to the flare_demo.dart file. Here we will import our FlareActor which will play our animation. Replace the Center and the Text widget with a FlareActor and give it the complete path to the button-animation.flr file.
import 'package:flare_flutter/flare_actor.dart';

...

@override
Widget build(BuildContext context) {
  return Scaffold(
    backgroundColor: Colors.purple,
    body:  FlareActor('assets/button-animation.flr')
  );
}
Now you should be seeing the image below. The animation file will be loaded in the state it’s in on the design tab in Flare. It’s a bit big, but we’ll take care of that soon.
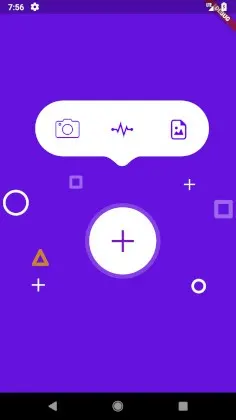
The animation is not playing because we haven’t specified our animation yet. There are five animations in our animation file, but we’re only concerned with two for now.
activate: This will rotate the button a bit and push out the actions toolbar
deactivate: This will rotate the button back and shrink the actions toolbar
After your asset file name parameter add animation: ‘activate’. It should look like this.
FlareActor('assets/button-animation.flr', animation: 'activate')When you save your code you should see the activate animation play. How cool is that! Now … How do we get it to play the other animation?
That’s also not as difficult as you might think. Our FlareDemo class is a stateful widget so we can manage state internally and react accordingly. To add this functionality we’ll need a value to tell us what state we’re in. A boolean isOpen should do, and we’ll have to swap the animation key out based on that value.
Change your _FlareDemoState class to look like this.
class _FlareDemoState extends State<FlareDemo> {
  bool isOpen = false;

  @override
  Widget build(BuildContext context) {
    return Scaffold(
        backgroundColor: Colors.purple,
        body: Center(
          child:
              FlareActor(
                'assets/button-animation.flr',
                animation: isOpen ? 'activate' : 'deactivate'),
        ));
  }
}
Now the only thing left to do is to wrap our FlareActor in a gesture detector and change our state in the onTap functionality.
 @override
  Widget build(BuildContext context) {
    return Scaffold(
        backgroundColor: Colors.purple,
        body: GestureDetector(
            onTap: () {
              setState(() {
                isOpen = !isOpen;
              });
            },
            child: FlareActor('assets/button-animation.flr',
                animation: isOpen ? 'activate' : 'deactivate')));
  }
Whooo hoooooo! How cool is that. If you tap it now you’ll see the animation play in and out. Definitely much less than building all of that in code :) Much much less code.
But that can’t be all Dane. You’re right, there’s one BIG question relating to combining large pieces of UI animations together.
How will I differentiate between the buttons on the toolbar tapped and the close button tapped? I’m glad you asked.
Interacting with multiple areas in a single animation
This is where things get interesting. What we’ll do here is use the tap details provided by the GestureDetector’s onTapUp function. This callback provides us with the global touch position. We’ll use this touch information to calculate where the tap was performed on the Flare widget. Then based on that position we will perform the actions we want.
Lets look at what we want to happen so we can have our calculations right before diving in.
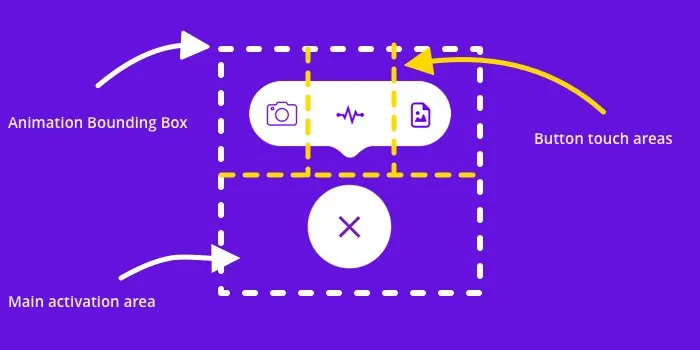
We will define an area that represents a certain action, when this area is touched we play our dedicated animation. To do this we require the localPosition, meaning the position that the touch occurred relative to the Animation widget, not the entire screen.
To determine the local position in Flutter we need to use the RenderObject. The RenderObject can be retrieved through the context. The way our code is written currently the RenderObject always represents the entire screen area which means our globalTouchPosition will be equal to our localTouchPosition.
To fix this we’ll move our FlareActor and GestureDetector into a container in it’s own widget so that our RenderObject is tightly wrapped around our animation. This will give us a more accurate RenderBox to work with.
Let’s do some refactoring first
Create a new file called smartflare_animation.dart and move the GestureDetector and FlareActor in there. We’ll wrap it with a Container and give it a fixed height equal to the artboard that we used (_If your artboard is larger than the screen size then scale down accordingly).
import 'package:flutter/material.dart';
import 'package:flare_flutter/flare_actor.dart';

class SmartFlareAnimation extends StatefulWidget {
  _SmartFlareAnimationState createState() => _SmartFlareAnimationState();
}

class _SmartFlareAnimationState extends State<SmartFlareAnimation> {
  // width and height retrieved from the artboard values in the animation
  static const double AnimationWidth = 295.0;
  static const double AnimationHeight = 251.0;

  bool isOpen = false;

  @override
  Widget build(BuildContext context) {
    return Container(
      width: AnimationWidth,
      height: AnimationHeight,
      child: GestureDetector(
          onTap: () {
            setState(() {
              isOpen = !isOpen;
            });
          },
          child: FlareActor('assets/button-animation.flr',
              animation: isOpen ? 'activate' : 'deactivate')),
    );
  }
}
Now you should see a less enlarged version of the animation. Next we’ll adjust our FlareDemo file. We’ll import our smart flare animation and replace the old code with that new widget. At this point you’ll see your animation at the top of the screen. We want it at the bottom. We’ll fix that by wrapping the SmartFlareAnimation in an Align widget and placing it at the bottomCenter of the screen.
import 'package:flare_tutorial/smart_flare_animation.dart';

...

class _FlareDemoState extends State<FlareDemo> {
  @override
  Widget build(BuildContext context) {
    return Scaffold(
        backgroundColor: Colors.purple,
        body: Align(
          alignment: Alignment.bottomCenter,
          child: SmartFlareAnimation()));
  }
}
Refactors done! Now onto the juicy parts.
Where did I touch my animation?
The way we’ll calculate which area of the animation was touched is by using some simple if statements within our GestureDetector. Since we’re on mobile and finger sizes matter for accuracy we’ll do general areas instead of very precise ones.
First we need to get our touch positions. For this we’ll change onTap to onTapUp and add our parameter tapInfo into the callback. TapInfo will give us the global tap position. We’ll convert that to local first and perform our operations using the new position.
Remember what I said about RenderObjects above. We have to do that now. We’ll get the renderObject of our widget and use the global position provided by the tap info to convert to a local position.
var localTouchPosition =
              (context.findRenderObject() as RenderBox).globalToLocal(tapInfo.globalPosition);
Now that we have our position we can calculate the area’s that are touched. Here’s the things we want to know.
Did I touch the top or bottom half? Did I touch the left-side, middle-side or right-side of the screen? Here’s how that would look in code.
var topHalfTouched = localTouchPosition.dy < AnimationHeight / 2;

var leftSideTouched = localTouchPosition.dx < AnimationWidth / 3;

var rightSideTouched = localTouchPosition.dx > (AnimationWidth / 3) * 2;

var middleTouched = !leftSideTouched && !rightSideTouched;
To put it all together we’ll add our conditionals and print out some logs. Below you’ll see the full view of the final onTapUp callback.
onTapUp: (tapInfo) {
  var localTouchPosition =
  (context.findRenderObject() as RenderBox).globalToLocal(tapInfo.globalPosition);

  var topHalfTouched = localTouchPosition.dy < AnimationHeight / 2;

  var leftSideTouched = localTouchPosition.dx < AnimationWidth / 3;

  var rightSideTouched = localTouchPosition.dx > (AnimationWidth / 3) * 2;

  var middleTouched = !leftSideTouched && !rightSideTouched;

  if (leftSideTouched && topHalfTouched) {
    print('TopLeft');
  } else if (middleTouched && topHalfTouched) {
    print('TopMiddle');
  } else if (rightSideTouched && topHalfTouched) {
    print('TopRight');
  } else {
    if (isOpen) {
      print('Bottom Close');
    } else {
      print('Bottom Open');
    }

    isOpen = !isOpen;
  }
}
Run your code. When you tap the certain areas you should see the logs printing in your code. Pretty cool right? This means you can build highly animated UI components and still get the interaction functionality.
It could become quite large, but it’s manageable. A few if statements in one place is much easier to handle and maintain than multiple animation controllers and syncing events across different widgets (especially if they have to be updated later on). At least for me it is. Whispers I’m also building a package to help with this.
Let’s Play some animations
Last step is to trigger our animations that we want to play for those interactions. We need something with more options than a boolean so we’ll add an enum called AnimationToPlay and give it 5 values.
enum AnimationToPlay {
  Activate,
  Deactivate,
  CameraTapped,
  PulseTapped,
  ImageTapped
}
We’ll add a new member to our SmartFlareAnimation state and set it’s starting value to Deactivate. We’ll also create a new method called setAnimationToPlay that will take in our animation enum and call setState with it. Additionally we’ll add one final method to return our animation name based on enum state.
AnimationToPlay _animationToPlay = AnimationToPlay.Deactivate;


String _getAnimationName(AnimationToPlay animationToPlay) {
  switch (animationToPlay) {
    case AnimationToPlay.Activate:
      return 'activate';
    case AnimationToPlay.Deactivate:
      return 'deactivate';
    case AnimationToPlay.CameraTapped:
      return 'camera_tapped';
    case AnimationToPlay.PulseTapped:
      return 'pulse_tapped';
    case AnimationToPlay.ImageTapped:
      return 'image_tapped';
      break;
    default:
      return 'deactivate';
  }
}

void _setAnimationToPlay(AnimationToPlay animation) {
  setState(() {
    _animationToPlay = animation;
  });
}
Last thing we need to do is replace our print statements with a call to _setAnimationToPlay, and also replace our animation parameter for the FlareActor with _getAnimationName
// Call our animation in our conditional checks
if (leftSideTouched && topHalfTouched) {
  _setAnimationToPlay(AnimationToPlay.CameraTapped);
} else if (middleTouched && topHalfTouched) {
  _setAnimationToPlay(AnimationToPlay.PulseTapped);
} else if (rightSideTouched && topHalfTouched) {
  _setAnimationToPlay(AnimationToPlay.ImageTapped);
} else {
  if (isOpen) {
    _setAnimationToPlay(AnimationToPlay.Deactivate);
  } else {
    _setAnimationToPlay(AnimationToPlay.Activate);
  }

  isOpen = !isOpen;
}

...

// Update our FlareActor animation property
 FlareActor(
  'assets/button-animation.flr',
  animation: _getAnimationName(_animationToPlay)
)
And if all my steps are correct then tapping those top items should give you some feedback :) I don’t know about you but I find this very cool, especially since I like to build animated applications. This is not all though, we still have 2 small things to take care of.
Adding the final touches
- You can’t replay the same animation immediately after it’s been played. So tapping the same toolbar icon will only play once[Solved on Stackoverflow]
- You can play the toolbar animations even when it’s closed. Tapping the top area of the animation opens it up and messes up the state.
For the first one we’ll make a small adjustment to our SmartFlareAnimation. We’ll start using FlareControls to play our animation. What this means is that we won’t rely on changing the animation name to get it to run, we will actually play the animation we want.
Replace the animation parameter with the ‘deactivate’ string, create new FlareControls and give it to our actor and then call our controls to play the animation instead of updating the state.
import 'package:flare_flutter/flare_controls.dart';

...

// create our flare controls
final FlareControls animationControls = FlareControls();

// Update our FlareActor
FlareActor('assets/button-animation.flr',
    controller: animationControls,
    animation: 'deactivate')

  ...

  // Update _setAnimationToPlay to
  void _setAnimationToPlay(AnimationToPlay animation) {
      animationControls.play(_getAnimationName(animation));
  }
Now you should be able to tap the same toolbar action over and over and it should play the animation.
For the second problem this will be unique to every animation and it’s states. In this case we don’t want to play the tapped animations if the last played animation is Deactivate. In our _setAnimationToPlay function we will check these conditions and stop the function if necessary.
We’ll add our new member _lastPlayedAnimation, set that at the end of our function and then add our checks at the beginning.
// Add our lastPlayed member
AnimationToPlay _lastPlayedAnimation;

...

// update our _setAnimationToPlay function
void _setAnimationToPlay(AnimationToPlay animation) {
    var isTappedAnimation = _getAnimationName(animation).contains("_tapped");
    // We don't want to play the tapped animation if the last played one was deactivate
    if (isTappedAnimation && _lastPlayedAnimation == AnimationToPlay.Deactivate) {
      return;
    }

    animationControls.play(_getAnimationName(animation));

    // remember our last played animation
    _lastPlayedAnimation = animation;
}
And that’s it. You can do some cleanup if needed, the _animationToPlay value is not needed anymore so that can be removed
If you received any value from this please give me some claps, it helps me gauge if the content is useful. I will be posting tutorials experimenting and breaking down things like this every week so please follow me.
Video tutorials come out about 3–5 days after written on YouTube so give me a follow there to get a deeper insight into the tutorial.
I am building a package that will help reduce the amount of code for this functionality, It’s almost ready I’m just sorting out a few quirks, but please follow me for update.