Today we’ll talk about Firebase Remote Config. This is a tool that can be used to allow for remote configuration of your application. On thing to keep in mind. Remote Config is NOT REAL-TIME. It has a default caching time of 12 hours, meaning for 12 hours it’ll use the local values and only once that time is expired will it get the new values and apply them locally. This is a tool used for things like A/B testing, conditional rollouts and partial feature releases. If these are not in your priority list then this is probably not the tool for you.
With that out of the way lets get started.
What is Remote Config
As mentioned above, and apparent from the name it’s a configuration tool for your mobile app. Imagine shipping your app and wanting to change the banner that’s shown on your home screen soon after it’s shipped. You’d have to update the code, change the url, push a new build to the stores. If you’re a bit smarter that banner would have come from an your backend and you can most likely change it in your db. But what if you don’t have one? Remote config makes that process easier. You store data as key-value pairs and then you reference them in your code. These values all have conditions attached to them to allow for specific configurations on a bunch of axis.
How is it used
The first thing we always want to do is supply default values. That we’ll do when the app starts up. Then we have the process of getting the new values and applying them to the applications. Lets go over some basic remote config terminology that will make the rest of the tutorial easier to understand.
-
Fetch Values: This a function that will fetch values from the remote config. If you perform a fetch and the cache hasn’t expired the cached values will be returned. The default time for cache expiry is 12 hours. Which means if the user starts your app at 1pm and you change your remote values at 2pm they won’t see it even if you restart the app and get it again. You can use a duration 0 for making sure it fetches from the remote config immediately but that can cause throttling issues since this is not a real time solution. The firestore DB is a better fit for that if you want real-time solutions.
-
Apply Fetched: After you call fetch values and they have been updated they sit in a separate location alongside your current config values. When you call apply fetched it then copies the new values over the remote config values making them available to read. This simple functionality allows for us to have multiple ways of handling remote config updates as you’ll see below.
There are three main ways of implementing a remote config flow.
-
Fetch, Activate and Update: You launch your application. Fetch the new values. In the completion handler of the fetch you activate those values and then send a notification or something out to the UI to rebuild everything using the new values. The main downfall of this is that the app UI might change while the user is using it. the benefit of this is that it happens in the background with no waiting time on the user.
-
Show a loading indicator while fetching: In this case we show a loading indicator when the app starts up, load the remote config and then run the app once we have the updated remote config or the request failed. This is the way we’ll be doing ours since we already have a startup view that performs logic to check if we’re logged in or not. The downfall here is that it will extend the time the user has to wait before using the app.
-
Load values for next time: With this method you fetch the values but apply it the next time the app starts up. You active fetched values when the app starts to apply the values fetched in the previous session. This is almost instant so you’ll have the latest values if there were any. Then you kick of a fetchCall and let it run without doing anything when those values comes back. This means that the user will have the experience they were supposed to have for the current session and on the next session they’ll have an updated app with the remote config values.
Implementation
In this part of the tutorial we will be using the code from the previous Dynamic Link tutorial. You can download the code here and follow along or add it into your own code base. This episode is part of a series of firebase tutorials that covers the basics of integrating Firebase into Flutter with production principles in mind.
Adding Remote Config Value
We’ll start by adding a remote config value so the code we write makes more sense. Open up the firebase console and go to your project. In the side panel scroll down to the Grow section and open up remote config. When loaded you’ll see an empty container like below.
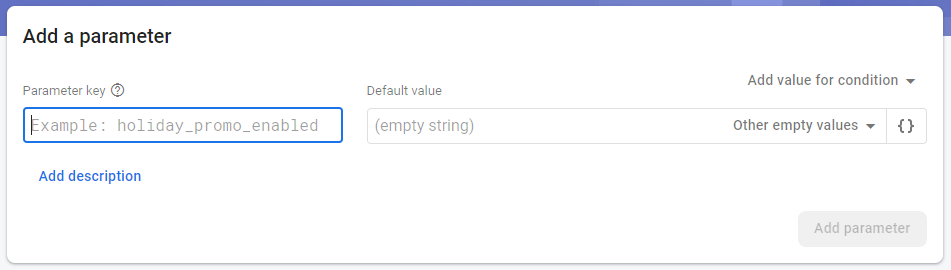
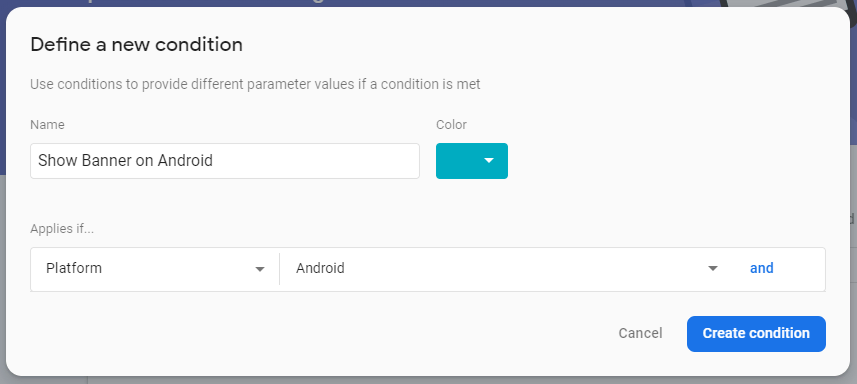
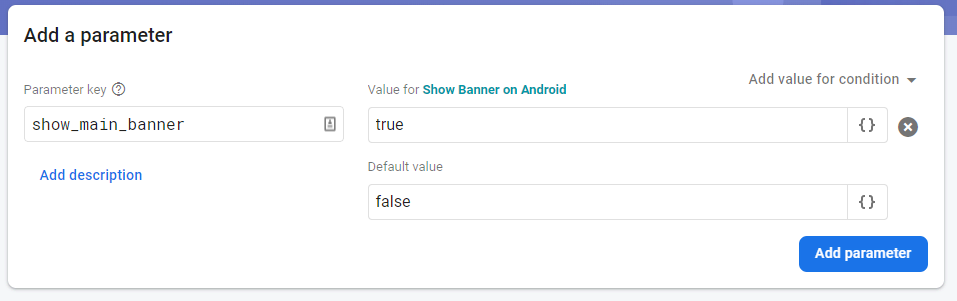
In the Parameter Key field type show_main_banner and in the value Default Value field type false. Then in the top right of the container click on Add Value for condition and then on Define Condition. In the name label enter Show Banner on Android. Click on the drop down under Applies if … and select Platform and then Android. Create the condition.
Once the condition is added you can now set the value for that condition to true
And finally you’ll see your parameter added.

Adding Remote Config Implementation
We’ll start by adding the package to the project.
firebase_remote_config: ^0.3.0+3Once this done we’ll create a new class under services called remote_config_service.dart. The instance of RemoteConfig is retrieved through a Future so we’ll setup a singleton pattern to create our service for us that we can use to register in get_it.
class RemoteConfigService {
  final RemoteConfig _remoteConfig;

  static RemoteConfigService _instance;
  static Future<RemoteConfigService> getInstance() async {
    if (_instance == null) {
      _instance = RemoteConfigService(
        remoteConfig: await RemoteConfig.instance,
      );
    }

    return _instance;
  }

  RemoteConfigService({RemoteConfig remoteConfig})
      : _remoteConfig = remoteConfig;
}
We can then use the getInstance method to register our singleton in the locator.dart file.
Future setupLocator() async {
  ...
  var remoteConfigService = await RemoteConfigService.getInstance();
  locator.registerSingleton(remoteConfigService);
}
Now that the setup is done we can Add the functionality required. In this tutorial we’ll have a banner that will show only on Android devices. I know it’s not a big feature but because this is a very app specific functionality I’ll show how to add a conditional config parameter which you can then modify to your liking. Basically we’ll have a new banner feature that we want to enable but we’ll roll it out on Android first. Let’s finish up the code.
Above the RemoteConfigService class add a new constant that stores the key we’ll use. This we’ll use to return the boolean from a property getter on the service.
const String _ShowMainBanner = "show_main_banner";

class RemoteConfigService {
  ...

  bool get showMainBanner => _remoteConfig.getBool(_ShowMainBanner);
}
The next thing to do is to the actual remote config work which we’ll do in one function. We’re doing option 2 mentioned above “Show a loading indicator while fetching” which we’ll do in the startup view logic. Add a new function initialise into the RemoteConfigService. In this function we set the defaults then fetch and activate the remote values.
class RemoteConfigService {
  final defaults = <String, dynamic>{_ShowMainBanner: false};
  ...
  Future initialise() async {
    try {
      await _remoteConfig.setDefaults(defaults);
      await _fetchAndActivate();
    } on FetchThrottledException catch (exception) {
      // Fetch throttled.
      print('Remote config fetch throttled: $exception');
    } catch (exception) {
      print('Unable to fetch remote config. Cached or default values will be '
          'used');
    }
  }

  Future _fetchAndActivate() async {
    await _remoteConfig.fetch();
    await _remoteConfig.activateFetched();
  }
}
Go to the StartupViewModel, get the remote config service and initialise it after the dynamic links call.
class StartUpViewModel extends BaseModel {
  final RemoteConfigService _remoteConfigService = locator<RemoteConfigService>();

  Future handleStartUpLogic() async {
    await _dynamicLinkService.handleDynamicLinks();
    await _remoteConfigService.initialise();
    ...
  }
}
This makes sure that by the time we get into the application all remote config has been synced. Which we can then access through the showMainBanner property where required. What we’ll do is show a banner at the top of the HomeView if the remote config value is true. If your remote values are required on every view, which I think it’ll be here you can add properties into your BaseModel for access in all viewmodels. Open up the BaseModel and add a property that returns showMainBanner from the remote config service.
class BaseModel extends ChangeNotifier {
  final RemoteConfigService _remoteConfigService = locator<RemoteConfigService>();

  bool get showMainBanner => _remoteConfigService.showMainBanner;
  ...
}
Then you can open up the HomeView and add a banner with some text in it. Add this code under the Row with the image in it. We’re not here to build UI so this is all that we’ll do :)
if (model.showMainBanner)
  Container(
    height: 80,
    width: double.infinity,
    padding: const EdgeInsets.symmetric(horizontal: 10),
    margin: const EdgeInsets.symmetric(
        horizontal: 0, vertical: 15),
    decoration: BoxDecoration(
        boxShadow: [
          BoxShadow(
              color: Colors.black12,
              blurRadius: 4,
              offset: Offset(0, 4))
        ],
        color: Colors.white,
        borderRadius: BorderRadius.circular(10)),
    alignment: Alignment.center,
    child: Text(
      'Compound can now share songs directly from Play Music',
      textAlign: TextAlign.center,
    ),
  ),
Last thing is to go to the main.dart file and before calling setupLocator call WidgetsFlutterBinding.ensureInitialized(); to ensure the remote config plugin is bound and ready to use.
Future<void> main() async {
  WidgetsFlutterBinding.ensureInitialized();

  // Register all the models and services before the app starts
  await setupLocator();

  runApp(MyApp());
}
And that’s it for all the code. If you run the app now you should see the banner when you get to the Home View. Remember, remote config works great for conditional roll outs and configuration. It’s not a real time tool, so if you’re not doing A/B testing, partial roll out, conditional feature releases then this is not the tool for you. That’s it for this Tutorial.
- Dane Mackier