Hey there,
Welcome to the first official TestSweets tutorial. First of all thank you for your interest in this project, we believe end-to-end testing should be easy enough that it becomes a requirement in every client facing application code base.
Introduction
Before we begin let me show you what TestSweets is so you can know what we’re working towards. TestSweets is a tool that allows you to write end-to-end tests without writing any code. This is how it works.
- You or a Dev adds TestSweets to a project
- You run the app and tell TestSweets which parts are of interest to you
- You give that Automation point a name
- Then you go to the TestSweets application and write scripts targeting those Automation points
- You run the tests using the new script and you’ve become an automation engineer!
It’s that simple. This tutorial will go over step 1,2 and 3 to get you to the point where you can start writing the scripts.
TestSweets Project Creation
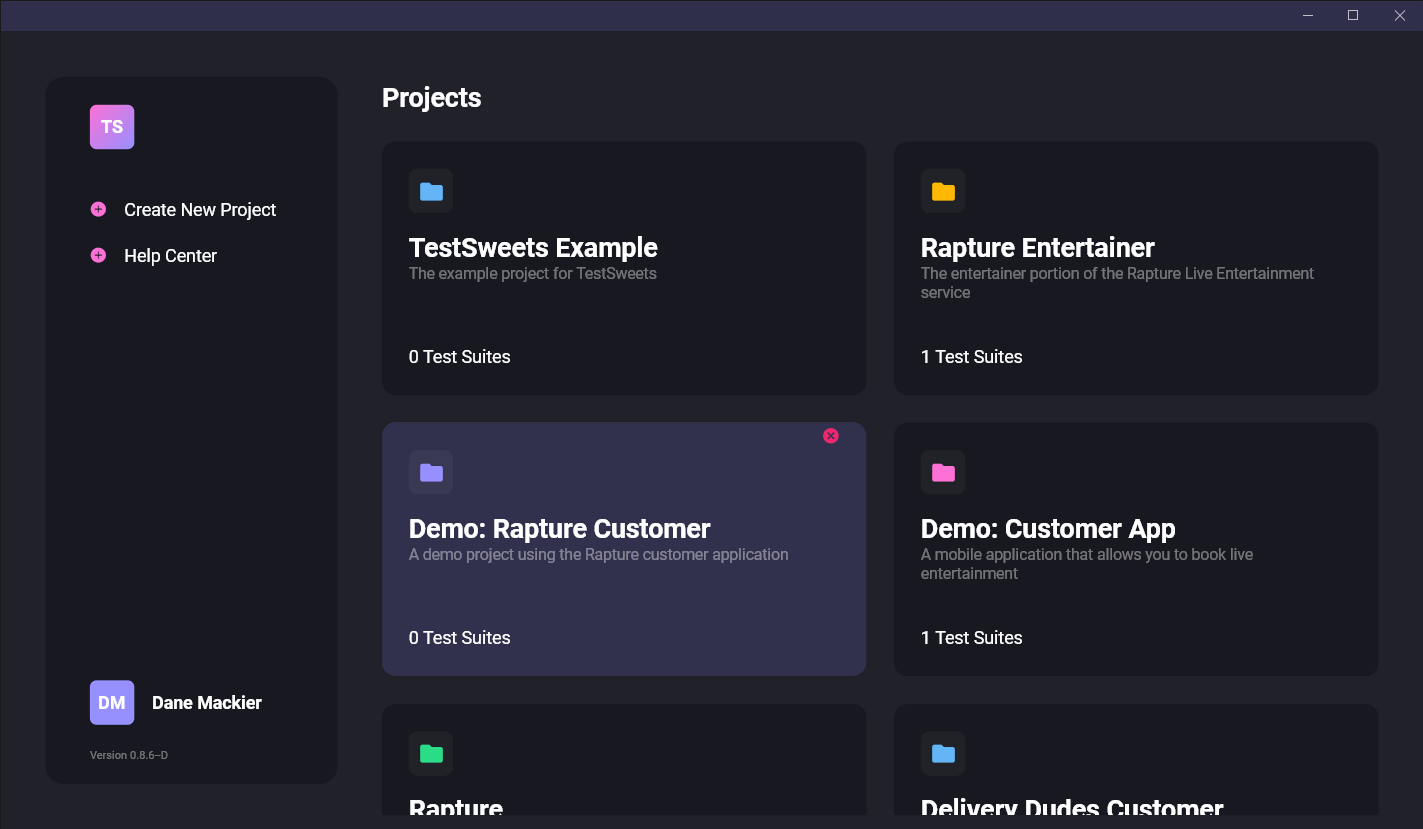
We start by logging in to TestSweets with our account, if you don’t have one, create one. Once you’re logged in you’ll see the ProjectsView
Create a Project
There you will either see an empty list, or if you’re like me you’ll have a few there 😝. In the left bar panel we can tap on “Create New Project”. You can enter the name and description. I’ll call mine TestSweets Example. We’ll use the TestSweets example application to follow with in case you don’t have a project to add this too.
You can download the testsweets example project here
Get Project Id
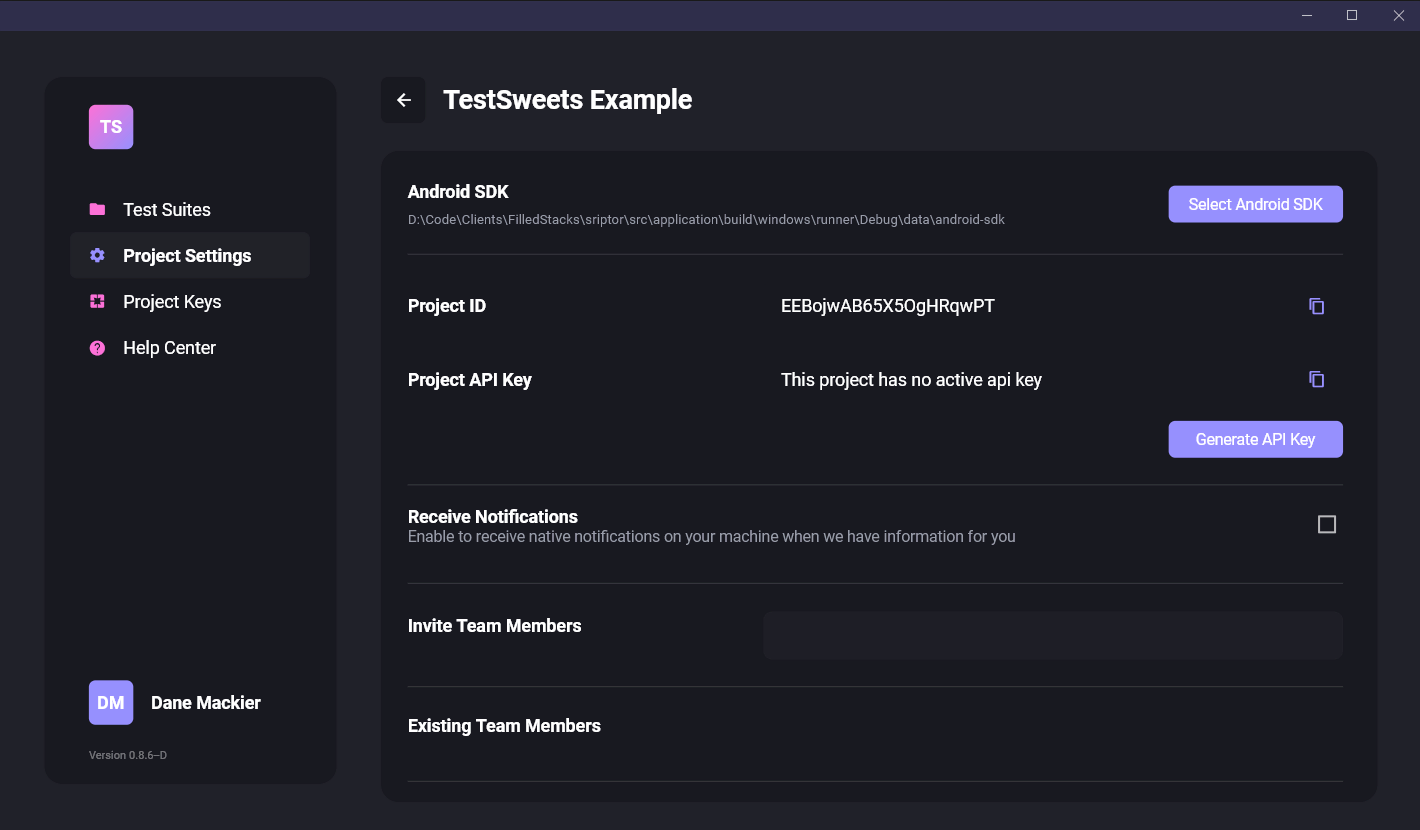
When the project is created you can open it up by clicking on it. In the navigation bar on the left you can now see a “Project Settings” option. Click on that and you should see the project settings view.
In here you’ll see the project ID, which is what we need to connect our app to this project. You can copy that and save it for later.
Code Setup
Next up we have to link the project we just created to our code for our app. If you don’t have access to this ask the developer to follow these few simple steps. It’s only a maximum of 6 lines of code.
Adding the Package
TestSweets comes with its own Flutter package that allows all the magic to happen. Open up your pubspec.yaml file and add the testsweets package.
dependencies:
	...
	testsweets:
Before we write any code I’m going to run the app and we’ll note down what our main goal is. We always want to start with our main flow and get that done, then add additional test cases as we go onto the road of 100% test coverage.
In this app you’ll see we have a login screen (faked). Enter any email and a password longer than 6 characters and login. That takes us to a main view that has a bottom nav bar. On the first tab there we have 2 scroll views, horizontal and vertical. we want to scroll both by 300px. Then we go to the second tab where we’ll press the floating action button 3 times and check if Todo 2 is on screen. That’s the goal, so lets write an automation script for that.
Initialise TestSweets
After adding the package above we will do an internal TestSweets initialise. We do this by calling the setupTestSweets function before we run the app. If your main function is not async then you can make it async so we can call the setup function and await. In the example project, change the main.dart file main function to look like this.
Future<void> main() async {
  setupLocator();
  await setupTestSweets();
  runApp(MyApp());
}
Using TestSweets Overlay UI
The Material and Cupertino app has a builder property you can supply. This a function that fires every time a new route is built in the app. The child in this function is the new route that flutter will display. All we’ll do is wrap that child with our TestSweetsOverlayView. We’ll set the projectId to the value from our project we created and enable capture mode. In the main.dart file update your MaterialApp and add the builder function as shown below.
return MaterialApp(
  title: 'Flutter Demo',
	// Add TestSweetsOverlayView to wrap the child below
  builder: (context, child) => TestSweetsOverlayView(
    projectId: 'EEBojwAB65X5OgHRqwPT', // <==== Use your ProjectId here
    child: child!,
    captureWidgets: true,
  ),
  theme: Theme.of(context).copyWith(
    textTheme: Theme.of(context).textTheme.apply(
          bodyColor: Colors.white,
          displayColor: Colors.white,
        ),
  ),
  initialRoute: Routes.loginView,
  navigatorKey: StackedService.navigatorKey,
  onGenerateRoute: StackedRouter().onGenerateRoute,
);
Tracking the routes
The next thing we want to do is make sure TestSweets knows what view we are currently on. To do that we can add the TestSweetsNavigatorObserver to the navigatorObservers.
return MaterialApp(
  builder: (context, child) => TestSweetsOverlayView(
    projectId: 'EEBojwAB65X5OgHRqwPT',
    child: child!,
    captureWidgets: true,
  ),
  ...
  navigatorObservers: [
    TestSweetsNavigatorObserver(),
  ],
);
If you’re using go_router you can add these observers to all your Shell Routes
Tracking Bottom Bar Navigations
This last part is optional, but if you have a bottom navigation setup that means that you’re not doing full navigations when tapping on that bottom nav item. This means that your view won’t change when swapping tabs. But we still want TestSweets to treat it as different views. To achieve that all we have to do is tell TestSweets when the tab has changed and pass in the index number.
In the getViewForIndex in main_view.dart function we will call setBottomNavIndex . This means as soon as we land on the view with the bottom navigation it’ll set the current view for the bottom nav.
Widget getViewForIndex(int index) {
		// TestSweets bottom nav tracker
		TestSweetsNavigatorObserver.instance.setBottomNavIndex(
		  viewName: Routes.mainView,
		  index: index,
		);
		switch (index) {
		  case 0:
		    return PostView();
		  case 1:
		    return TodoView();
		  default:
		    return PostView();
		}
}
And with that we are 100% ready to start automating. 6 lines of code, and now your end-to-end testing can be done without writing any code additional code.
Capture Automation Data
Now that it’s all setup you can run the application. At the bottom of the screen you’ll see a half circle, and when you tap on that you’ll see the TestSweets capture tools.
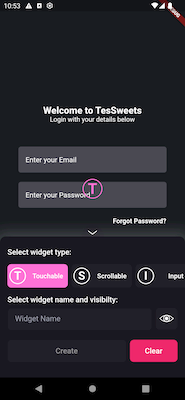
The box at the bottom is our TestSweets tools that will allow us to capture the automation data that we need. You’ll see that it added an interaction point in the middle of the screen. Those are the points that we want to place throughout the app to tell TestSweets which parts of the app we want to automate.
Capture Automation Data
There are 3 types of automation points we can add to TestSweets
- Touchable: This point should be used for any item on screen that you can tap. This usually used for Buttons, list items or linked text
- Input: This type is used specifically with input text fields. Anywhere you can enter information
- Scrollable: This type is used with any scrollable area
Tap on the Input item type and you’ll see a yellow automation point with the letter I on the screen

You can tap on it and drag it to be directly over the “Enter your Email” textfield. Tap on the “Widget Name” input field and type the name loginEmailTextField .

Last thing to do is save the widget.
This will close the TestSweets UI and send it to the backend. You’ll see a loading indicator in the top right corner while we’re saving a widget to the backend.
We will add another input interaction point for the password field and use similar naming loginPasswordTextField. And the final point on the screen will be Touchable type for the Login button.
Inspect Captured Data
Once we’ve captured all the automation points you will see them on screen when you’re in capture mode.
If you tap on any of the Automation Points you’ll get a snackbar at the bottom that tells you the information of that point.
Edit automation points
You can long tap on an automation point and you’ll see a context menu.

When you tap on the edit button, you will see the same UI as the ui when capturing the point. You can then move around the automation point, change the name and update the widget.
In addition to that you can also delete the automation point using the Delete button.
Before we continue, exit edit mode and login using any email and any password that’s longer than 6 characters.
This will navigate you to the next view where we’ll go over some more capturing scearios.
Nested Capturing
Earlier we setup some code for the bottom navigation tracking.
Since the navigation stack doesn’t actually change we track the tab index changes so we can know which tab is showing. If you land on a view with bottom navigation, you should see your current route should have a separator in it mainView / mainView0
Routes are shown in the topleft
Now the only thing here you want to do different is, when you capture the automation points for the bottom nav tab icons you should swap to the mainView first. This way the bottom nav items is on the parent view and the rest of the tabbed views will contain its own automation points.
To swap view we’ll simply tap on the mainView route name and it’ll select that as the current view. Once selected we’ll start capture, and add two touchable automation points.
- We’ll call
firstBottomTab - We’ll call
secondBottomTab
If you have an application that has names for these tabs, it would be better to use those names instead of the names I’m using here 😆
Capture the Rest
Instead of painfully making you read me do exactly what I did above here’s a rundown of the points to add before you follow the next tutorial.
- A scroll point for each scroll list on the view for the first tab. Place the point in the middle of the list
- A touchable point to the floating action button on the second tab
We’ll use that to script an automated end-to-end test using TestSweets in the next tutorial. That covers everything for the Getting Started and setting up.
Make sure to watch or read the follow up tutorial that shows you how to write an automation script using the data that you’ve just captured. Thank you for following along, I really appreciate it. If you have any questions or feedback, we are very open to understanding what would make this tool better for you. You can join our Slack or you can email us at automation@filledstacks.com and ask us anything or provide any type of feedback.
Until next time,
Dane