In this short tutorial I will be going over how we can use SmartFlare to integrate this animation in a Flutter app. We will make it act exactly as a Navigation drawer. Just with a little Flare on it :)
If you’d like to see how this animation is built watch the full video tutorial is here.
Setup
Go to my Flutter Tutorials repo, star and clone it and open up the 006-flare-drawer folder. Drag the start folder into your IDE.
Import animation and SmartFlare
This first thing we’ll do is import the animation into the project. Create a new folder in root called assets. Open up the animation folder in the root 006 tutorial folder and drag the slideout-menu.flr file into the assets folder. Your structure should look like this.

Next we’ll import the asset in the pubspec file. Find the assets line, uncomment it and add the full path to the animation file.
 ...
 # To add assets to your application, add an assets section, like this:
 assets:
  - assets/slideout-menu.flr
 #  - images/a_dot_ham.jpeg
 ...
Then go up to your dependencies and import the latest version of SmartFlare.
---
dependencies:
  flutter:
    sdk: flutter

  # The following adds the Cupertino Icons font to your application.
  # Use with the CupertinoIcons class for iOS style icons.
  cupertino_icons: ^0.1.2
  # import Smart Flare
  smart_flare: ^0.2.5
Save your file. When all your packages have been fetched all the setup is done and we can start integrating the animation.
Making the animation a functional Slide out menu
As with my previous tutorial, SmartFlare takes A LOT! of the boiler plate code away for adding interactions to your Flare animations.
Head over to the main.dart file and give the container a child, PanFlareActor. Import the smart_flare package and we’ll go over the properties you need to supply to this actor.
// Import smart_flare
import 'package:smart_flare/smart_flare.dart';

...

// update your build method
@override
Widget build(BuildContext context) {
  var screenSize = MediaQuery.of(context).size;
  return Scaffold(
    backgroundColor: Colors.grey[700],
    body: Container(
        child: PanFlareActor())
  );
}
Animation setup
The animation has to take up the entire height of the screen and the width will be set to 135. Supply the full filename to the animation, and the open and close animation to play (‘open’ and ‘close’). Additionally the PanFlareActor takes in a direction that indicates which direction of movement advances the open animation. Set the direction to ActorAdvancingDirection.RightToLeft.
@override
  Widget build(BuildContext context) {
    var screenSize = MediaQuery.of(context).size;
    return Scaffold(
      backgroundColor: Colors.grey[700],
      body: Container(
          child: PanFlareActor(
            width: 135.0,
            height: screenSize.height,
            filename: 'assets/slideout-menu.flr',
            openAnimation: 'open',
            closeAnimation: 'close',
            direction: ActorAdvancingDirection.RightToLeft
          ),
        ),
    );
  }
Animation Interaction
Then we want to tell the PanFlareActor how to handle the interaction from the user. First we’ll set a Threshold at 20 logical pixels. This means that a swipe larger than 20 units on the screen will trigger a complete animation play through. We also want the animation to reverse when the threshold is not reached and the user lets go of the touch, so set reverseOnRelease to true. Additionally to the threshold being reached, we want it to play the entire animation as soon as the threshold is reached, not only when the touch has ended. Set completeOnThresholdReached to true.
Lastly we have to provide the active area for the user to interact with. For that we’ll supply a RelativePanArea to the actor that starts at the left (0.0) with the top being 70% down (0.7), it takes up the full width (1.0) and takes 30% of the actor’s height (0.3). Your PanFlareActor should now look like this.
...
PanFlareActor(
    width: 135.0,
    height: screenSize.height,
    filename: 'assets/slideout-menu.flr',
    openAnimation: 'open',
    closeAnimation: 'close',
    direction: ActorAdvancingDirection.RightToLeft,
    threshold: 20.0,
    reverseOnRelease:
        true, // reverse's current animation when released and threshold not reaced
    completeOnThresholdReached:
        true, // plays the animation till the end when we reach threshold
    activeAreas: [
      RelativePanArea(
          area: Rect.fromLTWH(0, 0.7, 1.0, 0.3), debugArea: false)
    ],
  )
...
If you run the code you’ll see the animation on the left side of your screen and it should be fully interact-able as a slideout menu would be.
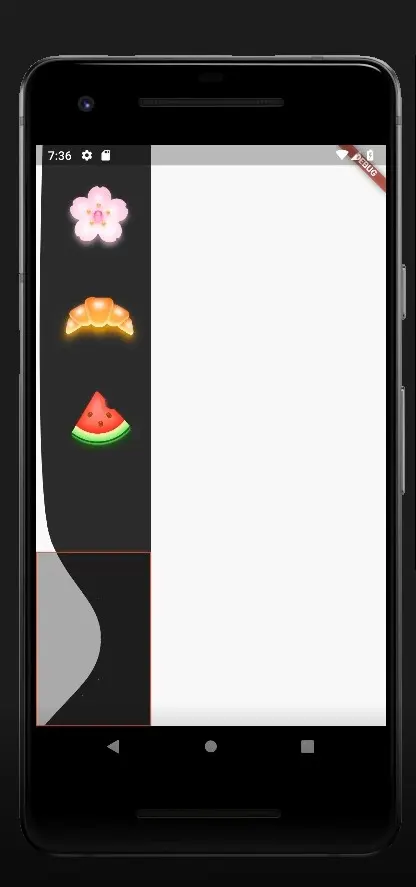
You’ll also see the RelativePanArea on your screen with a red border. Pannable areas have a red border and Tap Areas have a blue border. The last thing to do is to move the Animation to the right side of the screen and remove the debug value from the active area.
Wrap the PanFlareActor in an Align widget and set the alignment to Alignment.centerRight. See below code (PanFlareActor properties omitted to keep code short).
// Wrap the PanFlareActor in an Align widget
@override
Widget build(BuildContext context) {
  var screenSize = MediaQuery.of(context).size;
  return Scaffold(
    backgroundColor: Colors.grey[700],
    body: Container(
      child: Align(
        alignment: Alignment.centerRight,
        child: PanFlareActor(
         ...
        ),
      ),
    ),
  );
}
That will push your animation to the right and we are done with this tutorial.
Please leave some claps, I would appreciate a follow or a share. I’ll be putting out more content like this and my architecture in Flutter series every week so be sure to follow me on YouTube as well.
Until next week. Cheers.