Context
Flutter architecture around state management has been a discarded topic. Having built a few mobile apps with various technologies, I’ve found that certain principles will and should be present no matter what architecture or state management solution you choose. In this guide I will show you a code structure, naming conventions, where to place files, how to keep things well organised and easy to maintain using the Provider package.
General Overview
Provider is basically ScopedModel v2. I’ve implemented apps in Redux, BLoC and ScopedModel and I still consider ScopedModel the most practical and straight forward approach to build apps in Flutter. Even for large or massive apps (given you follow some coding guidelines). This guide will have a very similar setup to my ScopedModel Guide. Let’s look at the app we’re building so we can have some context.
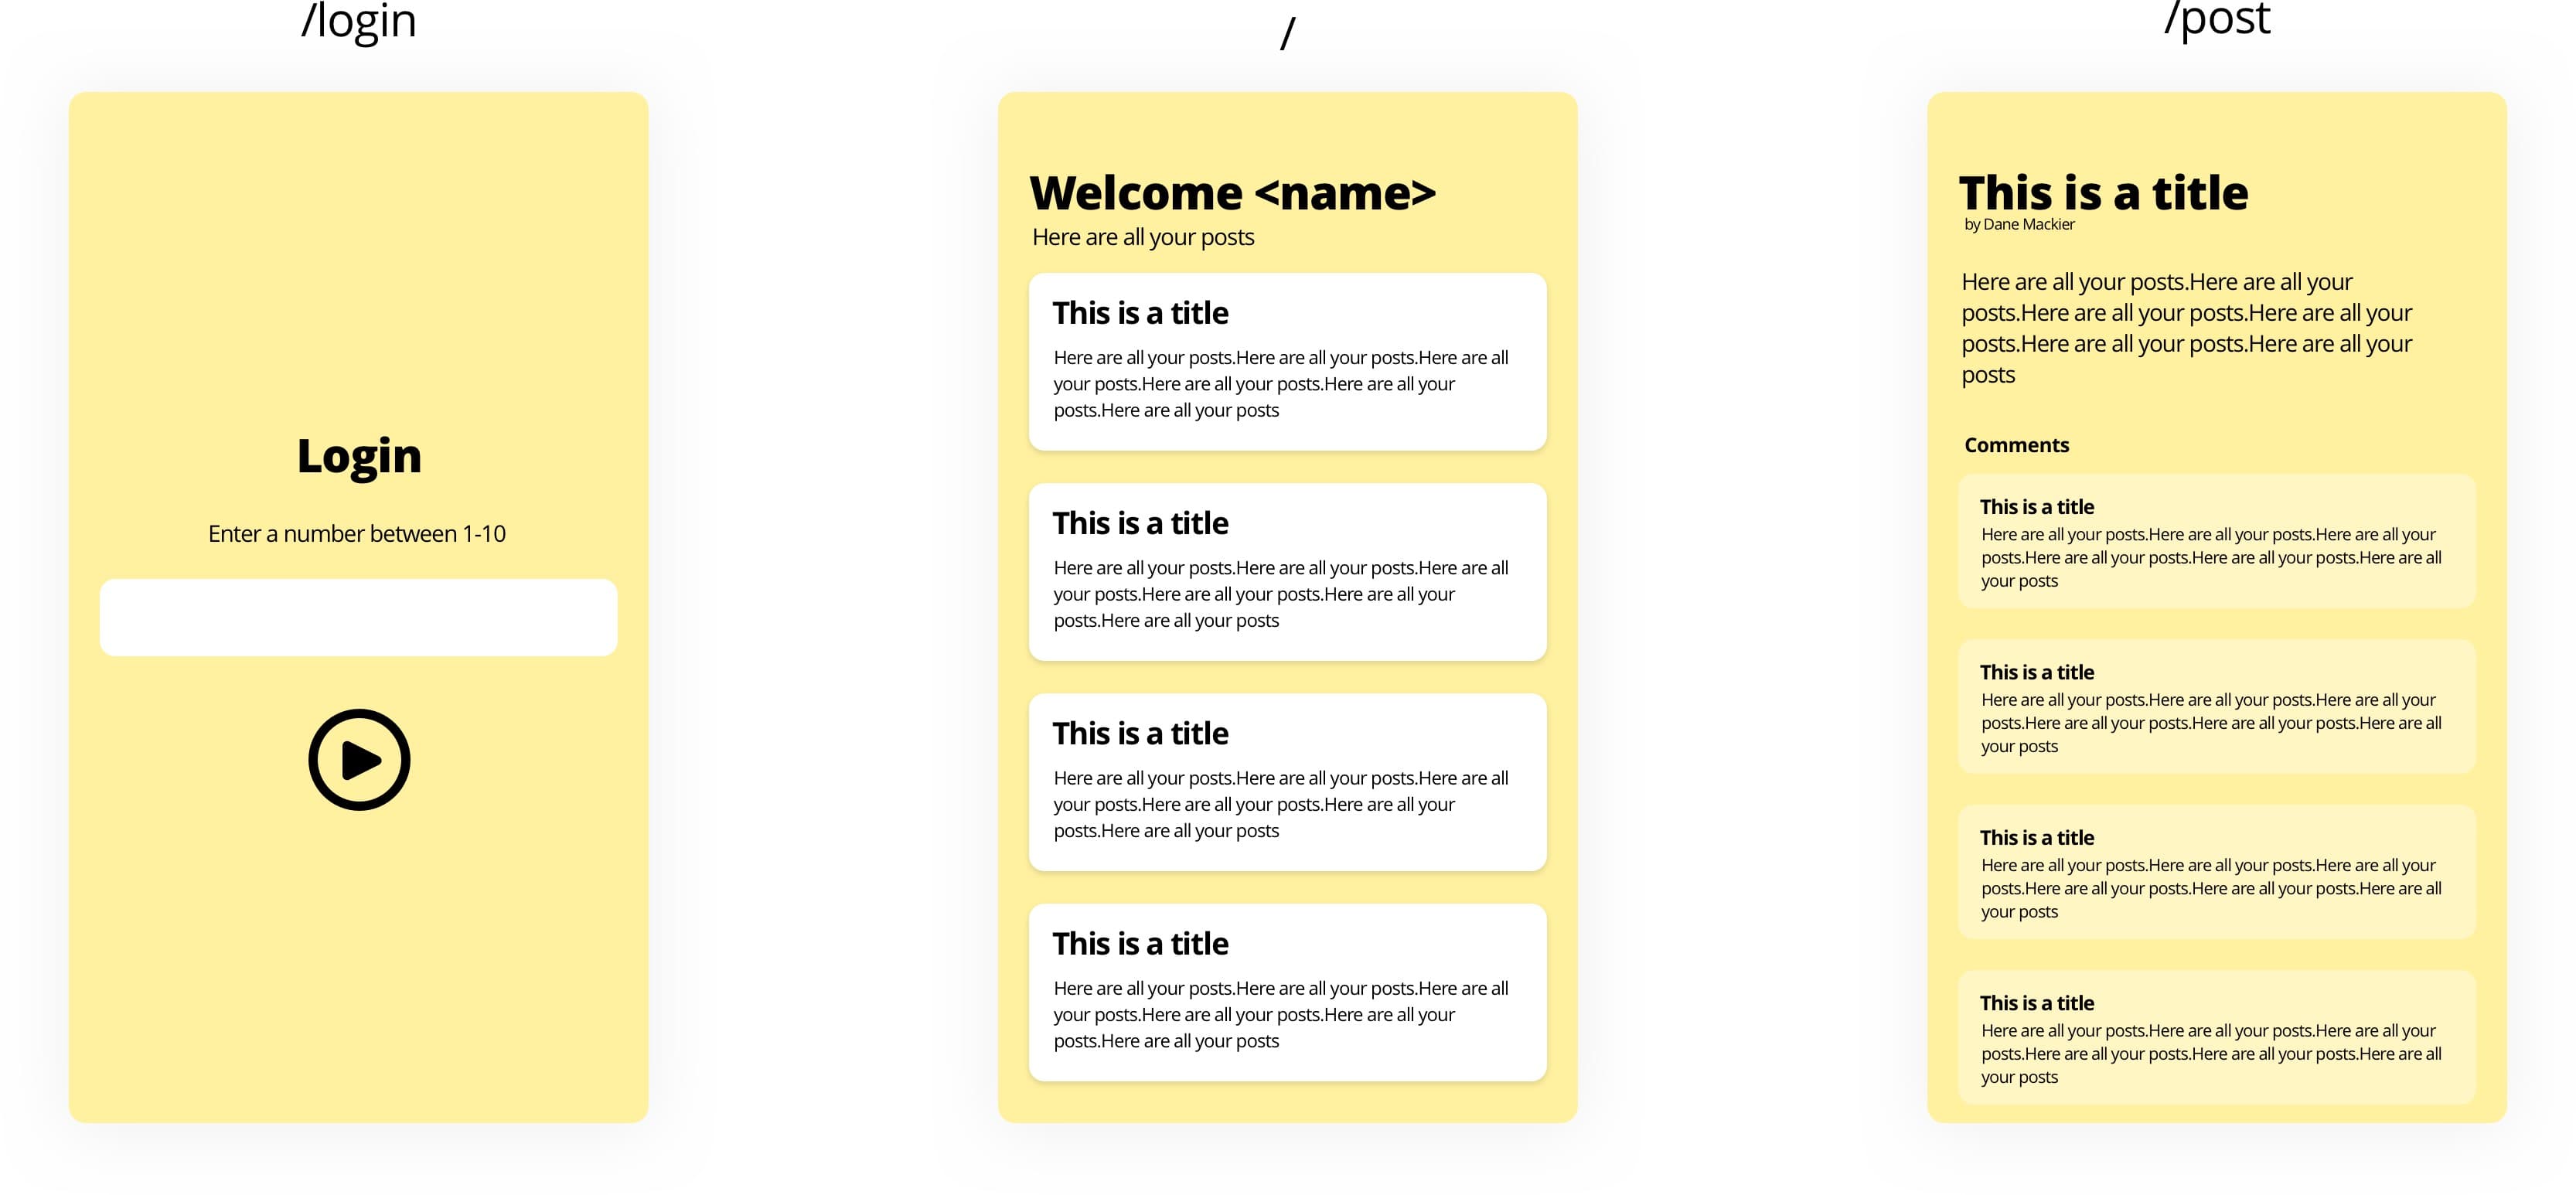
The app will have three screens. Login, Home and PostDetails. We’ll communicate with the JSONPlaceholder API, get a User profile from the login using the ID entered. Fetch and show the Posts on the home view and show post details with an additional fetch to show the comments. Very basic but it covers everyting required to build out an architecture that shows you the way.
Note: I will not be adding a toolbar, so iOS developers you can swipe from left to right on the screen to go back. Or just add an AppBar if you want on. Add it into each Scaffold.
High Level Architecture Overview
- Each view will have it’s own model that extends the ChangeNotifier.
- Notify listeners for a view will ONLY BE CALLED when the View’s state changes.
- Each view only has 2 states. Idle and Busy. Any other piece of UI contained in a view, that requires logic and state / UI updates will have it’s own model associated with it. This way the main view only paints when the main view state changes.
- Providers will NOT be passed in through app level global provider, unless it’s required by more than 1 view in the app architecture (Users information).
- Providers and services will be injected using get_it.
- Models will ONLY request data from Services and reduce state from that DATA. Nothing else.
- Dedicated Services(Just normal objects, to not confuse beginners) will perform all the actual work. Api class will request and serialize data. The model will just call the function to do that. Authentication service will use the Api to get the user details and track it. The model just calls the function and passes values to it.
That’s it on a high level. Keeping that in mind as we progress.
Code Setup
To keep the tutorial focussed on the architecture only I have setup a starting project in the tutorials repo under 010. Clone the repo if you want to follow along with me. Things that I’ve added in here has nothing to do with the architecture. Some of the things include:
- An Api service that uses the http client to get data from JSONPlaceholder
- All the data models that are required in the app. comment, post and user.
- Two colors, BackgroundColor and CommentColor.
- Two text styles, headerStyle, subHeaderStyle
- A Ui Helpers class that provides vertical spacing
- LoginView, HomeView and PostView with an empty build method.
- A Widget to render a single comment
- A Widget to render the login title and text field
- A widget to render a single post
- A locator file setup like this
Let’s quickly go over the structure. The lib folder is divided into two folders. core and ui. Core contains all the files associated with the logic. ui contains all the files associated with the ui. Core is divided into three folders.
- Models: Contains all the plain data models
- Services: Contains the dedicated files that will handle actual business logic
- ViewModels: Contains the Provider models for each of the Widget views
UI is also divided into three folders.
- Shared: Contains files used in multiple other UI files
- Views: Contains the files for the app views
- Widgets: Contains widget files that are too big to keep in the view files.
Implementation
We’ll go through the app view by view and add what we need. Let’s start with the Login Screen. Go to your viewmodels folder under core and add a new file called login_model.dart. We know our views will only have 2 states so we’ll add the ViewState enum in the same file.
import 'package:flutter/foundation.dart';

/// Represents the state of the view
enum ViewState { Idle, Busy }

class LoginModel extends ChangeNotifier {

}
Now to hook it up. As mentioned we will not be providing a bunch of models and services at the beginning of our app at global context scale. Instead we’ll inject it using the locator setup in locator.dart. Register the LoginModel with the locator as a lazy singleton. Read this to get a quick overview of the different types of registration.
void setupLocator() {
  locator.registerLazySingleton(() => LoginModel());
}
Head over to the LoginView and bind this model to a Provider / Consumer. We’ll wrap the scaffold in a Provider and we’ll make the child of the Provider a consumer that returns the Scaffold as it’s builder child.
import 'package:flutter/material.dart';
import 'package:provider/provider.dart';
import 'package:provider_architecutre/core/viewmodels/login_model.dart';
import 'package:provider_architecutre/locator.dart';

class LoginView extends StatelessWidget {
  @override
  Widget build(BuildContext context) {
    return ChangeNotifierProvider<LoginModel>(
      builder: (context) => locator<LoginModel>(),
      child: Consumer<LoginModel>(
        builder: (context, model, child) => Scaffold(),
      ),
    );
  }
}
Here we are associating the LoginModel with the LoginView. Lets get the UI to look like below
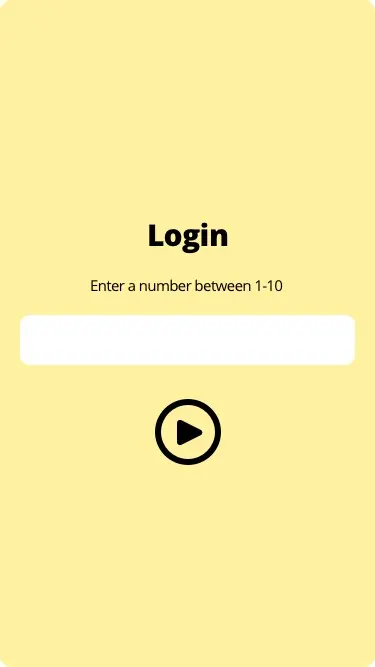
We set the background color of the Scaffold to backgroundColor. The body of the scaffold will be a Colum that’s fully stretched and aligns its children to the center. The first child is a LoginHeader and the second child is a Login Button. Make your build method look like below and import everything you need to.
Widget build(BuildContext context) {
    return ChangeNotifierProvider<LoginModel>(
      builder: (context) => locator<LoginModel>(),
      child: Consumer<LoginModel>(
        builder: (context, model, child) => Scaffold(
              backgroundColor: backgroundColor,
              body: Column(
                mainAxisSize: MainAxisSize.max,
                mainAxisAlignment: MainAxisAlignment.center,
                children: [
                  LoginHeader(),
                  FlatButton(
                      color: Colors.white,
                      child: Text(
                        'Login',
                        style: TextStyle(color: Colors.black),
                      ),
                      onPressed: () async {})
                ],
              ),
            ),
      ),
    );
  }
We need the LoginView to take in text, and for that we need a TextEdittingController so it’ll need to be a Stateful widget. Convert the view to a stateful widget, create a controller variable and pass it into the LoginHeader.
  final TextEditingController controller = TextEditingController();

  Widget build(BuildContext context) {
    ...
    LoginHeader(controller: controller),
    ...
  }
Next we’ll pass the value from the controller to a function on the model called login. Create a Future that returns a boolean on the LoginModel and pass in a string userIdText. This function will parse the text to an int and pass it to the authentication service that will make the API request. We also want to indicate the state of the view at this point. For this we’ll introduce the viewState property. Whenever we change this value we want to notify the listeners so the view is rebuilt. We’ll create a setState function that handles this for us. At the start of the call we want to set state to busy, when we’re done back to idle.
class LoginModel extends ChangeNotifier {
  final AuthenticationService _authenticationService = locator<AuthenticationService>();
  ViewState _state = ViewState.Idle;

  ViewState get state => _state;

  void setState(ViewState viewState) {
    _state = viewState;
    notifyListeners();
  }

   Future<bool> login(String userIdText) async {
    setState(ViewState.Busy);

    var userId = int.tryParse(userIdText);
    var success =  await _authenticationService.login(userId);

    setState(ViewState.Idle);
    return success;
  }
}
The AuthenticationService will use the Api to get the user profile. If the user profile is not null we return true to indicate success. Under services create the authentication_service.dart file and add a Future<bool> login function. This function will use the API and request a user profile. The Api (as well as every other service and model) will be injected using the locator.
import 'dart:async';

import 'package:provider_architecutre/core/models/user.dart';
import 'package:provider_architecutre/core/services/api.dart';
import 'package:provider_architecutre/locator.dart';

class AuthenticationService {
  // Inject our Api
  Api _api = locator<Api>();

  Future<bool> login(int userId) async {
    // Get the user profile for id
    var fetcheduser = await _api.getUserProfile(userId);

    // Check if success
    var hasUser = fetcheduser != null;

    return hasUser;
  }
}
Register both services with the locator.
void setupLocator() {
  locator.registerLazySingleton(() => AuthenticationService());
  locator.registerLazySingleton(() => Api());

  locator.registerLazySingleton(() => LoginModel());
}
Now in the LoginView in the onPressed on the button we can call the login function with the text from the controller. We’ll await the Future and if successful we’ll navigate to the root view. We also want to swap out the button when the view is busy. We’ll show a progress indicator when the view is busy.
...

model.state == ViewState.Busy
  ? CircularProgressIndicator()
  : FlatButton(
      color: Colors.white,
      child: Text(
        'Login',
        style: TextStyle(color: Colors.black),
      ),
      onPressed: () async {
        var loginSuccess = await model.login(controller.text);
        if (loginSuccess) {
          // Navigate to the home view
        }
      })
...
Login functionality and business logic done. Onto the next part.
Navigation
After we login we have to navigate to home view. My new favourite way of navigation is using onGenerateRoute functionality the MaterialApp provides. You have to provide it a function that takes RouteSettings as a parameter and returns a Route<dynamic>. To keep things nice and clean we’ll put all the routing in a separate file called … router.dart under the ui folder. Create the router file and put a static method with the signature I described earlier. This function recieves RouteSettings which contains the name of the route being requested. We’ll switch on that name and return a MaterialPageRoute for the appropriate views. We’ll also return a error view for any undefined route.
class Router {
  static Route<dynamic> generateRoute(RouteSettings settings) {
    switch (settings.name) {
      case '/':
        return MaterialPageRoute(builder: (_) => HomeView());
      case 'login':
        return MaterialPageRoute(builder: (_) => LoginView());
      case 'post':
        return MaterialPageRoute(builder: (_) => PostView());
      default:
        return MaterialPageRoute(builder: (_) {
          return Scaffold(
            body: Center(
              child: Text('No route defined for ${settings.name}'),
            ),
          );
        });
    }
  }
}
Now in your main file you can provide the onGenerateRoute property with the static generateRoute function from the Router. You can remove the home property and set the initialRoute to ‘login’ instead.
MaterialApp(
    title: 'Flutter Demo',
    theme: ThemeData(),
    initialRoute: 'login',
    onGenerateRoute: Router.generateRoute,
  );
In the LoginView in the login button’s onPressed we can now navigate to the home view by pushing a named route.
...

onPressed: () async {
    var loginSuccess = await model.login(controller.text);
    if (loginSuccess) {
      Navigator.pushNamed(context, '/');
    }
  }

...
Navigation done. View-Model binding done. Dependency Injection wired up, code structure laid out. So now what? Well, we have to refactor the code to make it easy for us to add more views with the same functionality so lets do that.
Shared ViewModel functionality for setState
All our Models will work the same. We have a state property that tells us what UI layout to show in the view and when it’s updated we want to call notifyListeners so we’ll move that into a BaseModel. Create a file under viewmodels called base_model.dart. Move all the state related code from the login model in there. Move the enum definition into a file called enums in core under viewstate.dart.
// base_model.dart
import 'package:flutter/material.dart';

class BaseModel extends ChangeNotifier {
  ViewState _state = ViewState.Idle;

  ViewState get state => _state;

  void setState(ViewState viewState) {
    _state = viewState;
    notifyListeners();
  }
}
// viewstate.dart
/// Represents the state of the view
enum ViewState { Idle, Busy }Update the LoginModel to extends from the BaseModel instead of ChangeNotifier.
class LoginModel extends BaseModel {
   ...
}
Now that the LoginModel is a bit cleaner we can add some extra functionality. We’ll handle one error case. If the user enter a value that’s not a number we’ll show an error message. We’ll add a new String errorMessage property that will store our message.
In the login function under the tryParse code we’ll check if the userId is null (not a number). If it is we’ll set the message and the state back to idle and return false.
String errorMessage;

...
var userId = int.tryParse(userIdText);

if(userId == null) {
  errorMessage = 'Value entered is not a number';
  setState(ViewState.Idle);
  return false;
}

...
In the Login view we can now pass the errorMessage to the validation message property on the loginHeader.
...
LoginHeader(
    validationMessage: model.errorMessage,
    controller: _controller),
...
If you type in some text now and try to login you’ll see the validation message show up.
Shared setup for all views
Most of the views require their own model, they need to have a root widget Provider and a child Consumer that takes a build method. We’ll create a BaseView that is generic that will do all this for us. Under the views folder in ui create a new base_view.dart file. Move all the code from the login view over besides the Scaffold and replace all the LoginModel types with T.
class BaseView<T extends BaseModel> extends StatelessWidget {
  final Widget Function(BuildContext context, T value, Widget child) builder;

  BaseView({this.builder});

  @override
  Widget build(BuildContext context) {
    return ChangeNotifierProvider<T>(
      builder: (context) => locator<T>(),
      child: Consumer<T>(builder: builder),
    );
  }
}
In the LoginView replace all the Provider related code with a BaseView and pass the LoginModel as the type.
  @override
  Widget build(BuildContext context) {
    return BaseView<LoginModel>(
        builder: (context, model, child) => Scaffold(
          ...
        ),
    );
  }
Now any widget that requires a model can use the BaseView with it’s model type and it’ll react to the state updating when setState is called 🎉. That’s basically the main architecture with one piece missing. We want the architecture setup to easily support calling functions when a new view is shown without having to conver everything to a stateful widget. To achieve this we’ll convert our BaseView into a stateful widget on use the onInit to pass our model back to use in a callback function that we can execute on. Convert the BaseView into a stateful widget and pass it a Function(T) that returns the model to us. We’ll store the model locally in the state and in the initState call we’ll check if we have a callback. If we do we’ll call it and pass our model to it.
class BaseView<T extends ChangeNotifier> extends StatefulWidget {
  final Widget Function(BuildContext context, T value, Widget child) builder;
  final Function(T) onModelReady;

  BaseView({@required this.builder, this.onModelReady});

  @override
  _BaseViewState<T> createState() => _BaseViewState<T>();
}

class _BaseViewState<T extends ChangeNotifier> extends State<BaseView<T>> {
  T model = locator<T>();

  @override
  void initState() {
    if (widget.onModelReady != null) {
      widget.onModelReady(model);
    }
    super.initState();
  }

  @override
  Widget build(BuildContext context) {
    return ChangeNotifierProvider<T>(
      builder: (context) => model,
      child: Consumer<T>(builder: widget.builder),
    );
  }
}
🎉 Architecture and code setup complete 🎉
At this point everything is setup that concerns the architecture. The rest of the tutorial will show you how to use this architecture to add more views and expand it. Lets build the HomeView.

Lets start by creating the homemodel.dart file in the viewmodels folder. Remember: _All a model does is use a service to request data and then reduce state using that data. The model will get the Api injected into it and expose a List
class HomeModel extends BaseModel {
  Api _api = locator<Api>();

  List<Post> posts;

  Future getPosts(int userId) async {
    setState(ViewState.Busy);
    posts = await _api.getPostsForUser(userId);
    setState(ViewState.Idle);
  }
}
Then register you model with the locator. We’ll register as a Factory. What this does is that everytime your request this type it creates a new one.
...
locator.registerFactory(() => HomeModel());
When the home view is inialised we want to call the getPosts function to get the posts for our user. We need the userId for that and we currently don’t have it. We know the user info will be required in this view and the post details view to show author name. We don’t want to inject the AuthenticationService into the home model because that makes no sense in code. Instead we’ll expose a stream controller of type User and we’ll provide that using the StreamProvier. Update the AuthenticationService and add a StreamController and also when the user is not null put the fetchedUser onto that controller.
StreamController<User> userController = StreamController<User>();

Future<bool> login(int userId) async {
    // Not real login, we'll just request the user profile
    var fetcheduser = await _api.getUserProfile(userId);
    var hasUser = fetcheduser != null;
    if (hasUser) {
      userController.add(fetcheduser);
    }

    return hasUser;
  }
Now over in the main file we’ll wrap the MaterialApp with a StreamProvider and pass in our streamController from the AuthenticationService. We’ll supply an empty user as the initialData.
class MyApp extends StatelessWidget {
  @override
  Widget build(BuildContext context) {
    return StreamProvider<User>(
        initialData: User.initial(),
        builder: (context) => locator<AuthenticationService>().userController,
        child: MaterialApp(
          title: 'Flutter Demo',
          theme: ThemeData(),
          initialRoute: 'login',
          onGenerateRoute: Router.generateRoute,
        ));
  }
}
The user can now be consumed anywhere in the app by using Provider.of<User>(context). In the Home view we can now set our root as the BaseView of type HomeModel and onModelReady call our getPosts function.
class HomeView extends StatelessWidget {
  @override
  Widget build(BuildContext context) {
    return BaseView<HomeModel>(
        onModelReady: (model) {
          model.getPosts(Provider.of<User>(context).id);
        },
        builder: (context, model, child) => Scaffold(
          backgroundColor: backgroundColor,
          body: Column()));
  }
}
For the body we will show different UI based on the state value. When busy we’ll show a ProgressIndicator in the center of the screen. When Idle we’ll show a the actual UI. It’s just a column, first child a spaceContainer, second a title, third a title as well, another a space and then an expanded widget with the list of posts in it.
Update your build method and add the listView function like below.
 @override
  Widget build(BuildContext context) {
    return BaseView<HomeModel>(
        onModelReady: (model) {
          model.getPosts(Provider.of<User>(context).id);
        },
        builder: (context, model, child) => Scaffold(
          backgroundColor: backgroundColor,
            body: model.state == ViewState.Idle
                ? Column(
                  crossAxisAlignment: CrossAxisAlignment.start,
                  children: [
                    UIHelper.verticalSpaceLarge(),
                    Padding(
                      padding: const EdgeInsets.only(left: 20.0),
                      child: Text('Welcome ${Provider.of<User>(context).name}', style: headerStyle,),
                    ),
                    Padding(
                      padding: const EdgeInsets.only(left: 20.0),
                      child: Text('Here are all your posts', style: subHeaderStyle),
                    ),
                    UIHelper.verticalSpaceSmall(),
                    Expanded(child: getPostsUi(model.posts)),
                  ])
                : Center(child: CircularProgressIndicator())));
  }

  Widget getPostsUi(List<Post> posts) => ListView.builder(
      itemCount: posts.length,
      itemBuilder: (context, index) => PostListItem(
            post: posts[index],
            onTap: () {
              Navigator.pushNamed(context, 'post', arguments: posts[index]);
            },
          ));
As you see in the getPostUi function. When the PostListItem is tapped we navigate to ‘post’ but we pass some arguments to it. The argument is the post model. We have to update our Router to look at the argument and pass it to the Post view. Open the router and update the ‘post’ case to get the arguments and cast to a Post. Then pass it to the PostView.
case 'post':
  var post = settings.arguments as Post;
  return MaterialPageRoute(builder: (_) => PostView(post: post));
If you run the code now you’ll see the login view. Enter 3 and tap login. You should see the busy indicator then a navigate to the home view where it’ll also show busy and then the UI when the posts are fetched.
Lastly we want to show the Post details and fetch some additional comments.
Using a widget with it’s own model
The comments will be a standalone widget that has it’s own model and update cycle. This way, if the comments were real-time using something like firebase only the comments widget would rebuild and repaint not the entire screen. This actually means that PostView doesn’t need a model, it has no logic in it. So lets create the comments model and then build the comments widget so we can finish up the post ui.
Create a new file under viewmodels called comments_model. It’s almost exactly the same as the HomeModel. Fetches the comments using the postId, sets it and then calls setState.
class CommentsModel extends BaseModel {
  Api _api = locator<Api>();

  List<Comment> comments;

  Future fetchComments(int postId) async {
    setState(ViewState.Busy);
    comments = await _api.getCommentsForPost(postId);
    setState(ViewState.Idle);
  }
}
We already have a Comments file so we’ll just fill in the bits relating to the architecture we set up. We’ll use the BaseView with type CommentsModel. onModelReady we’ll request to fetch comments using the postId passed in. The UI will be the same as the HomeView. When Busy, circular indicator else Expanded list view.
class Comments extends StatelessWidget {
  final int postId;
  Comments(this.postId);

  @override
  Widget build(BuildContext context) {
    return BaseView<CommentsModel>(
        onModelReady: (model) => model.fetchComments(postId),
        builder: (context, model, child) => model.state == ViewState.Busy
            ? Center(child: CircularProgressIndicator())
            : Expanded(child: ListView(
                children: model.comments
                    .map((comment) => CommentItem(comment))
                    .toList(),
              )));
  }
}
Register it inside of the locator.
locator.registerFactory(() => CommentsModel());Now lets build the PostView ui.
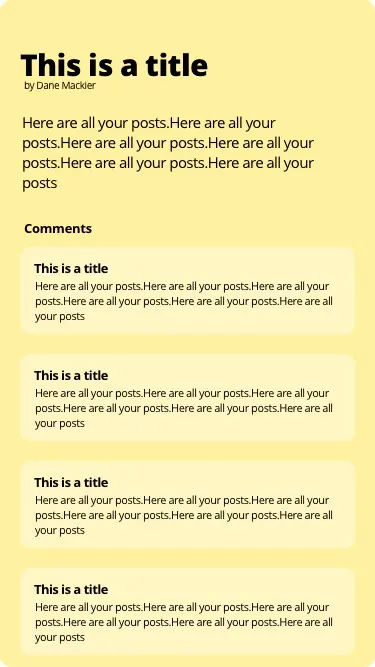
Very simple UI. A title with some spacing at the top, the author name, the post body and then our Comments widget. Nothing fancy here.
class PostView extends StatelessWidget {
  final Post post;
  PostView({this.post});

  @override
  Widget build(BuildContext context) {
    return Scaffold(
      backgroundColor: backgroundColor,
      body: Padding(
        padding: const EdgeInsets.symmetric(horizontal: 20.0),
        child: Column(
          crossAxisAlignment: CrossAxisAlignment.start,
          children: <Widget>[
            UIHelper.verticalSpaceLarge(),
            Text(post.title, style: headerStyle),
            Text(
              'by ${Provider.of<User>(context).name}',
              style: TextStyle(fontSize: 9.0),
            ),
            UIHelper.verticalSpaceMedium(),
            Text(post.body),
            Comments(post.id)
          ],
        ),
      ),
    );
  }
}
And that’s it. We have a complete architecture that can definitely stand the “large app” comments thrown at it. I have been greenlit for a re-write of a very large app I wrote in Xamarin and this is the Architecture that I’m using. It’s neat and easy to follow. Most models have less than 20 lines of code. Services are minimal as well so it’s very easy to scale with.
I hope this helped. There are many other things to add on, but this is where you want to start. Going further you can decide on new folders to create, grouping widgets under viewname folders to keep it together, splitting services into utilities and services etc. All up to you, atleast you have a better starting point now.
Check out some of my other tutorials if you liked this one.