In this tutorial we’ll use the quick_actions package to create a widget that you can wrap around your material app to handle your quick actions. To start off add the package to your project.
quick_actions: ^0.3.0+2Create a new file called quick_actions_manager and inside create a stateful widget with the same name that takes in a child and returns it from the build method.
import 'package:flutter/material.dart';

class QuickActionsManager extends StatefulWidget {
  final Widget child;
  QuickActionsManager({Key key, this.child}) : super(key: key);

  _QuickActionsManagerState createState() => _QuickActionsManagerState();
}

class _QuickActionsManagerState extends State<QuickActionsManager> {
  @override
  Widget build(BuildContext context) {
    return widget.child;
  }
}
We’ll be navigating in our quick action so we’ll wrap the manager around our Home widget. That way it’s under the MaterialApp which provides us with the Navigator that we’ll use through the context. If you don’t want to navigate from your quick actions you can wrap it around your material app.
class MyApp extends StatelessWidget {
  // This widget is the root of your application.
  @override
  Widget build(BuildContext context) {
    return MaterialApp(
        title: 'QuickActions Demo', home: QuickActionsManager(child: Home()));
  }
}
We’ll also add some view’s that we can navigate to.
class Home extends StatelessWidget {
  const Home({Key key}) : super(key: key);

  @override
  Widget build(BuildContext context) {
    return Scaffold(body: Center(child: Text('Home')));
  }
}

class Login extends StatelessWidget {
  const Login({Key key}) : super(key: key);

  @override
  Widget build(BuildContext context) {
    return Scaffold(body: Center(child: Text('Login')));
  }
}
Creating Quick Actions
To implement quick actions there’s 2 things we have to do.
- Tell the app which actions we want to show
- Handle the actions when selected
Before we do that we have to import the quick_actions package and create a new instance of the QuickActions in the Manager’s state class.
import 'package:quick_actions/quick_actions.dart';

...

class _QuickActionsManagerState extends State<QuickActionsManager> {
  final QuickActions quickActions = QuickActions();

  ...
}
Setup Quick Actions
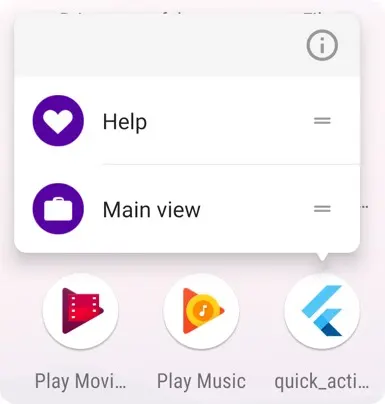
We’ll create a new function in the QuickActionsManager called _setupQuickActions that we’ll call from init state. In that function we’ll use the setShortcutItems to register two shortcuts.
import 'dart:io'; // Exposes plaftorm to check OS
...

 void _setupQuickActions() {
    quickActions.setShortcutItems(<ShortcutItem>[
      ShortcutItem(
          type: 'action_main',
          localizedTitle: 'Main view',
          icon: Platform.isAndroid ? 'quick_box' : 'QuickBox'),
      ShortcutItem(
          type: 'action_help',
          localizedTitle: 'Help',
          icon: Platform.isAndroid ? 'quick_heart' : 'QuickHeart')
    ]);
  }
The ShortcutItem takes in:
- type (String): This should be unique per type in your application as it’s used to identify the action when it’s triggered later
- localizedTitle (String): The title shown on your home screen / drawer
- icon (String): The name of the icon in the drawable folder for Android or the xcassets bundle for iOS.
The only special thing we’re doing here is supplying a different name for the icon on iOS.
Handle Selected Action
Create a function called _handleQuickActions that will register a handler that we can use to perform actions based on the shortcutType value.
void _handleQuickActions() {
  quickActions.initialize((shortcutType) {
    if (shortcutType == 'action_main') {
      Navigator.push(
          context, MaterialPageRoute(builder: (context) => Login()));
    } else if(shortcutType == 'action_help') {
      print('Show the help dialog!');
    }
  });
}
The register function on the QuickActions takes in a callback that returns the shortcutType that maps to the type you supply in your ShortcutItem. Then we’ll override the initState function and call both of these functions in there.
@override
void initState() {
  super.initState();
  _setupQuickActions();
  _handleQuickActions();
}
Last thing to do is add the assets to your folders mentioned above. The drawable folder for Android and the xcassets folder and make sure the names match.
Android assets
Android recommends a 24x24 image that you can customise. Export that to all the size buckets and add them in the res/drawable-[dpi] folders. Here are the assets that I used. Copy then into the drawable-mdpi, drawable-hdpi, drawable-xhdpi, etc folders to use them.
iOS
iOS recommends using the icons under home screen quick actions. I did not create custom icons for iOS for the tutorials.
If you run the app and long press on your icon you should see the quick actions show up like this.
Checkout some of the other Snippets, if you have a request please come over to the slack (link at the bottom) and let me know.