“Pull to refresh” is a common task for mobile apps that displays lists of dynamic data. Today we’ll implement pull to refresh using the pull_to_refresh package and make use of Slivers to create a custom Collapsible header along side with it.
Setup
We’ll start by adding the pull_to_refresh package to our project
pull_to_refresh: ^1.4.5Then we can just do the basic setup with a MaterialApp and a Home widget.
class MyApp extends StatelessWidget {
  // This widget is the root of your application.
  @override
  Widget build(BuildContext context) {
    return MaterialApp(title: 'Flutter Demo', home: Home());
  }
}

class Home extends StatelessWidget {
  final RefreshController _refreshController = RefreshController();

  @override
  Widget build(BuildContext context) {
    return Scaffold(
      backgroundColor: Colors.grey[700],
      body: Container(),
    );
  }
}
Then we’ll create a function that returns a list of widgets that we’ll use to display in our list. We’ll be showing rounded rectangles of height 100 underneath each other.
 List<Widget> buildList() {
    return List.generate(
        15,
        (index) => Container(
              height: 100,
              margin: const EdgeInsets.symmetric(
                vertical: 10,
                horizontal: 15,
              ),
              decoration: BoxDecoration(
                color: Colors.white,
                borderRadius: BorderRadius.circular(15),
              ),
            ));
  }
Implementation
Now we can get on to adding the PullToRefresh functionality. We’ll import the package then create our controller as a final variable. and we’ll make the body of our scaffold a SmartRefresher that takes in our controller.
import 'package:pull_to_refresh/pull_to_refresh.dart';

class Home extends StatelessWidget {
  final RefreshController _refreshController = RefreshController();

  @override
  Widget build(BuildContext context) {
    return Scaffold(
      backgroundColor: Colors.grey[700],
      body: SmartRefresher(
        controller: _refreshController,
        enablePullDown: true,
        header: defaultHeader,
        onRefresh: () async {
          await Future.delayed(Duration(seconds: 1));
          _refreshController.refreshCompleted();
        },
         child: CustomScrollView(
          slivers: [
            SliverList(delegate: SliverChildListDelegate(buildList()))
          ],
        ),
      ),
    );
  }

  ...
}
Above we enable the pullDown functionality, we supply the default header shipped with the package and on Refresh we want to delay and then indicate the refresh is complete. We’re also setting our List inside a CustomScrollView. Since we know we’re adding a collapsible toolbar we know slivers will be involved. This code alone should give you a pull to refresh without any background or collapsible app bar.
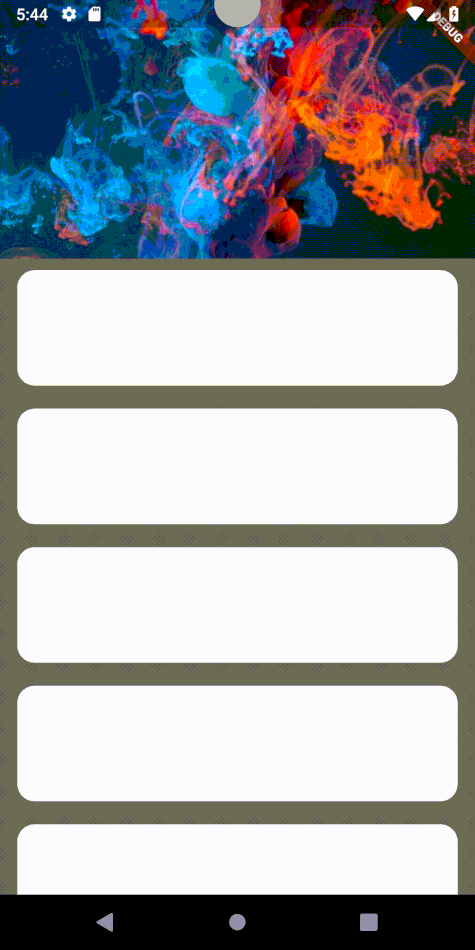
Adding a collapsible AppBar and image
To add the RefreshBackground we’ll create a new widget where the root child is a SliverAppBar.
class RefreshBackground extends StatelessWidget {
  @override
  Widget build(BuildContext context) {
    return SliverAppBar(
      expandedHeight: 200.0,
      flexibleSpace: FlexibleSpaceBar(
          background: Image.network(
        "https://images.unsplash.com/photo-1541701494587-cb58502866ab?ixlib=rb-0.3.5&ixid=eyJhcHBfaWQiOjEyMDd9&s=0c21b1ac3066ae4d354a3b2e0064c8be&auto=format&fit=crop&w=500&q=60",
        fit: BoxFit.cover,
      )),
    );
  }
}
Now we can add this above our list and that’s it for the tutorial.
 @override
  Widget build(BuildContext context) {
    return Scaffold(
      backgroundColor: Colors.grey[700],
      body: SmartRefresher(
        controller: _refreshController,
        enablePullDown: true,
        header: defaultHeader,
        onRefresh: () async {
          await Future.delayed(Duration(seconds: 1));
          _refreshController.refreshCompleted();
        },
        child: CustomScrollView(
          slivers: [
            RefreshBackground(), // <== Add AppBack background
            SliverList(delegate: SliverChildListDelegate(buildList()))
          ],
        ),
      ),
    );
  }
You should see the gif in the intro if you run this code. The only difference is the color of the appbar when collapsed. You can change that.
Check out the other snippets for some more Flutter related articles.